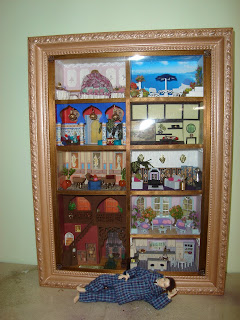
First for 2015 was the Sitting Room for the Tower of Magic. It is absolutely not my favourite room in the ToM, but one way or another most of them do end up disappointing me.
My favourite part of this room is probably the grate in the fireplace. It was made from plastic fence railing and wire mesh with red and black beads for coals and embers. I think the effect is quite good.
My next project of the year was Pumpkin Cottage from the 48th scale kit by Petite Properties. It was one of those kits I just knew I had to have the moment I first saw it. The one thing I don't like about it is that it's one of those kits that's just open at the back. I find this arrangement makes it harder to get the inside layout right and let's face it who wants to have to dust inside a 48th scale house on a regular basis?
Inside, the cottage has one large room per floor connected by a rather clever staircase (so clever in fact that I copied the idea for Orchid House later in the year!). Downstairs is the kitchen and living space.
Upstairs is the bedroom. I was going to put twin beds in here but sadly that meant that the bed closest to the fireplace actually ended up with it's covers poking into the fire - it looked entirely unsafe and thus unrealistic.
As much as I like the way Pumpkin Cottage turned out I wouldn't mind doing it again, this time totally differently . . . and I understand Petite Properties have now released this kit in the larger 24th scale version as well . . . .
Another 48th scale project came next, this time it was a castle (yes, yet another castle). It is open to view on both sides with a solid front and back. I'm not too sure I like this design as it means you can never see the whole inside at once and makes it feel a little like two castles instead of a cohesive whole.
On the other hand I really do like how the insides turned out. Working in 48th scale meant I had more room to use for features that I just couldn't have squeezed into my earlier (12th scale) castles. I finally got an opening to a secret passage (even if it doesn't lead anywhere) a dungeon and a fancy vaulted ceiling to name a few.
From the outside though I'm not so pleased. It looks OK but it just doesn't really say castle does it? I should perhaps have added more towers and turrets but even in 48th scale there is only so much room and the more complex the structure the more likely I'll make an even bigger mess of it.
Still, I learned a few things for the next castle, the next one will be better . . . . What, you didn't think four castles was enough did you?
The castle is the only 48th scale property I've done to date with 'people' in it. The people are hand made from polymer clay and as no one seems to make moulds for 48th scale people they look only vaguely human. Next time I want people in 48th scale I'll try some O scale model railway people and see which sort of person I like best.
After the castle came the bathroom for the ToM. It's the final reason why I gave up on the ToM for a while. It's all right I guess - the problem is that it looked all so much better in my head.
Alongside the ToM bathroom I worked on Orchid House using the 'Orchid' kit from Greenleaf. This was my first plywood house kit and I suspect my last. I found the plywood, well, annoying really. It splintered and/or cracked (always in precisely the worst spot), it sagged, it warped, and was generally impossible to finish nicely. Also, given my dislike of rear opening houses I adapted this kit to open from the front and to be a sealed unit which is a lot of work when you consider there is no reason the manufacturer couldn't make it the right way in the first place if only they would go to the expense of supplying a solid back wall and roof. It really makes me feel sorry for people in the US where almost all dollshouse kits are made this way.
Inside, beams help stop the plywood ceiling/upper floor from sagging. This piece of plywood was already bowed (i.e. sagging) when I built the house and by installing it upside down I have the rather unusual problem of a ceiling that sags slightly upwards. The one redeeming feature of the plywood was that it was easy to cut extra door holes in the end wall to create access to the staircase I added at the side of the house.
For the most part, I worked on this house with the intention of using up as much as the old furniture I had laying about the place. I did a reasonably good job of this but was surprised how little would fit into the house. Even leaving out the internal walls and adding an annex for the stairs to maximize the floor area I still couldn't fit in as much as I had initially expected and then of course I spent weeks trying to decide how to arrange it nicely.
There is still more to come from 2015 in Part Two including some current projects I've not shown you yet.


