
Friday, February 26, 2010
Highcroft Castle - Week Two
Offically, I'm still working on the stonework for the castle. Unoffically, I've had more than enough of smearing paste over walls and washing stencils and so am planning to work on other tasks for a while before I finish the stone. I have also ordered a stone-look paper which i hope will make finishing the exterior of the tower much faster and easier, I just need to put the two finishes together (paper and liquid stenciled stone) to make sure they look OK in close proximity to each other.
Meanwhile, the "Treasury" room is progressing well having had all it's walls 'stoned'. It just needs a good strong door to hold all those pesky thieves at bay and some treasure! (Okay, and some lights, chests, guards, etc). The kitchen next door is the only other room I have started to work on. It looks rather messy at the moment, but should improve once the fireplace is finished. I do have one very big problem with the kitchen however. The finished castle will (hopefully) be hosting a banquet in the Hall that is well underway. This means that in the kitchen, the cooking will be done and it will be time to clear away the leftovers and wash the dishes (etc). I've seen many miniature hung geese, turkeys, rabbits, etc, to hang in the kitchen ready to cook and many dishes prepared and ready to eat, but what I've never seen is the goose when it's been reduced to bones and the odd scrap too small to throw to the dogs. For example, what does a roasted boar's head look like after it's been eaten, or rather, what do the uneaten bits look like? What is left over? When a peacock is roasted and presented 'dressed' in it's feathers, what happens to the feathers afterwards? They aren't eaten, but do they end up back in the kitchen on the scrap heap? Do the diners keep them? I haven't had much luck finding answers to these sorts of questions yet. There is a lot of information out there about how food was prepared in past times, but very little about what happened after that.
Wednesday, February 17, 2010
Sandstone and more Sandstone
Everytime I decide to stencil stone I forget how time consuming and numbinlg dull it is. Still, here is a sample of how it is going.


Monday, February 15, 2010
Highcroft Castle Week One
There's not much to report this week. Progress is slow at the moment. This is partly because I'm working on the exterior stonework which is tedious and time consuming. I'm using a stencil again and a 'paste' made from texture paste and a product called "Liquid Sandstone". The Liquid Sandstone is designed for use outdoors on patios and walls etc to give a sandstone look and like the real thing it is made of millions of tiny grains of sand and when dry it really does look like the real thing. The problem is I have to wait for one patch to dry before I can stencil the next and as I have the front pannel of the castle laid flat on my table for the durration, I have no space to work on another part of the house until I finish "stoning" the front. So while I wait for one stencil area to dry I go away and read a chapter of a book, or mop the floor, etc, and by the time I get back to the Castle, the last patch of stone has been dry for hours!
I haven't even gotten around to taking a photo of the stonework to date, but take a look at my flickr account over the next couple of days as hopefully I'll get organised enough to upload one soon.
Meanwhile, my recent spending spree is starting to pay off with the various orders for miniatures starting to arrive. First was a (roughly) twelth scale suit of armour (I don't know where in the castle it's going, but what's a castle without at least one ornamental suit of armour? Okay, so real medieval castles didn't actually display armour, that came later, but what the heck.) Next to arrive was my order from Dollshouse Miniatures in New Zealand. This consisted mainly of small items, bowls, pitchers, tankards, cats, etc, that I won't be needing for a long time yet, but they were having a 20% off sale and who's to say they'll have another one when I do need to start worrying about accessories? I'm still wating on an order from an ebay seller called, from memory, dollhouserunner in the US. This is mainly trim and architectural details that I'm mostly planning to use for the furniture in the castle.
Wednesday, February 10, 2010
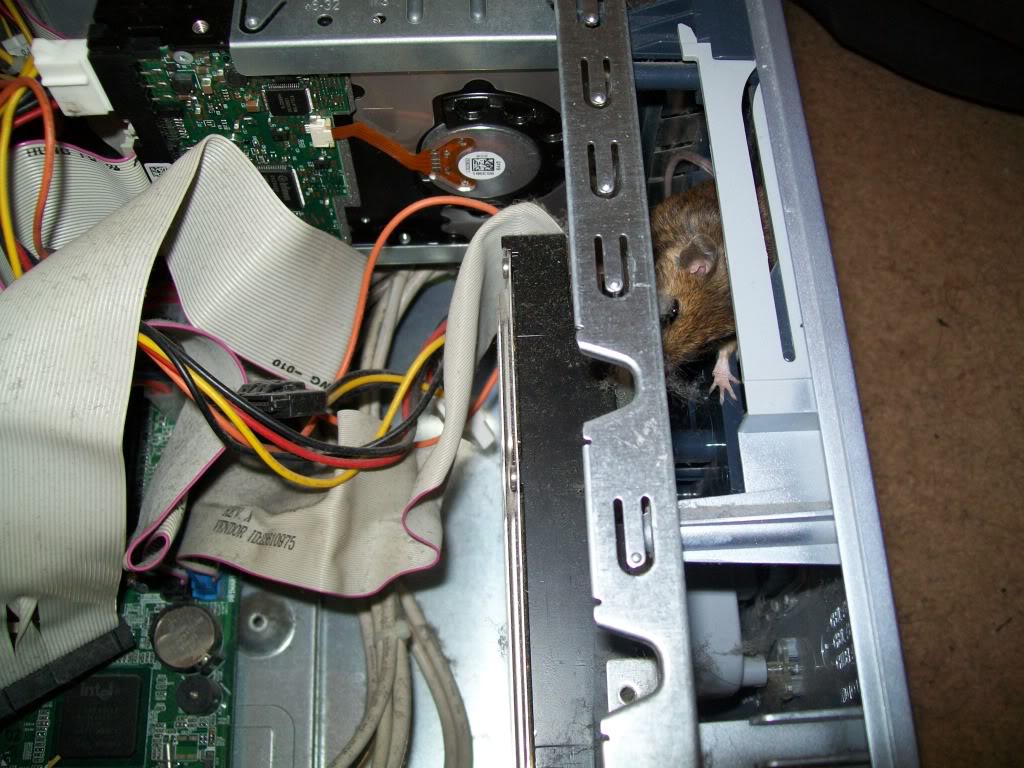
Have you cleaned out your PC lately?
Any geek will tell you that you ought to crack open the case of your PC and give it a thorough clean out every now and then (because if you don't, it's the geek that has to do it for you when something goes wrong!). Below are a few links that make the reasons for clean PCs pretty obvious:
Image One
Image Two
Image Three
In extreme cases the dirt build up in the PC can even catch fire! What does the inside of your case look like?
Monday, February 8, 2010
Highcroft Castle - Deconstruction
Well, for better or worse I've started to work on my behemoth which is called Highcroft Castle. The main section of the castle is to be built in an old kit house I never really liked, so the first job was to strip out the old house. After carefully removing the furniture and other items that can be reused, I pulled, peeled and pried all the wallpapers, lights and internal fittings out of the house. When it was stripped out, it was time to start re-arranging the walls and floors. Becuase I had used glue in addition to the screws that came with the kit to hold everything together, it took a few good blows with a hammer to removeeach piece. The dividing internal walls were removed and the third floor to create a double height room for the Great Hall. I also took out the top floor and lowered it by about 3.5cm to increase the ceiling height of the top floor.
With all the re-arranging done, it was time to start cutting. As I'm not certain which side of the house my tower will be, or whether to do a tower on each side, I cut a doorway on both sides of the house on the level of the Great Hall (ie the middle floor). If I don't use both as access to a tower, one can be a window or a balcony. Because the original house came with a faux basement, the base of the house projected 15cm or so past the front of the house to accomodate the steps and basement effect attached to the opening front. This always made the house very deep and hard to find a place to put it, not to mention very back heavy. At one point I was going to leave this extended front in position so I could add a drawbrigde to the castle front, but once I started working with the house I very quickly discarded this notion. Instead I cut the extended base back so there is just enough protruding from the front of the building to support a pair of stairs that run flat against the front wall in a sort of inverted 'V' shape. A larger hole was cut for a new, more grand front door. The really messy job that came next was of course sanding the whole lot.
All this has made the old house ready to start becoming a castle. The next step is to give the whole lot a coat of sealer and start to finish the exterior with a stone effect. While in the local hardware store I found a product called "Liquid Sandstone". It is designed for use outdoors to make paving and walls look like real sandstone. I've done some experimenting with it and discovered that it is really effective, dries quite quickly but probably won't work well with a stonework stencil. By mixing a little Texture Paste into the Liquid Sandstone, it becomes much more workable, dries less quickly and dries a lighter colour (which is a good thing as the straight sandstone is a little darker than I had in mind).
Blogger seems to be having a problem loading my photos, but I do have all of them on Flickr here in a new set called Highcroft Castle in the Dollshouse Miniatures collection.
Wednesday, February 3, 2010
My Next Project - The Behemoth
 I bought and decorated this house some years ago. It was the first proper kit house I'd bought and it taught an important lesson - don't buy cheap (well, comparitively cheap) houses. That's not to say that I had any problems with it, it was easy to assemble, the exterior finish is quite good for the price and it has concealed magnetic catches to hold the front closed. The problem I found with this house were it's dimensions. The rooms are 35cm deep, the height from floor to ceiling on the three lowest floors is only 20cm, the top floor only 17cm. This means that the back of the rooms is hard to see into and tend to be very dark. Electric lighting would fix the latter problem, but any sort of hanging light would hang so low that the dolls would poke their eyes out on them as they wandered about their home! In addition to the depth of the rooms, there is another 21cm of depth in the faux basement. I bought the house because I liked the basement look and houses with basements are hard to find down under, but it made the house so deep it was hard to find a suitable place to put it, both while I was working on it and after.
I have another similar kit house (without the basement) and a couple of years after I first decorated it, I took it apart and reduced the floors from three to two, making the ceiling heights of each floor 1/2 as high again as they had been. The final result of this work is the "Victorian House" which is a vast improvement over the original. Of course the windows in the front of the house were left at the wrong heights and I decided to leave the front that came with the kit off the house and use a clear covering. Basically, the house became a big box with a shelf in the middle and a clear front. I could have made that myself from scratch!
The moral of the story is that it's best to buy good quality houses with good dimensions in the first place or to make your own houses from scratch. Conesquently, although I was more or less satisfied with the house pictured above when I first decorated it, I was never thoroughly pleased with it. Then a few weeks ago I was walking past this house and suddenly saw, not a house, but an entire castle trying to break free! I could see the crenellations across the bottom of the roof, the front steps turned into a drawbridge (etc). At first I just said "well that's just plain crazy" and tried to ignore the idea, but like all the best crazy ideas, it refused to go away.
Eventually I had to sit down and think it through properly. The bottom floor/basement could still be below ground level and house a kitchen, catacombes, a treasury, dragons cave or dungeon. The next floor up could be the Great Hall. The next floor would be removed to make the Great Hall double the height, allowing more light in and providing space for a gallery of some kind. The top floor could be the royal bedchamber. But what about a solar, armoury, still room, library, servants quaters and other castle type rooms? Not to mention, where were the staircases going to be? Soon, the idea had expanded from the original house to include an added tower housing these extra rooms. Typically, towers are taller than main buildings which will make the castle at least one metre tall and about 3/4 of a metre wide. At this point I stopped and said no, you can't possibly do this, it's too big and there will be no room to put it.
I bought and decorated this house some years ago. It was the first proper kit house I'd bought and it taught an important lesson - don't buy cheap (well, comparitively cheap) houses. That's not to say that I had any problems with it, it was easy to assemble, the exterior finish is quite good for the price and it has concealed magnetic catches to hold the front closed. The problem I found with this house were it's dimensions. The rooms are 35cm deep, the height from floor to ceiling on the three lowest floors is only 20cm, the top floor only 17cm. This means that the back of the rooms is hard to see into and tend to be very dark. Electric lighting would fix the latter problem, but any sort of hanging light would hang so low that the dolls would poke their eyes out on them as they wandered about their home! In addition to the depth of the rooms, there is another 21cm of depth in the faux basement. I bought the house because I liked the basement look and houses with basements are hard to find down under, but it made the house so deep it was hard to find a suitable place to put it, both while I was working on it and after.
I have another similar kit house (without the basement) and a couple of years after I first decorated it, I took it apart and reduced the floors from three to two, making the ceiling heights of each floor 1/2 as high again as they had been. The final result of this work is the "Victorian House" which is a vast improvement over the original. Of course the windows in the front of the house were left at the wrong heights and I decided to leave the front that came with the kit off the house and use a clear covering. Basically, the house became a big box with a shelf in the middle and a clear front. I could have made that myself from scratch!
The moral of the story is that it's best to buy good quality houses with good dimensions in the first place or to make your own houses from scratch. Conesquently, although I was more or less satisfied with the house pictured above when I first decorated it, I was never thoroughly pleased with it. Then a few weeks ago I was walking past this house and suddenly saw, not a house, but an entire castle trying to break free! I could see the crenellations across the bottom of the roof, the front steps turned into a drawbridge (etc). At first I just said "well that's just plain crazy" and tried to ignore the idea, but like all the best crazy ideas, it refused to go away.
Eventually I had to sit down and think it through properly. The bottom floor/basement could still be below ground level and house a kitchen, catacombes, a treasury, dragons cave or dungeon. The next floor up could be the Great Hall. The next floor would be removed to make the Great Hall double the height, allowing more light in and providing space for a gallery of some kind. The top floor could be the royal bedchamber. But what about a solar, armoury, still room, library, servants quaters and other castle type rooms? Not to mention, where were the staircases going to be? Soon, the idea had expanded from the original house to include an added tower housing these extra rooms. Typically, towers are taller than main buildings which will make the castle at least one metre tall and about 3/4 of a metre wide. At this point I stopped and said no, you can't possibly do this, it's too big and there will be no room to put it.
 At around the same time I had the idea for a story set in a new fantasy world. Not surprisingly for a fantasy story, there was a castle that featured prominently - the home of the monarch. As you would expect in a castle it had a Great Hall, a dungeon, a sorcerer's library, catacombes, secret passages, etc. As the world and story began to develop, I looked again at the plans for the dollshouse castle and realised that Highcroft Castle, the home of the kings of Oronia, was in fact the same castle I had been planning to make. This then led to my knowing exactly what was going to be happening in the dollshouse castle's Great Hall - the coronation feast for the new queen, attended by all the different peoples of Oronia (including elves, fairies, centaurs, etc) just as it happens at the end of the story. It also gave me more definate ideas for a few other rooms too. This put the castle idea back on the table. Or rather on the floor as I am currently thinking that the castle should be designed to be floor-standing mainly on account of I don't have a cupboard or table large enough to accommodate it. Of course, I doubt I have enough floor left to accommodate it either, but I'll worry more about that later.
At this point, I've more or less given up worrying about practacallity; keeping the house/castle to a reasonable size (I'm even toying with the notion of yet another tower!) and restricting my ideas to things I can reasonably expect to be able to make. How for example am I going to make a centaur? I can't even make a believable loaf of bread our of polymer clay. Horses and men are far more tricky than bread and a combination of the two - yikes! It'll probably end up being a good likeness of a pile of dragon dung! But again, this is something to worry about later on. More immediate concerns are questions like "what will the tower be made of?" and "where do I need to cut holes for stairs, windows and doors?".
Another problem is the exterior finish. To go for a more realistic effect like using real stone pieces or stenciling with stone-look compound will be both expensive and incredibly time consuming when you consider the amount of exterior there is going to be. The same can be said of making a stone effect with clay (much as I did the roof of the Bakery). That leaves some sort of paint effect. At the moment I'm thinking of using one of my stonework stencils and a can of spray stone effect paint. It should be reasonably fast (especially working in the Aussie summer when the paint will dry almost instantly) and hard-wearing although probably not as realistic as some of the other options. I need to do some experiments to see what works and what doesn't.
First of course I have to strip out the existing house. I've already pinched the people (they're now redressed and inhabit the bakery). I should be able to remove the skirting board and other details intact (I hope) for later use. Then it is a matter of disassembling the whole house, cutting door/s in the side to give access to the tower, then the house will be ready to become a castle!
At around the same time I had the idea for a story set in a new fantasy world. Not surprisingly for a fantasy story, there was a castle that featured prominently - the home of the monarch. As you would expect in a castle it had a Great Hall, a dungeon, a sorcerer's library, catacombes, secret passages, etc. As the world and story began to develop, I looked again at the plans for the dollshouse castle and realised that Highcroft Castle, the home of the kings of Oronia, was in fact the same castle I had been planning to make. This then led to my knowing exactly what was going to be happening in the dollshouse castle's Great Hall - the coronation feast for the new queen, attended by all the different peoples of Oronia (including elves, fairies, centaurs, etc) just as it happens at the end of the story. It also gave me more definate ideas for a few other rooms too. This put the castle idea back on the table. Or rather on the floor as I am currently thinking that the castle should be designed to be floor-standing mainly on account of I don't have a cupboard or table large enough to accommodate it. Of course, I doubt I have enough floor left to accommodate it either, but I'll worry more about that later.
At this point, I've more or less given up worrying about practacallity; keeping the house/castle to a reasonable size (I'm even toying with the notion of yet another tower!) and restricting my ideas to things I can reasonably expect to be able to make. How for example am I going to make a centaur? I can't even make a believable loaf of bread our of polymer clay. Horses and men are far more tricky than bread and a combination of the two - yikes! It'll probably end up being a good likeness of a pile of dragon dung! But again, this is something to worry about later on. More immediate concerns are questions like "what will the tower be made of?" and "where do I need to cut holes for stairs, windows and doors?".
Another problem is the exterior finish. To go for a more realistic effect like using real stone pieces or stenciling with stone-look compound will be both expensive and incredibly time consuming when you consider the amount of exterior there is going to be. The same can be said of making a stone effect with clay (much as I did the roof of the Bakery). That leaves some sort of paint effect. At the moment I'm thinking of using one of my stonework stencils and a can of spray stone effect paint. It should be reasonably fast (especially working in the Aussie summer when the paint will dry almost instantly) and hard-wearing although probably not as realistic as some of the other options. I need to do some experiments to see what works and what doesn't.
First of course I have to strip out the existing house. I've already pinched the people (they're now redressed and inhabit the bakery). I should be able to remove the skirting board and other details intact (I hope) for later use. Then it is a matter of disassembling the whole house, cutting door/s in the side to give access to the tower, then the house will be ready to become a castle!
Tuesday, February 2, 2010
The Bakery - Stage Two - Week Five
To start where I left off last post, I should explain those waggon wheels, but at this point it's easier just to show you a picture of the finished item:
 The wheels go on the cart of an ale seller who has stopped outside the bakery to try and sell some ale to go with the shoppers' bread. The cart itself is a little unstable once I added a heavy barrel to the top of it; hence the supporting leg that can be seen underneath. The barrel itself is a short wooden cylinder surrounded by air clay to create a barrel shape (or at least a close approximation of a barrel shape).
The major task of the week was dressing and wigging the dolls for this house. As with the rest of this project, the dolls are dressed to be "roughly tudor" but are not meant to be historically acurate. The men are the most noticably out of style.
The wheels go on the cart of an ale seller who has stopped outside the bakery to try and sell some ale to go with the shoppers' bread. The cart itself is a little unstable once I added a heavy barrel to the top of it; hence the supporting leg that can be seen underneath. The barrel itself is a short wooden cylinder surrounded by air clay to create a barrel shape (or at least a close approximation of a barrel shape).
The major task of the week was dressing and wigging the dolls for this house. As with the rest of this project, the dolls are dressed to be "roughly tudor" but are not meant to be historically acurate. The men are the most noticably out of style.
 From the left are: the baker's wife (with baby), a shop assistant, the bookkeeper, the ale seller, another shop assistant and a customer. The baby is as purchased, the other dolls have all been dressed enitrely by me. The two men and the second assistant (in red) have also been wigged by me. The first shop assistant is just a cheap plastic doll and when I get brave enough, i'll try repainting her face as she is wearing far too much makeup. As usual the clothes were made without the benefit of patterns and the hats on the wigged dolls are what keep their hair from standing on end!
 Once the dolls were done, I looked at the house and made a list of all the things that needed finishing and was surprised how short it was! Top of the list was finish the bedspread. I had started the bedspred last week and with some dedicated effort, it has now been finished (as you can see above). The other items on the list were all small things like making a fire basket for the fireplace, make cushions for the settle (etc) which didn't take long to knock off. Before I knew it, the house was finished! At the start of the week there seemed like an awful lot of things let to do and I had expected it to take another couple of weeks but there doesn't seem to be anything left to do, so it must be finished. The idea that the house was finished came as a complete surprise, but not an unwelcome one as my ideas for my next project have been gaining momentum over the past couple of weeks, but I'll start discussing that in my next post. For now I'll just give you the clues that my next project involves re-doing an old house I was never happy with.
 As usual, the complete set of photos for this project are in my Flickr photostream. Click here for a direct link to the bakery photos on Flickr
Subscribe to:
Comments (Atom)