A Randomly Selected Newspaper Headline:

The following is a randomly selected newspaper headline from many years ago:

Welcome to my blog. Please feel free to leave a comment. I assure you I always read and appreciate everything you have to say. Unfortunately, thanks to Blogger being, well . . . Blogger, I can not respond to comments nor leave any on your blogs. They simply disappear into the ether. Occasionally I will remember to respond in the next blog post I put up, but usually these good intentions slip my mind. So if you want to ask a question or get a response to any comments you may have please leave an email address or other contact method in your comment and I will get back to you.

I have also added a separate page to the blog for the Tower of Magic with a brief summary of all the rooms of the ToM in the one spot. The link is just below this and above the main body of the blog, or you can just click here.

Monday, June 30, 2014

Fill 'Er Up


For anyone having trouble picturing the size of this 48th scale house, here's Harry in his spiffy new suit holding a 48th scale person (well, as near to a 'person' as I will ever get with polymer clay).  Yep, Harry is slightly taller than two floors of the house.  My goal this week was to finish filling the house with furniture and I have more or less made it.


The music room now has it's first (and probably last) instrument.  The piano is a printable from the internet on legs of metal beads.  I think I'll paint it black to match the chaise and fireplace and hide the white lines where the edges of the paper show.  The cabinet in the back corner is also a printie while the chaise in the front is black EVA foam with red brocade cushions and more bead legs.


Upstairs in the green bedroom not too much has changed since last you saw it.  A rug has been added to the floor and the bed has moved.  Does anyone else think a fabric canopy would look good over the bed?


 In the pink bedroom the wardrobe and desk and chair have been painted.  The rug, like all the rugs in the house, is printed on matte photo paper.  The rugs are so small that putting them onto fabric would tend to make them too thick.


The attic hall also has had it's furniture painted and a printed rug added.


In the nursery, canopy take three has worked wonderfully.  This one was made in a similar way to that over the bed in the yellow bedroom being formed of two arches of wire covered in silk.


The lilac salon has a new cupboard with mirrored doors.  I still don't really know what this room is though. The tall cupboard is needed to hide where there aren't enough panels for the upper wall (I had been planning to put a door there once).  The question is what do I do with this room now?


The yellow bedroom has a new rug, but no other changes this week.


In the blue dressing room I'm still re-arranging the furniture and I'm not too sure about that rug either.


In the library, the sofa has been painted and the floor 'rugged'.  I'm thinking that table needs to be painted brown/wood to match the sofa.


The only change to the dining room is the rug which continues the red and gold theme.


And the drawing room also has a rug.


The scullery next to the kitchen has a large white sink made of EVA foam set in a block of balsa wood with a balsa wood duckboard and a side table from a Petite Properties kit.


The back wall of the kitchen has been brought forward and covered in brick paper to create a recess for the range/oven.  The oven opening is surrounded by a fire surround by Petite Properties raised on stilts of balsa wood for extra height.  The range itself is black EVA foam with a scrap of red cotton to simulate hot coals.  The strange black blobs on the wall are the doors to bread ovens and will hopefully look like it once they have hinges and handles added.


The next room in the basement is the sewing room.  I divided this room by adding a brick wall with a curtained opening.  A printed cupboard sits in the back section of the room.  It's a bit fancy for the 'service' part of the house, but I ran out of other places to put it.


And the final room in the basement is the servants bedroom with simple twin beds.  The nightstand and mirror were made from kits.  The beds, like all the beds and seats in the house still need pillows and/or scatter cushions adding.  And that is one very big small house full of furniture.


Tuesday, June 24, 2014

Not Kit Furniture

Blogger's latest fault has hit.  In the Dashboard it is showing only one recent post from the various blogs I follow instead of a dozen or so and when I click "view more" nothing happens.  This makes it hard to keep up with new posts on everyone's blogs.  Has anyone else struck this problem?


Having run out of kits to make furniture, I decided to start my attempts to scratch build furniture in 48th scale by tackling the easiest things first - the beds.  In the pink attic bedroom, the printed bed head and foot were joined by a length of balsa wood covered in white and purple fabrics.  Small wooden beads act as feet.


 Across the hall in the nursery I copied the crib from this one by Bespaq.  Yeah, Bespaq did it better.  The crib is white EVA foam with plastic coated wire to form the bars.  The round crib itself is quite effective, it's the canopy that really isn't working at the moment.  I'll have to try a take three on this one (this is take two and you really don't want to know about take one).


But the most successful piece I've made so far is the canopied daybed for the yellow bedroom.  The bed itself is just a block of balsa wood covered in a piece of pink silk.  The ends of the block were covered with pieces of more EVA foam to create a head and foot for the bed.


The canopy is supported on four lengths of wire over which more pink silk was glued.  The domed top is cardboard cut and folded into shape and covered in more silk.  It is topped off with some pieces of pink and yellow feather.


Also for this room there is a chaise, made from a pattern and tutorial from the internet and reduced in size from 12th to 48th scale.  It is again EVA foam with silk covered card cushions and gold bead legs.


Another chaise has been made for the lilac salon.  This is another solid block of balsa wood hidden behind a skirt made from a strip of pre-pleated fabric.  This is topped with a cushion of silk covered cardboard.  The backrest is a gold finding.


Finally for this week is another chaise this time in the drawing room.  This is the simplest piece yet, just a strip of cardboard covered in fabric and bent at the ends to make 'arms' with gold beads for legs.  Scattered through the rooms you've probably noticed some white tables.  These are plastic chess pawns with circles of EVA foam on top to create a table.

Wednesday, June 18, 2014

Kit Furniture

Before I show you my progress on the Petit Palais this week, please indulge me while I let off a little steam with the following rant.

At the start of every month the Dolls House Emporium send out an email newsletter.  This month's newsletter included the following statement:  "Call us on TOLL FREE 1800 004 997 or visit dheaustralia.com now to place your order and take advantage of FREE shipping and packaging on all orders over $60 this month!".  Normally, I don't buy direct from DHE as I prefer to support my 'local' dollshouse shops, but there were some things on special that would come in handy and with free shipping I figured why not.  When I went to place my order, shipping charges were added in the checkout.  I thought maybe I overlooked something, but no matter what I did during this month of "free" postage, postage was going to be charged to me.  Eventually I emailed DHE and asked the question why was I getting shipping charges added when it should be free?  This was DHE's response:

"Hi,
Thank you for your email.
Unfortunately this email was sent in error and there is no free shipping on orders over $60.
Please accept my apologies for any inconvenience caused."

Apparently, the people who work at DHE think this is good enough.  As you may have guessed by now, I don't.  I don't mind that they sent out what amounts to a piece of false advertising and that there are laws against that sort of thing.  Everyone makes mistakes sometimes (DHE more than most it seems).  What really bothers me is that DHE clearly are aware of the mistake and have done nothing about it.  Would it be so hard to send out a second email and say "Oops, sorry" and let their potential customers know what is going on?  Should they maybe honour the promise they made even if if was in error, or at least offer discounted postage or a gift voucher or other gift in lieu?  Any business that wants to attract and keep customers would do something like that.  There are any number of things they could have done to avoid making their customers really annoyed and simply did not bother.  Perhaps they were actually hoping to catch people out if they didn't notice postage being added before they placed their order and therefore make more money?

So guess what has happened DHE?  Yep, customer annoyed.  Really annoyed.  Customer now unsubscribed from their emails as it is clearly pointless to continue to receive them.  Not only are they wrong whenever you want to act on them, but the company has no notion of what constitutes good customer relations, so what does that say about what to expect from their customer service?  The quality of their wares?  It does not inspire faith.  I can't say I've heard any good about DHE since it was sold and from now on I don't care any more.  DHE, you have lost me as a customer forever thorough your own faults.  I very much hope that all of you reading this will also consider all the wonderful alternate places you can buy miniatures before considering an order with DHE.


Okay, with that out of my system, back to Le Petit Palais.  This week saw all the internal doors added and the furniture begun.  The doors are mostly kits from Petite Properties.  The doors in the basement are just plain cardboard in a cardboard frame and painted white.  The furniture so far is a mix of Petite Properties kits and kits by A Sheila's Shed, an Australian maker of laser cut kits in 24th and 48th scales.  Both had pros and cons but ultimately both were good quality kits that I could recommend to anyone.  There are also a few pieces from internet printables, mostly screens as these are by far the best (easiest) type of furniture to make from paper.


The pink attic room will be a bedroom with a printed bed head.  The challenge in these rooms will be finding a way to fill them with furniture that won't be fouled by the sloping roof.


In the attic hallway is one of the kits by A Sheila's Shed coupled with a chair from a P-Properties kit.


The last attic room will be a nursery with a canopied crib in the back corner.  Um . . . OK . . . It will be a nursery with a canopied crib in the back corner if I can manage to make a canopied crib in 48th scale from scratch.  My ability to do this remains to be seen . . .


The yellow bedroom is also in need of a bed, with canopy, at the back of the room..


The dressing room attached to the yellow bedroom looks more filled with kit dressing table and screen and a chaise bought as is at the local doll, bear and miniature fair a few months ago.


The red, white and gold dining room continues it's colour scheme in the furniture with gold chairs and clock with wood table that will eventually be covered with a crisp white (or gold?) tablecloth.


The entry hall has a pair of tables in gold and off white.  Now, how do I make some vases of flowers to sit on them . . . ?


The Drawing room has a sofa and matching chair also in gold.  The remaining rooms in the house are still bereft of furnishings.  As I am now out of kits, it's time to start making my own 48th scale furniture from scratch.  Oh dear.  That is an awful lot of very small furniture.


Tuesday, June 10, 2014

Coming Down and Heading Out


Normally, I would decorate the outside of a house first, then work on the interiors.  Given the tiny size of this house (in 1/48th scale) It was necessary to decorate the rooms as they were assembled.  With that done it was time to move onto working on the exterior at last.  Well, almost.


First I built a box from more 3mm balsa wood to sit under the house and create a basement to house the "service" areas of the house.  The base is 5mm thick for a little extra strength.  By making my own stairs for the main level of the house, I had one of the two staircases in the kit designed to match the house left over and this I used in the basement.


The largest room in the basement will be the kitchen.  To be honest I haven't completely decided what purpose the remaining three rooms will serve yet.


 Once the basement was constructed, it was time to decorate the outside of the house.  The walls are painted in a lavender grey paint with the roof and trims in a slate grey.  For a change I knew exactly what colours I wanted to use before I started painting and even more rare managed to mix exactly the right colours.


The side extension wings have fixed, non removable roofs made of stiff cardboard.  They are basically a pyramid shape with the top point cut off.  I bought some French door kits from Petite Properties that match the front door that came with the kit  on the extensions and added a balcony on each upper floor.  The balcony railings are lace painted to match the rest of the trim on the house.


 The one thing I have found that I don't like about this kit is the way the roof sits on the top floor.  As you can see in the photo you can see the edges of the inside floorboards when the roof is in place.  I need to think of a way to add some trim to cover this up.  I also need to find a way to hold the front panels in place more securely than just sitting them in place as they are now.


As I forgot to include a photo of it last week (and I think it looks really worth showing off) this is the Drawing room with ceiling installed.


 The exteriors still need a little work such as a step outside the ground floor doors on the extensions but the house is nearly ready to enter a more terrifying stage: furniture making!

Tuesday, June 3, 2014

Going Up . . .


This week Le Petit Palais' second floor was added and decorated.


 The second floor in the left extension wing holds a bedroom decorated with sage green paint and a wallpaper in greens and blues.


Next door is the Lilac room which will serve as a dressing room for the Green Bedroom with a bathroom in the area behind the curtained partition.


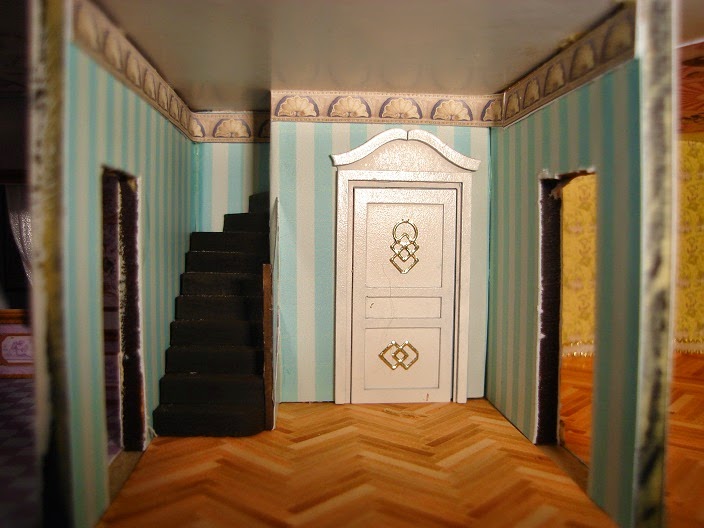
In the centre of the house is another blue hallway.  Rather than cut a hole in the floor for the stairs to emerge through from the lower floor I simply added a fake door on a fake wall to give the impression that the stairs emerge somewhere behind the door.  The stairs on this level are the kit designed for "Le Petit Palais" by Petite Properties.  Like the house kit, the stairs were easy to assemble and fit perfectly into the house.


The next room along is the Yellow Bedroom.  Technically, I should have decorated one bedroom in a feminine style and one in masculine to create a bedroom for both the lord and lady of the house.  After the last time I set out to create a manly bedroom (Master's Chamber in the Tower of Magic) I decided it would be better to have two girly rooms instead.


Finally for the second floor is the dressing/washing/sitting room for use by the occupant of the Yellow Bedroom.


The top floor has been started with the walls erected and the floors covered in simple (paper) pine boards.  The hall has been papered in tones of beige and cream.  The figure in the corner is my attempt at creating a 48th scale person.  With clothes and hair it may look reasonably human but at this point I am thinking it may be best to leave the house unpopulated.