A Randomly Selected Newspaper Headline:

The following is a randomly selected newspaper headline from many years ago:

Welcome to my blog. Please feel free to leave a comment. I assure you I always read and appreciate everything you have to say. Unfortunately, thanks to Blogger being, well . . . Blogger, I can not respond to comments nor leave any on your blogs. They simply disappear into the ether. Occasionally I will remember to respond in the next blog post I put up, but usually these good intentions slip my mind. So if you want to ask a question or get a response to any comments you may have please leave an email address or other contact method in your comment and I will get back to you.

I have also added a separate page to the blog for the Tower of Magic with a brief summary of all the rooms of the ToM in the one spot. The link is just below this and above the main body of the blog, or you can just click here.

Tuesday, March 31, 2015

Castle of Dragons


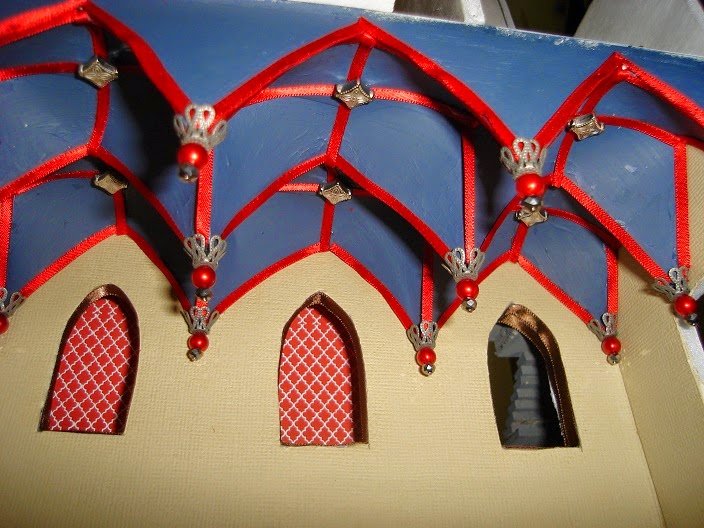
 Many hours of painting later and the castle walls now look vaguely stone like.  Sadly, they don't look particularly castle-like.  Mostly I think they look bland.  Too bland.  I need to find a way to add more interest to the front of this castle.  I am going to add a pointed cone like roof onto the little gatehouse which will fill in the space in the centre of the castle when you look at it head on, but it will still need more.  A creeping vine perhaps?  Or some suitably medieval banners or flags?


I've already added some interest to the top of the front wall in the form of this dragon medallion.  It is a jewellery pendant in a cardboard scrapbooking frame painted the same stone colours as the walls.  I wonder though if I should paint at least the dragon in a different colour to make it stand out more (and look less bland!).


The gatehouse has it's own dragon pendant guarding the entry to the castle.  With this pair of dragons I really need a dragon related name for the castle - something with Draco, Lind, Wyrm or so forth in it . . . . but at this point I still haven't had a great inspiration for an appropriate name.


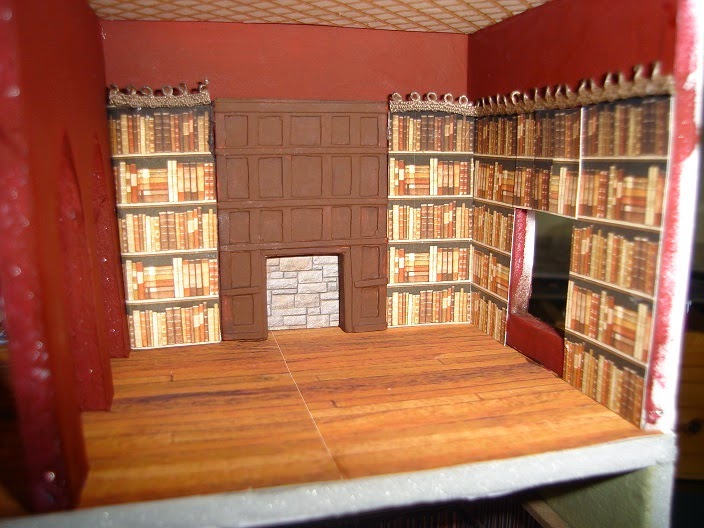
There are now two doors into the castle.  The left door leads into the Armoury/Entry Hall while the right door leads into the kitchen (the servants entrance).  The railing around the  bridge and balcony area still needs a lot of work so please ignore it for now.


 All the former holes in the walls have been filled with windows.  Most of these windows are left over from the "Old Rectory" kit from Petite Properties.  The kit comes with mullioned window frames for both the inside and the outside.  As the front lifts off and I've noticed no one ever looks at the inside of a lift off front, I saved the inside window frames when I made the kit and used them here instead.


The few remaining windows are hand made with faux lead lighting paints surrounded by cardboard frames.  Not the most inspiring windows you've ever seen but they are nice and colourful.


These suits of armour are from A Trifle Small in the UK.  They have one of the best (one of the only) ranges of 48th scale accessories I've come across, but it's still woefully inadequate.  Any one not prepared to make their own accessories could not fill their house (or castle) just from the website.  That's not the store's fault as they can't stock what no one makes and it seems 48th scale is not a favourite among manufacturers.   Another problem with 48th items is that most are not strictly 48th scale.  I've previously complained that the doors used in the castle are too low.  As you can see in this photo, the 48th scale armour are a head taller than the 48th scale person.  They would also need a very skinny knight to fit inside them.  I should point out however that my 48th scale person is the right height, not necessarily the right width, so the skinniness of the knights might not be as exaggerated as they look.


With all the big construction type jobs done, I can now start adding the finer finishes the the castle, both inside and out . . . and hopefully think up a classier name than "48th scale castle".

Tuesday, March 24, 2015

Heading Outdoors

 With the castle finally having reached it's full height it was time to start making the outside of the building look like a castle.  The first step in this process was to add a small gatehouse tower and a bridge in front of the castle.  This lifts the level of the entrance up one floor so that the lowest floor inside (the dungeon) becomes a basement rather than a ground floor.


After painting the entire outside of the castle black I then clad it in rectangular 'blocks' cut from a sheet of EVA foam.  I chose this method over clay or pollyfilla to create the stones because the moisture in these two products tends to make the foam board of the walls warp.  The foam is easier to cut than cardboard and is flexible so is very forgiving when applied to uneven walls (and yes, they are a little uneven).


Unfortunately, the foam doesn't come in grey or anything close to stone colour; the blocked walls started off in a deep blue so once all the walls were covered in blocks they had to be painted.  If you look closely, you can still see slivers of blue between the blocks so at least one more coat of grey is needed before I start to dry brush some lighter tones over the top to make the outside match the stonework you saw in the basement.  I would also like to know when the walls are black, blue and grey how flashes of white are showing between the blocks in these photos; you can't see them with the naked eye.


Originally, the plan was to have solid walls on all four sides of the castle, but I've decided instead to cover the sides with clear plastic so you will be able to see into the castle without the need to lift off the side panels.  This means no more time spent on the tedious task of 'blocking' the walls and it means that when finished the castle will look like a solid castle from the front, but the internal rooms will still be on display (I'm not a fan of spending hours creating the ultimate interior and then closing it off behind a wall where you'll never see it).

Wednesday, March 18, 2015

Top Two

The construction and rough decoration of the top two floors of the castle have now been finished.  The ceiling of the top floor rooms are sloped to allow for the pitch of the roof line.


On the left side both rooms feature (paper) wood panelling and patterned wallpaper.  The top floor has been sunken by a few steps so that I could add steps leading up to the door in the back wall.  As I've previous mentioned, these Petite Properties doors are a little low to be what I consider 'in scale'.  By adding a few steps leading up to them it makes them look taller and thus more to size.  Sadly I only figures this out in time to use the trick in this one room . . . the rest of the castle just has really short doors.


On the right side these short doors aren't such a big issue as they are not viewed directly against the larger archways I cut into the stair tower.  There are four rooms over the top two levels on this side.  The rooms on these top two levels will all be bedroom suites (i.e. bedrooms with private sitting rooms, bathrooms, etc).

Left Side
Right Side

 All together, the castle has eighteen rooms (nineteen if you count the stairwell) that all need to be furnished and filled.  I haven't decided yet whether to fill the rooms and then finish the exterior or to do the outside first.  It all depends on how I decide to enclose the sides.

Front
Back


Tuesday, March 10, 2015

Upward and Onward


The 'little' 48th scale castle continues to grow with five of its overall six floors now in place.


On the left side of the castle the room immediately above the entrance hall come armoury is the library.  Technically, it shouldn't be filled with books and in a real castle would more likely to have had a few scrolls which listed the castle accounts and records and very little else.  I don't have the patience to try and make a room full of 48th sized scrolls and try finding a wallpaper that looks like a shelf full of scrolls, so books it is.  Every building should have a room filled with books in any case.


I've always wanted to add a secret passage or hidden room to my houses but never manage to fit it in.  Until now.  The shelves to the left of the fireplace (which is a plaster piece from Petite Properties by the way) swing open to reveal a secret staircase.


Hopefully, this passage will emerge higher up in the castle but as I keep changing my plans as I go (as usual) this may wind up being a passage that leads only to a dead end.


Above the Library is this room with some handsome faux wood panelling.  I have to admit I'm not to sure of the purpose of this room yet but it will likely be some kind of sitting room.  The door in the back wall leads to the minstrel gallery above the Great Hall, but I'll tell you about that a little later.


Above the potential sitting room the only room decorated on the fifth level so far is this little corridor that connects the stairs to the other rooms on this level which will be bedrooms.


Swinging about to the right side of the castle and the Great Hall sits directly above the kitchen.  It spans two floors (the Library and the probable Sitting Room being on the opposing side of this space).  It features a vaulted ceiling and colourful tiled floor.  The tiles and wood panels are of course print outs from internet images.  The red paper behind the two openings in the back wall is left over from the dining room in 'Le Petit Palais'.  These openings will have railings added to serve as a minstrel gallery overlooking the hall.  The third opening opens into the stairwell.  I added it to keep the wall balanced but I'm not sure whether to leave it open and add a rail to make it a balcony like the first two or whether to put a stained glass window in there to block it off.


 The ceiling was created by making a skeleton of balsa wood and covering it in a skin of card as shown in the above photo.  Once the gaps were filled and the whole lot painted, the edges were trimmed in red ribbon and the points decorated with beads.


 This is the end result.  Personally, I'm really pleased with how it turned out and will definitely be looking for places to create similar ceilings in future.


The floor rises up a few steps at the back of the Great Hall.  This is where the 'high table' where the lord and all the really important people will sit raised above the level of the common folk at the other end.


Above the great hall on the fifth floor, there are walls but that's about it.  Eventually, it will be a suite of rooms including a bedroom, sitting room and dressing room with an additional surprise as well!