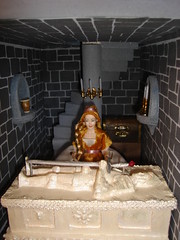
A few finishing touches were added to the Inn this week. In the "low" bedroom a tapestry was added on the left hand wall, a faux hide mat and a bolster cushion were added to the top of the blanket box, thus elimintating the naked look of this wall.


 With a holiday for Australia Day and with Cumberland Castle in the mail, I thought I should practise my assembly skills by dry building the two kits I already have, The Retreat and the Stratford Bakery. I started with the very simple Retreat which literally fell together. All the parts fit together perfectly and needed minimal tape to hold them in place. I bought the Retreat because it was small, or rather looked small in pictures. The real thing is bigger than it looks . . . In fact it's huge. There is so much space on the ground floor I'm wondering how I'm ever going to fill it!
  I don't know what I'm going to do with it yet. I have a few ideas, all going in totally different directions, but there are a few things that will happen to the Retreat no matter what else I do. Firstly, the stairs. The stairs that come with the kit must be the most ugly stairs ever conceived. I have no idea what DHE were thinking, but those stairs have to go. I'll be replacing them with a spiral staircase. The other change I'll make to the basic kit is the addition of a balcony on the top floor. The standard images of the Retreat on the box feature one with a door added to the upstairs front with a small balcony. I really like the look of this and think I have a single door somewhere that matches the double doors downstairs. The last basic change to make is the front windows. I had assumed there was a row of three doors along the front. It turns out only the middle door opens, the two on either side are fixed in place and meant to be windows. I think if they're windows, they ought to look like windows, not doors. I'm thinking I'll block off the bottoms of these two side windows, perhaps adding planter boxes to make the windows stop well above floor level and look more like windows.
 With the Retreat built, photographed, measured, disassembled and packed away again, it was time to play with the Stratford Bakery. This has a lot more parts than the Retreat, but started out going together just as easily. The first few parts the instructions say to assemble are all easily distinguishable and slot together beautifully. Then you get to the "overhang" room which is supported by little more than two posts. Even in the instructions for the proper build you are supposed to prop the room up on the posts without attaching them, you do this at a later stage when you add the beams under the room. Needless to say this room falls down. Often. Half a roll of tape (or thereabouts) saw it secure, but when I come to build it permanently, I'll be assembling the overhang room first and attaching it to the central wall while the wall is flat rather than vertical and when that is dry I'll attach wall and room to the rest of the building.
 Aside from the odd collapse of the overhang and the first floor occasionally falling down, assemly was pretty simple . . . until I came to the roof. There I lost the plot totally for a little while. Even Dapper Dan (formerly known as Naked Neville) couldn't quite figure it out. The first part of the roof to be assembled is the bottom of the rear side. What throws you is that the diagrams in the instructions show the appropriate pieces as almost square. They're not, in fact they're rectangular. Next problem, the diagram only shows half of one of the next two pieces you're supposed to assemble. So when you're trying to figure out which pieces you need by eliminating the pieces that you need later on you glance quickly at the next few steps, miss the truncated diagram and get totally confused.
 Like the Retreat, there are a few things about the basic kit that need to be changed. First is the door to nowhere. At the side under the stairs there's a door. It leads a solid wall. I really don't understand this feature. The door goes nowhere. It's at the back of the side, so would be hard to see in the finished article. So why include it? What's it's purpose? Where is it supposed to lead? It would make more sense if there was a doorway out of the back of the side wall of the ground floor room so you could walk right through under the stairs (at least if you were six inches tall you could). At the moment, I'm at a loss as to what to make of this feature. The other alterations I may make to the kit are small. I'm not sure I like the stair arrangement. I usually think of Tudor era steps as being open/backless, the ones that come with the kit are solid. Also, the roof over the stairs really hides them and makes them fell boxed in. I'm toying with the idea of replacing the roof section with some trellis with vines growing over it that will still feel like a roof, but also be more open.
 I have two things to say before starting this week's post. Firstly, a warm welcome to the newest followers, Kelly and Stitcher. I can't find a blog link for either of you, but if you have one and would like it added here, just let me know. Secondly, don't forget there is only one week to go in my Giveaway. Click on the picture to the right to find out how to enter.

 One or two other small tasks this week include adding handles to the doors. These were made when I had the polymer clay out last week and this week I finally got around to glueing them onto the doors. Also going back to last week are the signs for the Inn. I'm pretty sure I forgot to mention these last time. They are very simple white cardboard rectangles surrounded by a basic balsa wood frame and decorated with a dragon made from faux leadlight paint. The dragon is the same as the one on the front window but in different sizes. There is no writing on the signs because in a society where most people can't read and write a written sign isn't much use.
 The Inn is almost finished now. There are a few little things to tend to yet. The market seller at the very least needs a purse to keep her money in. The others may or may not end up with them. The chest in the low bedroom needs some "junk" spread out on top of it, or I might replace it with a different piece of furniture. That's something that needs thinking about. The back wall of the top floor rooms needs something too, tapestries? some exposed brickwork? more beams? They need something else anyway.
  I got an email this morning to let me know that my Cumberland Castle kit has been posted! I should be seeing it early next week. As the Inn has been nearing completion I've spent some time flicking through old dollshouse magazines looking to ideas to use in the castle and the other two kits I already have. I found a review of the Cumberland Castle kit from when it was first released in one of them. At the top of the page I'd made some notes and apparently calculated that the kit would cost me $871.00, plus postage from England which would have been about as much again. Now five years later I've finally bought one and thanks to changes in the exchange rate and to Fairy Meadow Miniatures shipping them into Australia it cost me $635 including postage. I probably would have bought the kit from FMM whatever they charged for it, but knowing I would have paid more in times past makes parting with that much money a little easier. Now all I need is FMM to get a Market Cross kit and I'll have all the Dollshouse Emporium kits on my all time most wanted list. At least all the kits DHE still make, they always seem to discontinue the best ones!

 Firstly, I'd like to welcome the four newest followers to the blog. They are Drora Hed and Eli en Karina, neither of whom appear to have blogs of their own and Susi of Mini Eden and Glenda of Peppercorn Miniatures. Thank you all for choosing to follow my blog and extra thanks to Glenda for her excellent instructions in last April's Dolls House and Miniature Scene, they came in very handy!
 After making a start on populating the Inn last week I made a big push this week to get as many people as I could finished. I now have thirteen people dressed, wigged and more or less finished. Some of the dolls vaguely have a tudor look about their clothes, but "vaguely" is as close as they come to any type of authenticity, it is after all a fantasy Inn. In the building and decoration of the Inn, the fantasy aspect wasn't very strong, I was planning to step it up with the people and accessories. So far, this plan has had only minimal success as most of the people are clothed very mundanely. The exceptions are the wizard and his wife for the tavern and the oriental traveller for . . . somewhere in the Inn. The oriental fellow is very striking in vivid red and brocade and is definately not a lowly peasant. Perhaps he should be staying in the high, ie most lavishly expensive, bedroom? As for the wizard and witch, they are very pink-and-purple and decidely not quite right. They either need stripping and re-dressing or perhaps just sitting in the back corner of the tavern where they won't be so noticable. There are still more people needed for the Inn - about eight more. The extra dolls I need arrived in the mail this morning, so I can make a start on the remaining dolls anytime, though after one mamoth sewing effort I may wait until next week to start on them.
 Being rather tired of working with fabrics, I sepnt Sunday afternoon working with something completely different - polymer clay. I made some basic door handles, a half dozen ale mugs, some stew, a mass of small pies, one large pie, pieces of bread and a loaf of bread, some jugs and a jug and basin for the washstand in the top floor bedroom. Needless to say, now I'm a bit fed up of clay too. I was going to make some fish for the stream too, but discovered fish are harder to make than you'd expect. I guess my fishing urchin is going to have to go hungry because there are still no fish for the stream. That's okay, I haven't made him a fishing line yet anyway.


 Because people in Inns often have luggage, I made four simple sack like drawstring bags to scatter about the place. As I had fabric out to do this, I figured I might as well start dressing some of the people for the Inn. So far there is a barman, sorcerous parton, lady, kidnapped princess and a pauper in the process of being dressed, but none of them are finished yet. Most only need their wigs and head gear seeing to and a bit of trim on their clothes. There are a lot more people yet to do for the Inn. I had thought I might set the goal of having the Inn finished by the end of January so I would be free to play with Cumberland Castle, the Retreat and Stratford B. kits, but having started on the people and remembered how slow it can be to dress them, I really doubt this will happen.
 At long last the doors have hinges. They were made from faux leadlighting outliner. I drew a hinge shape on some paper and slipped it into a palastic pocket. I then traced the design with the outliner and filled it in, moved the paper and repeated the process until I had enough hinges. Once dry these were simply peeled of and stuck onto the doors.


 With time of work between Christmas and New Year, I finally had the time to crack on with the Inn. Now that I have a Cumberland Castle kit on order (to arrive by the end of January) I have new motivation to complete the Inn so I can clear the way to work on C. Castle, the Retreat and Stratford Bakery. I decided that the Inn is going to be finished before starting any of the others and knowing that if I dry built the two kits I already have as I planned to do over Christmas, I would end up not putting them away again. So for now they remain safely tucked away in a cupboard.
 In the "high" bedroom I has already made a start on the bed and it only needed dressing with curtains, bedspread and pillows. The pale green fabric used is some kind of satin and not the most practical choice for an Inn, but it is a perfect match for the green leaves on the wallpaper frieze and was the only fabric I could find that was a good colour for the room. I used the king of sewing machine that has pre-programed cards of embroidery designs to add the design to the centre of the bedspread. This was plan B. Plan A had been to use a design from a book of iron on transfers to hand embroider the bedspread all over. It would have taken longer, but looked better in the finish. The reason I didn't do this is that when I tried to iron-on the design, it went right through the fabric and ended up on the fabric layer beneath. Luckily I had a piece of scrap under the good fabric or I'd have had a mess on the ironing board. I tried this several times, the the design always passed straight through the fabric. I guess some things just weren't meant to be.

 . . . unless you turn the bed around and look from the other side. As the far side of the bed can't be seen when the be is in position this isn't a problem. The left hand room has three beds with a better quality of manchester, but no privacy curtains. The beds are covered in a printed cotton fabric. The white table in the photos will be replaced with a proper wash stand or perhaps just renovated to suit.
 Downstairs in the tavern there are now a range of chairs and tables. The bench seats and rectangular table were made from the same templates I created for the table in the "Dragon's Maiden" kitchen while the round tables are just circles of balsa wood with sticks for legs. The chairs are popsicle sticks with one end cut off and glued around a circular balsa wood seat.
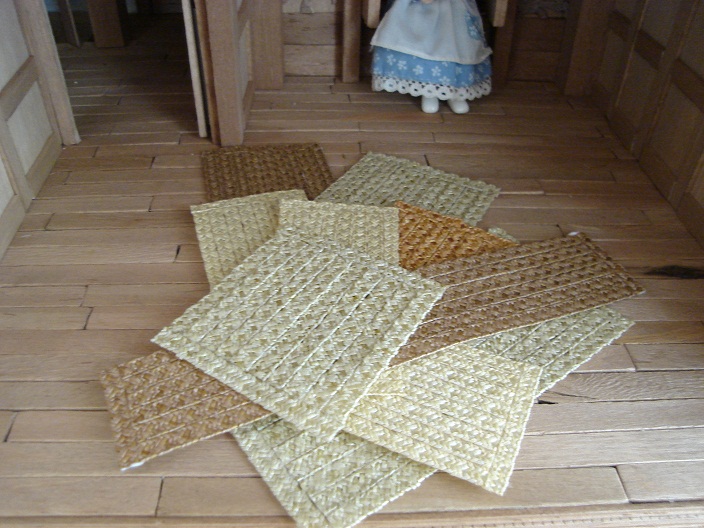 You may have noticed some rush mats on the floors in some of the photos. These were made with lots of straw braid and the instructions in the April 2010 edition of Dolls House and Miniature Scene magazine, written by Glenda of Peppercorn Miniatures. At first, I really didn't think the process was going to work fo me - too hard not to get glue everywhere I didn't want it - but after the first couple of mats something clicked and I rather obessively kept working until I ran out of straw. I will definately be doing this again, it was a lot of fun and the results look fabulous! (well, at least that's what I think).
 The last major piece of work made for the Inn are the candles sconces and candles. The sconces are simply more bits of balsa wood cut to shape and glued together to create a back board, a shelf and a bracket. The candles are made by dripping wax from a 1:1 candle into cut up drinking straws and poking bits of cotton in the top to create wicks. Once the wax is cool, the candles are removed from the straws and the base of the candle is gently remelted then quickly pressed onto the scone to fix it in place. A little more wax from the 1:1 candle is then dripped over the top of the candle to give the effect of used drippy candles. If you want to try this, it does help if you happen to have asbestos fingers. The finished scones were then glued onto walls all over the Inn.
 In a few of the photo you'll see some people trying the Inn for size. They will eventually be re-dressed, or in some cases just dressed, in something more appropriate to the setting.