
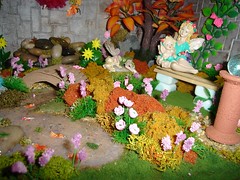
Finally, the garden is finished!! (At least for now). After planting the premade flowers I bought the only thing left to do was make the dragon to sleep above the garden gateway.
To make the dragon, I call him Clarence, I started by crumpling alfoil into roughly dragon shaped lumps connected by bits of wire and shaped the foil to fit the space above the gate. I then gave him a "skin" of polymer clay in a shade of lilacy-purple. The clay was then smoothed all over and built up where neccesary until Clarence's body looked about right in shape and size. He was again fitted on the gate to make sure he was still the right size. Next he was given some personality by adding a face, horns, toes, claws and a ridge down the centre of his back. His horns and claws were made from translucent Sculpey while the rest of him was the one shade of clay as his main skin. When all of this looked about right (which was after much fiddling) I made a pair of wings from a slightly lighter mix of clay and pressed some berry coloured wire along them for extra interest. Once these were attached, Clarence was ready to be baked (dragons do like heat remember).
Once out of the oven, Clarence was stippled with some gold pearlecent paint (that looks more silver) to give an impressions of scales and so he would look like he was reflecting the light of the setting sun. Lastly, his "eyelashes" were painted on and he was glued in place above the garden gate. Working with polymer clay was never a particular skill of mine, so I'm really quite proud of Clarence.
Clarence's addition to the garden finished it off, largely because there literally isn't room to squeeze anything else in. Standing back to look at the finished product, I think I should have put a tree or something with a bit of height in the middle of the garden so I may one day uproot a bush or two and add one if I find a tree suitable to the task. As usual, you can see all the photos of the garden in my flickr photostream here : http://www.flickr.com/photos/dollshouses/sets/72157624474785104/
Tuesday, August 31, 2010

Welcome New Followers
A quick, but none the less warm welcome to this blog's newest followers Nuria and De.
Nuria's blog can be found here: http://mininuris.blogspot.com/
while De's is here: http://delightfulminis.blogspot.com/

Nuria's blog can be found here: http://mininuris.blogspot.com/
while De's is here: http://delightfulminis.blogspot.com/
Monday, August 30, 2010
Blue Room - Weeks Four and Five
The past couple of weeks have been very busy in a non miniature way, but hopefully things are going to be calming down now. Being busy not much has happened in the Blue Room, but I have managed to do some more work dressing the bed.
Too bad what I've done is terrible.
I can't buy any more of the blue fabric I'm using as the store doesn't have any more left. I want enough left to make curtains, but I don't think there will be, so do I try and make do with what I've got left or do I redo the bed curtains/drapes so they look . . . . well, good.
I need to see what fabrics I can get my hands on to try and find something that will work. If I can't find anything . . . . I guess I'll have to put this room on hold until I find an answer.
Meanwhile, the Sunset Garden is finished. I'll add a separate post for it soon and next I'll finally be able to start on my Inn and/or my Regency room.
Monday, August 16, 2010
Sunset Garden - Week Six
Again, not much time to spare so not much has changed in the garden. I did get time to play with the "flower colour" I talked about last week that came from Earth and Tree Miniatures. I made flowers by cutting short lengths of green wire, dipping the ends in tacky glue then rolling the end in some of the flower colour. Once dry, these were planted in the garden. I've also added the fish from Earth and Tree to the pond. This morning my order of pre-made flowers arrived and hopefully once I add these the "garden" part of the garden will be finished, all that will remain is the dragon to sleep above the gateway (and maybe a gate for the gateway would be a good idea too!)
Blue Room - Week Three
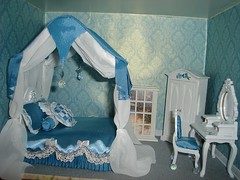
Very little time to spare again this week. This week the only alteration to the Blue Room was the addition of a bedspread. It is made from the same fabric as the valance, but with the reverse side showing giving it a completely different look. The bedspread is a single piece of fabric, essentially a rectangle but with three scallops cut out of each side. The side edges were trimmed with lace and a silver trim and finished off with some premade bows at the top of each scallop. The scallops at the foot of the bed are two separate pieces of fabric glued in place and finished the same way as the main bedspread.
I've added a skirting board around the room instead of the panelling I originally planned. Once the room is filled with furniture, the windows are added with floor length curtains, any panelling added would be almost invisible anyway, so why go to the trouble? I've decided to save the picture frames bought for the panelling in this room for the panelling in the Regency Room I have planned.

I've added a skirting board around the room instead of the panelling I originally planned. Once the room is filled with furniture, the windows are added with floor length curtains, any panelling added would be almost invisible anyway, so why go to the trouble? I've decided to save the picture frames bought for the panelling in this room for the panelling in the Regency Room I have planned.
Tuesday, August 10, 2010
This Weeks' Progress - Sunset Garden and Blue Room

This week I snatched some time to make a few flowers for the garden. I made some roses in shades of pink, some small "mystery" flowers in a lilac colour and some big yellow starshaped flowers, al from polymer clay. The mystery flowers are so called because they weren't made to be a particular type of flower, they are just a generic flower and could be almost anything. For the yellow star shaped flowers I started out trying to make dahlias but didn't come close enough to succeeding to be able to call them dahlias. After they were baked they were added to some pieces of plastic pondweed (intended for use in fishtanks) and 'planted' in the garden. This is where the layer of oasis foam over the bottom comes in handy. To plant the flowers, I had pushed a hole in the foam with a toothpick, dipped the bottom of the plant in glue and pressed it into the hole.
The bridge made last week has been painted just about every colour you can imagine, but none of them looked quite right, so form now at least, I've settled on a plain soft brown. I've also painted and added a feature at the end of the path. The pillar part is an old cotton reel while atop it is a glass marble coated with Gallery Glass Hologram Glitter. Again, I'm not sure exactly what this construction is supposed to be, but it looks good.
Some packages have been turning up in my mail box lately. Yesterday my order from Earth and Tree miniatures arrived. I placed this order online in early July and it contains bits I thought I'd need at the time for my Inn, the Regency Room and the Sunset Garden. Now I have no excuse not to start the Inn and the Regency roombox as soon as I have the time. For the Sunset Garden I ordered some fish for the pond and some "flower color" which is very similar to what they call "flower soft" and to the model railway foliage I used for the bushes last week. From this I should be able to make some wisteria like flowers for a vine and some more ground based flowers. I have also ordered some ready made polymer clay flowers which are still yet to arrive.
Once I have these added to the garden it will be all but finished with one exception. Above the gate in the back corner of the garden is currently a small red dragon. I plan to replace him with a sleeping dragon that has his tail and a few legs hanging over the wall. (Yes, I must have been watching cats sleep when I thought of that). This dragon will be made either from air dry or polymer clay.

In the Blue Room, the furniture has all been painted white. Decals adorn the back of the chair and the top of the wardrobe. The chair cushions have been recovered in a blue fabric and the same fabric has been used to make a valance or skirt around the bottom of the bed. The valance was pleated by hand using a great many pins, spray starch, an iron and a hairdryer. I really need to buy or make a proper pleater for these kinds of jobs, it would surely be easier and faster than pining each individual pleat in place. Among the other items to have arrived in the mail the past couple of days are half a dozen picture frames (miniature ones naturally) which will be used to make decorative panels in the panelling I will be adding around the bottom of the walls. Once I have the panelling in place I can decide on the height of the windows (which are salvaged from the house that became Highcroft Castle) and make the curtains (more pleating!). I've also re-arranged the furniture since last week, but am not sure it should stay this way either.
Welcome More New Followers

It's always a pleasant surprise to discover the number of followers has increased. Today, it's gone up by three. First is Anything Miniature, whose blog is to be found here: http://anythingminiature.blogspot.com
Next is Sylvia whose blog is to be found here: http://lotjesdollshouse.blogspot.com/ You'll also find a link to her Etsy store on her blog.
Finally comes Ron Nelson of RND Modelshop.com otherwise known as Artisan of Ocala. You'll find his blog here: http://artisanofocala.blogspot.com/ and his Flickr photos here: http://www.flickr.com/photos/rndmodelshop/
Wednesday, August 4, 2010
Sunset Garden - Week Four and the "Blue Room"
 Despite not spending a lot of time working on miniatures this week, the appearance of the garden has changed quite dramatically. First, the path of air-dry clay I put in last week has been taken out and replaced with gravel. This is because I decided I didn't like the path as it was . . . too bad I don't really like it now either, it looks too much like the stream bed. The path is made of fish tank gravel with some smaller model railway gravel mixed in. The stream bed is just the smaller railway gravel. In retrospect I should have tried to get some of the railway gravel in a different colour. For both the path and the stream, the loose gravel was spread in position and then soaked with watered down PVA glue to glue it in place. A small bridge made of balsa wood crossed the stream and connects the two sections of path. The other advancement for the week was the addition of some plants and figurines. The autumnal vine growing up the left hand wall is the vine I bought at the Hobart miniatures fair last month, the small tree is a fake bonsai like the larger autumn toned tree in the back right corner. The "bushes" scattered about the garden are model railway foliage while the bits of green wedged between rocks and growing along the edges of the stream are lichen moss. The remainder of the exposed ground will largely be covered with flowering plants which are yet to be made. Finally, a winged unicorn, a mermaid and a scattering of faeries have taken up residence in the garden.
Tuesday, August 3, 2010
Welcome New Follower & Update

Subscribe to:
Posts (Atom)