A Randomly Selected Newspaper Headline:

The following is a randomly selected newspaper headline from many years ago:

Welcome to my blog. Please feel free to leave a comment. I assure you I always read and appreciate everything you have to say. Unfortunately, thanks to Blogger being, well . . . Blogger, I can not respond to comments nor leave any on your blogs. They simply disappear into the ether. Occasionally I will remember to respond in the next blog post I put up, but usually these good intentions slip my mind. So if you want to ask a question or get a response to any comments you may have please leave an email address or other contact method in your comment and I will get back to you.

I have also added a separate page to the blog for the Tower of Magic with a brief summary of all the rooms of the ToM in the one spot. The link is just below this and above the main body of the blog, or you can just click here.

Monday, July 25, 2011

Everywhere the glint of . . . . Silver?

I guess the residents of Castle Starcaster aren't as wealthy as Tutanhkamen; he had gold, but the poor folks of the castle have to make do with silver.  Their 'treasures' are proudly displayed in the entrance hall and will be the first thing visitors to the castle see.  The silver goblets and plates are arranged on the shelves of a court cupboard style set of shelves.  The shelves are balsa wood with wooden beads for supports.  It was made to fit exactly in the space between the steps on the left and the steps on the right (which is why it's a miracle that it fits this space perfectly).


The goblets and tray on the top level of the tray I pinched from the table of my very first castle.  I have to admit there is some wholsale scavanging going on between to oldest castle and the newest.  This is because the old castle is, well, old and there are many things that I can now do better, so sometime after I finish Castle Starcaster I'll go back and give the old castle a light renovation and reburbishment.  This is a good excuse to plunder the old castle dry now.

Most of the thefts from the old castle have been to the benefit of Starcaster's kitchen.  Things like the dead turkey and the good Barehaven pottery are from the old castle.  There is also a continuation of the silver theme in the kitchen.  On the front table is a silver brazier over which hangs a silver bowl on a silver chain.  This is the comfit maker that I started on last week.  This is something I would never have thought of including until I saw one on ebay, but was so simple to do and is fairly effective too.  For those of you who are wondering, a 'comfit' is a nut or other small edible object coated in sugar.  The nuts would be placed in the bowl over the brazier and a glucose or sugar solution would be poured in a little at a time.  The bowl would be constantly swung/swirled to ensure all the nuts were evenly coated.  My nuts are finely chopped balsa wood and the brazier holds red and black seed beads to imitate hot coals.  If you look closely, you'll see more 'coals' in the fireplace and oven.


There is still more silver in the kitchen.  From beneath a new shelf between the door and the oven on the left wall hang an assortment of silver toned utencils such as a ladle and a strainer.  There aren't easy to see in the photo due to another new addition to the kitchen, a ladder.  I decided that there had to be some way to reach the high shelf over the door, so I made a quick ladder out of bamboo skewers.  The rungs were glued to the long sides at an interval of about an inch.  When the glue was dried I used some crochet threat to tie around the joins to give the ladder a more rustic look.


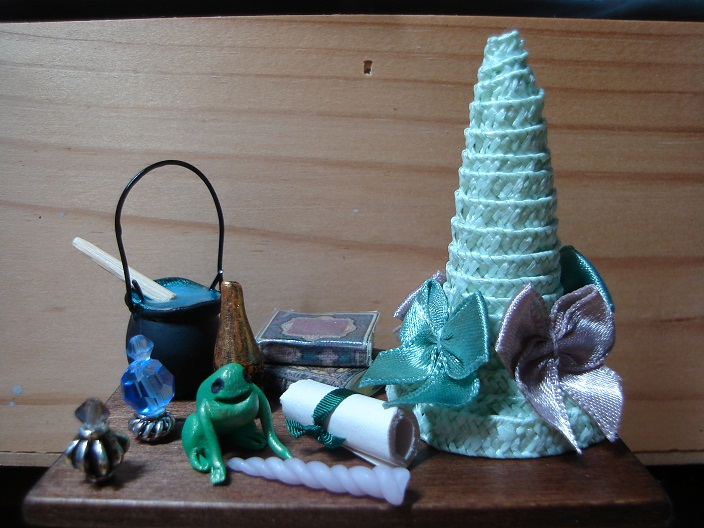
Even the Witch Shop got a little bit of glitz in the form of some silvery sparkles in the fish pond.  The pond is rather obviously a feature in the garden to the right of the path.  It was made very simply by glueing stones around the edge of a piece of thin card cut to the right size and shape.  Any gaps between the stones were filled, the bottom card was painted a greeny-blue and then filled with some clear resin water.  To give it some extra sparkle, some fantasy flakes were sprinkled over the resin before it set.  Although I haven't taken a photo of it, the fountain in the castle's rooftop garden was filled up the same way at the same time.  The two polymer clay frogs I made a few weeks back have taken up residence, one by the pond, one by the fountain.


The most noticable change to the witch's garden was the addition of the fence around the edge.  The fence marks the boundary of the public street leading to the shop door and the private garden leading to the residence beyond the green door.  Like everything else, the fence is made from balsa wood.  I wasn't sure what colour to paint it at first; purple to match the building, brown to match the woodwork, green to match the door, but I settled on basic black.  Crowley the mail crow seems to approve the fence; at long last he has somewhere to perch while waiting for someone to open the door so he can drop his delivery inside.  Now the garden needs plants, lots and lots of plants.  Does anyone know a quick, easy way to make a wisteria vine?  Wisteria is going to climb up the posts and/or walls and hang down from the beams above.  This is going to require a lot of leaves and blooms and take a long time.  Then there are the flower beds, bushes, lily pads for the pond . . . perhaps I should invest in some kits, at least for the more prominent flowers?


Tuesday, July 19, 2011

The Magic Teapot


Take a look at what I just received in the mail!  I was lucky enough to win this set comprised of fireplace, dining table, dining chairs, sofa and armchairs on ebay from Linda of Linda's Miniature Musings.  They look quite big in the photo, but they are only 1/24th (or half) scale and they are tiny.  I've been thinking over the past few months that once the Castle and the Shop are finished perhaps I should try and do something in 1/24th scale.  If I was going to do this, I'd need to start with a reference for comparason to ensure I got things the right size and not only will this set do this, it also furnishes most of a room, or even the downstairs of a house.  Linda was gracious enough to include a few extra items in the box, the plant, saucepans, milk, butter and coffee you can see in the photo.  Thank you Linda.  If I am going to make use of these, I have to do something fairly modern, but the sofa is very Victorian looking. . . . . Well, at the rate I'm going it will be a long time before the Castle and the Shop are finished, so I'll have lots of time to come up with a brilliant idea for my 24th scale scene.  So for now they go into storage while I mull over the possiblities and get on with the projects I already have underway.

The work in progress

Have you seen pictures of "floating" teapots or potion bottles that pour liquid into cups or bowls with nothing but the "liquid" flowing out of them to hold them up?  Needless to say from the first time I saw a picture of such a thing I wanted one but never happened upon one for the right price, so I decided to try making my own.  Initially, I thought to use the pre-bought teapot I already had in the Reading Room, but discovered the spout didn't have a hole in it, which rather put a crimp in my plans.  Instead, I copied the teapot in polymer clay and made also made a cup and saucer.  As poor as my scuplting skills are, I thought that this would be the easy part and making it float would be harder.  Turns out making the teapot was the hard part.

The finished Teapot

To make the pot float, I cut a piece of heavy gauge wire a little over an inch long and carefully poked one end into the spout of the teapot until it felt firmly wedged.  The other end of the wire went into the cup and saucer and the wire was carfully bent so that the teapot sat at a nice angle when the cup was placed on a flat surface.  To keep it in position, I cut a scrap piece of balsa wood to support the base of the teapot.  I then carefully covered the wire in some "tea" coloured clay and put a little extra clay in the bottom of the cup.  Finally, right before I put the lot into the oven, I coated the pouring tea with liquid Fimo in the hopes it would give it a more liquid look and not have time to slide off the tea into the cup before it was baked into place.  This final step didn't quite work as all the liquid Fimo ended up in the teacup rather than on the tea and now it looks like there is coloured tea being poured into the cup that turns clear once it gets there.  It's also almost overflowing the cup.  So the moral of the story is either tint the liquid Fimo or skip it all together and put some gloss on later to get a liquid like shine.  Once baked I painted the teapot and cup and the bottom of the saucer was then glued onto a table and when dry, the support was removed from under the teapot.  The result was a floating magic teapot.  I was really surprised how easy it was to do this and for a first attempt I'm really pleased with the result.

Harry the Snake
While I had the polymer clay out, I made a few more little items for the shop and castle.  Harry the snake hangs from the ceiling beams.  Is he for sale or is he the shops "guard dog"?  I haven't quite decided yet.  You might also spot some small potion bottles hanging from the beams and a clawed "hand" emerging from the centre draw of the hat display stand.  The shop has also aquired a set of scales to weigh items sold by weight and a couple more small cauldrons.  For the castle kitchen there are four utencils and a pile of "wooden" spoons.  A silver bowl and small brazier are my as yet unfinished attempt to make to make a comfit maker like this one: Tudor Comfit Maker on ebay


The rest of the week's acomplishments were small bits and pieces.  The cupboard in the castle's centre/sitting room was repainted to a faux wood look and now looks much better.  I also made a floor standing candlearbrum for the room, the first form of lighting the castle has.  Outside the witches shop I cleaned up the garden area and made a start on it by laying some "turf" and adding a faux window next to the door on the back wall.  It looks pretty rough right now, but once it has a vine climbing around it and flowers in the window box it should blend in better.


Tuesday, July 12, 2011

Furniture Making

Welcome to my newest followers, CrisColás  and Caroline.  Thanks for following.  You picked a good time to join up as for the first time in weeks, I actually feel like I did a good weeks work on my miniatures and have something worth showing for it.


Ever since I started working on the castle, I had no firm plan for the use of the room in the exact centre, or heart, of the castle.  For a long time I simple ignored it hoping that a brilliant idea would just burst into mind some day.  Unfortunately, this never happened, so for the past couple of weeks I've been trying to work something out.  Of all the inventive an unique purposes the room could have been given, it's ended up being just a plain old sitting room.  Well, the folks who live in the castle needed somewhere to sit back and relax. 

Once I decided on the basic layout, I made a bench seat/settle for the left side wall by the library door.  Rather than make a seat with a high back that covered over the wall panelling, I incorporated the seat into the wall so that the back of the seat is the wall panelling. 


Next up I made another seat for the room, this time a free standing chair.  Mostly, the chair is made of balsa wood and would have been rather boring, except for the fretwork panels in the back and base.  These were bought from Angela Downton on ebay (the same lady who made the chest/coffer along the right wall).  I designed the chair by pulling out all the pieces of trim and fretwork I had and fiddling about until I had something that I liked.  The first chair design I came up with only had a fretwork panel in the front side of the back of the chair, nothing I had would fit on the sides or base with the particular panel at the back.  So I moved the panel to the rear side of the chair back so that the front and sides of the chair were plain but the rear of the chair was fancy.  Once assembled I put this chair in the Witch Shop's reading room facing into the room so only the back was visible. Perfect.  It now adds to the ecclectic feel of this room.  I then went back and came up with a design for the chair in the centre room and I'm utterly thrilled with how this one turned out.  No one is ever going to be allowed to sit in this chair and cover up how gorgeous it is!


 Less successful was the cupboard for the back left corner of the room.  I felt this corner needed a piece of furniture, but everything I had was too deep and blocked the doorway in the back wall.  I made a simple rectangular box our of balsa wood then used cut out sections of the embossed paper used for the downstairs ceilings to add "carved" panels to it.  The panels were then overlaid with strips of balsa wood to give the cupboard a panelled look.  Some prebought wood turnings were glued on the bottom for legs and some cotton trim was run around the top to finish it off.  All this went quite well, but then I decided to paint it.  Why on earth did I pick those colours?  Aren't they ghastly?  At the very least they are wrong for this cupboard and this room.  Maybe if I used a deeper purple close to the colour of Artie's robe?  Maybe I need to totally change the colour scheme or maybe it should be given a wood look finish?  Be prepared for it to change colours at least once, and probably many times over the next few weeks.


For the remaining furniture in the room, the coffer on the right wall will probably remain where it is.  The chess table I pinched out of an earlier house and is really a little too modern to be right for the castle so I'll make something more suitable for this space and put the table back where it belongs.  The X frame chair I took out of Highcroft Castle but will leave where it is as I never really liked it where it was. 

Well, what do you think of this room so far?  I think it needs one more piece of furniture, perhaps a floor standing harp so the residents can listen to some music while they sit back and relax?


This isn't all the furntiure I made this week though.  I've also re-furnished the kitchen.  Remember the wall mounted shelves and the large central table?  I was never happy with them, so I ripped them out and went back to the drawing board.  The shelves have been replaced with a free standing unit of shelves.  The three doors on the bottom level of the unit actually open and the kitchen staff can either use them as general storage or as livestock cages.  Even fantasy castles like mine don't have refridgeration, so animals were often brought into the kitchen while still alive and kept there until the cook was ready to start preparing the meal.  The big table has been replaced with two smaller trestle tables that make the kitchen look less crowded than the big table did. 


After spending all this time working on things for the castle, I decided that the witch shop needed some attention.  I made a simple shelf for the wall behind the counter from a plank of balsa wood and a pair of brackets.  Some wire hooks fastened to the underside of the shelf were intended to hang the shop's selection of broomsticks.  You'll notice there are cauldrons hanging there now - that's because the broomsticks I'd made were taller than the distance from the shelf to the floor.  So instead I made a pair of racks to display a couple of brooms horizontally on the right wall of the shop.  I'd collected some "witchy" images from various printables sites and printed these out and placed them around the upper walls of the shop.  Some are ads, some are posters for sale.  I've also filled up the display area in the counter and the display cabinet at the front of the left wall with various bits and pieces.  The shop has also gained one more display area in the form of a shelf under the front window.  The items you can see on it now are just temporary; I hope to do some sort of proper window display for it in future.


Let's see, have I forgotten anything?  Oh yes, I also rearranged the furniture in the castle bedroom.  Yes, again.  The screen is now by the door where it will block any drafts that come through the door.  The bed now sits in the middle of the right wall with it's foot toward the fireplace.


Monday, July 11, 2011

Witch Hat Tutorial

What you'll need:

5mm Straw Braid x 1m
Tacky Glue
Sewing Pins
Fray Stop
Hat Form (See Below)

When I sat down to figure out how to make a witches hat I very quickly figured out that I needed something solid to support the hat and help keep the shape even.  This support is what I call a Hat Form.  Changing the size and shape of your hat form changes the size and shape of your finished hat.  The measurements given below make an average sized hat.

There are two ways you can make your own hat form.  The first way is to use thin cardboard. With the pin end of a compass on the point of a ninety degree corner, mark a quater circle on the cardboard with a 4.5-5cm radius.  Cut this out and bring the corners of the semi-circle together to form a cone shape.  You want the base of the cone to have a diameter of about 1.7cm and may need to overlap the edges a little to achieve this.  Once happy with the size and shape of your cone, use some tape to fix it in shape.  You'll also need to cut a small circle of cardboard with a diameter of about 4cms to shape the brim of your hat.  Draw a circle in the centre of the circle the size of the base of your cone.

Cardboard Hat Forms
The second and best way to make a hat form is to use paper clay.  You must use paper clay and not regular air drying clay.  Simply shape a lump of paper clay into a solid cone about 4.5-5cm high with a base diameter of about 1.7cm and leave until dry.  To make the brim form, roll some paper clay flat until it's 3mm thick and carefully mark and cut out a circle about 4cm in diameter.  If you want a sloping brim push up the centre of your circle to create a slight convex shape.   When the brim form is dry carefully mark a circle the size of the base of your hat form in the centre of the circle.  All the photos in this tutorial show a clay hat form being used.

Paperclay Hat Form
Please note that you will be pushing pins into the hat form.  This is why paper clay is ideal as it remains soft and a little spongy when dry.  If you are using a cardboard hat form you'll need to use more force to punch the pins through but be careful not to use too much force and distort the shape of the hat form.  Also when using a cardboard hollow hat form I find myself holding it with one finger inside the form.  This works fine, but please remember where your finger is when pushing pins into the hat form!

If your straw braid has been twisted or kinked, you may like to iron it with a medium heat iron before you use it.

To make a hat:

While working with the straw braid, you'll need to keep it tightly wound around the hat form, but be careful not to pull it too tightly as this will distort the braid.

Take your piece of straw braid and loop the end of it around the top of the hat form so that the braid wraps tightly around the tip to create a point.  Ensure the cut end of the braid is beneath the continuing length.  Carefully push a pin through the straw and into the hat form to hold the braid in position.  This forms the point or peak of the hat.


Run a thin line of glue around the bottom edge of the part of the straw braid already wrapped around the hat form.  A glue syringe is perfect for this, but if you don't have a syringe squeeze a small blob of glue onto a piece of plastic and dip the tip of a toothpick in it.  Run the toothpick along the edge of the braid to leave a line of glue behind.  Carefully wind the braid around the hat form so that it overlaps the row of braid above by about 3mm.  This first rotation is a little tricky as the braid tends to want to go in a different direction than you want and you have to overlap the braid above while at the same time angling this rotation to create a downwards spiral.  Just fiddle until you're happy with what you have, then push another pin through the braid to hold it in place.


Run another line of glue around the bottom of the rotation of braid you've just positioned and wrap another rotation of braid around the hat, remembering to angle it slightly downwards.  Pin this in position.  Repeat this step until you approach the bottom of the hat form.  Stop when you have either about half a centimeter of hat form exposed at the bottom or you have only about 20cms of braid left.


Cut the braid at the bottom of the hat as shown in the photo and leave it to dry.

NOTE:  If you have a copy of Dolls House World magazine, August 2011 issue, use the instructions by Kat Hazelton detailed in the issue to make your brim.  I haven't tried doing it that way yet, but it makes so much more sense than the method below!

To create the brim of the hat:  Start with the end of the braid, pin it onto your brim form following the line of the centre circle.  (If using a cardboarm brim form, try resting it on a pice of polystyrene foam to give the pins something to sink into.)   The inner edge of the braid will want to stand up so use lots of pins to hold it down as securely as possible.

Run a thin line of glue around the outer edge of your braid circle.  Wrap the braid around the circle so that it overlaps the inner ring by about 3mm.   Position only about a finger width of braid at a time and press and hold it in place for several seconds before securely pinning it down and moving on to the next segment.  The inner edge of the braid will want to stand up vertically, so keep pushing down on anything that tries to rise up.  If using a convex brim form this will be less of a problem than if using a flat form.  Don't worry too much if some bits are left standing up though, we'll flatten the brim later on if needed/desired, the important thing at this point is that enough of the braid is secured to the inner ring so that the brim will hold it's circular shape when the glue is dry.  Repeat this step until you have either completely covered your form or run out of braid. Leave the brim to dry.


Once both peak and brim have thoroughly dried, carefully pull the pins out of both pieces and remove the forms.  For the peak, hold the exposed base of the form and gently twist the straw braid in the direction it spirals to free it. 

If you need to flatten your brim, iron it with a low to medium heat iron.  If necessary, poke a little extra glue anywhere the rings of braid have not held properly and secure with a small clamp until dry.

To tidy up the ends of the braid, dip a toothpick in some Fray Stop and run it over the braid along a line that runs diagonally across the braid and joins the bottom of the braid with the row of braid above it.  Once the Fray Stop is dry, carefully trim the braid along the line to create a tidy edge.


Check that your brim fits the peak by taking your brim and sliding it over the top of the peak of the hat and work it down to the bottom.  The brim should be a snug fit around the base of the hat.  If the brim doesn't fit you can carefully pull the brim apart and remake it to fit by changing the size of the circle in the centre of your brim form.  If the brim fits, slide it back up the hat and run a line of glue around the base of the hat.  Slide the brim back down into position and leave to dry.  Try to position the cut ends of the straw braid at the back of the hat where it will be less noticable.


 Finally, decorate your hat with your choice of ribbon, flowers, charms or findings.


Friday, July 8, 2011

What's the Lucky Number?

Time to draw the giveaway prize!

Here is the list of entries (you'll need to poke it to make it big enough to read):


Each entrant is listed under their chosen number.  The two in blue failed to nominate a number, so I used Random.org to assign them one.

I then generated one more random number to select the "finalists".  The winning number was . . . Seven!


This meant that Iris, Fabiola, Lainie, Carmen and Diane all had a chance to be the ultimate winner.  I entered their names into Random.org's list randomiser to pick the winner.


The name randomly placed on the top of the list was . . . . Carmen!


Congratulations Carmen.  Please send me your postal address in an email to celestial@y7mail.com so I can send your prize to you.

And now at long last, here is what Carmen has won:


It's a selection of "Witches Essentials" including a straw hat in mint green, a small cauldron full of brew, a unicorn horn and a slightly wonky looking frog.  As a consolation to those who didn't win I'll be adding a tutorial describing how to make your own witches hat from straw braid soon.

Thursday, July 7, 2011

Giveaway Closes Soon!

Remember Dexter?


Just a reminder that my giveaway closes in about 11 hours and the winner will be drawn tomorrow.   So far there have been 35 entries.  The most popular numbers chosen are 4, 5, 6 and 7 with five entries each while the least popular numbers are 1 and 10 with only one entry each.  If haven't entered yet but would like to, click here and do so now!

Astoundingly, new followers are still jumping on board at an amazing rate.  Today I would like to welcome the two newest followers Marver and Lydia (no blog?).

Tuesday, July 5, 2011

Blue and Green Should Never Be Screen

I have to appologise for dropping out most of this past week and not acknowledging any comments left on the blog.  I've been busy with work.  I will get around to addressing the comments . . . eventually.  I have three more new followers to welcome; Isabel (morgana135), Mona and Petra.  Welcome to the blog and thanks for following.

The good news is that I finally have the giveaway prize sorted, but the bad news is that I've decided to keep it a secret until I draw the winner, so you'll have to wait until later in the week to find out what it is.  I'm also working on another tutorial.  It's related to the giveaway prize and I'll hopefully add it after I announce the winner.


In the castle bedroom, I rearragned the furniture and cut a little length of the bed so it sits along the back wall.  I decided to use the raw wood screen I'd been using to represent a fireplace in the centre room next door as a permanet feature of the bedroom.  I painted the back of the screen a deep blue and the front "antique green" which is a soft blueish green.  They do say that blue and green should never be seen, but I've never understood that rule, mostly because I was wearing a blue and green stripped top that I absolutely loved when I first heard it said.  As the dominant colours on the tiles on the upper walls of the room are blue and green, blue and green the screen is.  The panels of the screen were inset with pictures with a fantasy theme (dragons, unicorns, etc) cut from old cross stitch catalogues and the edges were painted in gold.


Next door in the Centre Room, I still haven't decided quite what to do, but I have walled in the spiral staircase.  I sitll need to smooth out and paint the handrail to match the rest of the woodwork, but I think the room looks better this way already.  Artie is standing in the doorway that accesses the staircase just to prove that it's there while a mysterious lady in purple is climbing the stairs.  Having someone climbing the stairs gives them some more interest to look at and the only way to put someone on the stairs was to do it before closing them in.   She's just a cheap doll in a very hasitly made gown, but works quite well in this position.


In the Witch shop, Hetty's bed arrived in the mail early in the week, so the first thing I did was assemble and dress it.  The valance (or bed skirt) is a pre-pleated fabric simply glued around the base of the bed.  The bedspread is a printed cotton while the throw over the foot was a pre-rushed fabric.  Next door in the Reading Room, the shelves are filling up with books, but it looks like Hector and Agatha have been up to mischief.  There are cups of tea all over the floor, Agatha is sliding slowly toward the floor, the "monster under the bed" has taken refuge in the fireplace and Hector seems to have found himself a naked, bald floosy.  Perhaps it was more than tea in those cups?