
 With time of work between Christmas and New Year, I finally had the time to crack on with the Inn. Now that I have a Cumberland Castle kit on order (to arrive by the end of January) I have new motivation to complete the Inn so I can clear the way to work on C. Castle, the Retreat and Stratford Bakery. I decided that the Inn is going to be finished before starting any of the others and knowing that if I dry built the two kits I already have as I planned to do over Christmas, I would end up not putting them away again. So for now they remain safely tucked away in a cupboard.
Despite there still being some work to do on the exterior of the Inn, I started the Christmas break going back to the interior. Okay, so I started the Christmas break by cooking too much, eating too much and trying to act enthusiastic about the present my sister gave me, but all that is another story entirely. The insides of the Inn were given their basic decor as I built the structure, so the next task was to start on adding furniture.
 In the "high" bedroom I has already made a start on the bed and it only needed dressing with curtains, bedspread and pillows. The pale green fabric used is some kind of satin and not the most practical choice for an Inn, but it is a perfect match for the green leaves on the wallpaper frieze and was the only fabric I could find that was a good colour for the room. I used the king of sewing machine that has pre-programed cards of embroidery designs to add the design to the centre of the bedspread. This was plan B. Plan A had been to use a design from a book of iron on transfers to hand embroider the bedspread all over. It would have taken longer, but looked better in the finish. The reason I didn't do this is that when I tried to iron-on the design, it went right through the fabric and ended up on the fabric layer beneath. Luckily I had a piece of scrap under the good fabric or I'd have had a mess on the ironing board. I tried this several times, the the design always passed straight through the fabric. I guess some things just weren't meant to be.
On the top floor of the Inn are the cheaper rooms. Here guests don't get a room to themselves but a bed separated from the next by only a curtain. The right hand top room has four beds made of balsa wood and cardboard covered in mis-matched bedding. Curtains strung between the beds can be drawn to give each bed an amount of privacy. Unfortunaly when I made the curtains I forgot to allow for the slope of the roofline, so the section of curtain against the roof does hang a little peculiarly. Two of the four beds are neatly made ready for the next guest, one has been left in disarray by it's last occupant and the fourth still has it's occupant sleeping within it. To create a body shape in the bed I used a cheap plastic skeleton rather than a more expensive doll or to try and cobble together something belivable out of scraps. Some felting wool glued to his head and the bedcovers completely hide the skeleton . . .

 . . . unless you turn the bed around and look from the other side. As the far side of the bed can't be seen when the be is in position this isn't a problem. The left hand room has three beds with a better quality of manchester, but no privacy curtains. The beds are covered in a printed cotton fabric. The white table in the photos will be replaced with a proper wash stand or perhaps just renovated to suit.
 Downstairs in the tavern there are now a range of chairs and tables. The bench seats and rectangular table were made from the same templates I created for the table in the "Dragon's Maiden" kitchen while the round tables are just circles of balsa wood with sticks for legs. The chairs are popsicle sticks with one end cut off and glued around a circular balsa wood seat.
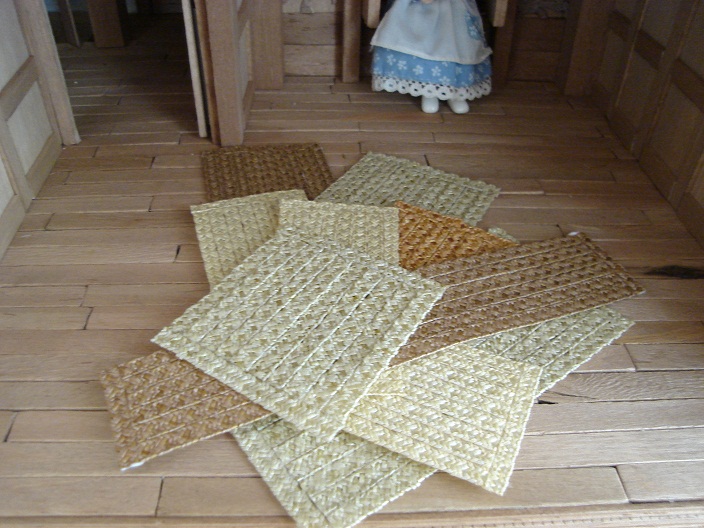 You may have noticed some rush mats on the floors in some of the photos. These were made with lots of straw braid and the instructions in the April 2010 edition of Dolls House and Miniature Scene magazine, written by Glenda of Peppercorn Miniatures. At first, I really didn't think the process was going to work fo me - too hard not to get glue everywhere I didn't want it - but after the first couple of mats something clicked and I rather obessively kept working until I ran out of straw. I will definately be doing this again, it was a lot of fun and the results look fabulous! (well, at least that's what I think).
 The last major piece of work made for the Inn are the candles sconces and candles. The sconces are simply more bits of balsa wood cut to shape and glued together to create a back board, a shelf and a bracket. The candles are made by dripping wax from a 1:1 candle into cut up drinking straws and poking bits of cotton in the top to create wicks. Once the wax is cool, the candles are removed from the straws and the base of the candle is gently remelted then quickly pressed onto the scone to fix it in place. A little more wax from the 1:1 candle is then dripped over the top of the candle to give the effect of used drippy candles. If you want to try this, it does help if you happen to have asbestos fingers. The finished scones were then glued onto walls all over the Inn.
 In a few of the photo you'll see some people trying the Inn for size. They will eventually be re-dressed, or in some cases just dressed, in something more appropriate to the setting.
Finally, I did promise before Christmas that I would be holding a giveaway in the new year. The items for this have been made and are ready to go, so please keep an eye on this blog as I will be adding a new post offically announcing the start of teh giveaway in the next few days.
ooooooooooo i love it!! :D Linda x
ReplyDeleteThis is really wonderful, Alennka -- I love all your panelling and the skeleton is adorable!
ReplyDelete