This week involved making four sets of curtains with two very different results. The curtains for the roombox bedroom are quite possibly my best curtains yet. They are made of damask with silk dupion tails and swag. The total height of the curtains is about 20cm. The next step is to make a window for them to frame, then they can be hung on the wall.
At the same time as making the curtains, I dressed the bed for the room in more of the silk and some pink brocade. The bed covers are fairly basic with no fancy flounces or frills because I didn't want them to detract from the bed itself. I am thinking however that I need to add a canopy over the bed of some kind.
Now to move on to curtains of the less sucessful kind. The curtains for Tilli's bed and bathroom were made from a light green linen and are . . . pretty horrid to be kind to them. It's not the scale (24th instead of 12th) that is the problem, its the way I did the windows. The windows and roof line are all angles with no where to really hang curtains from making it really awkward to get the curtains to hang and look right. Add to that the fact that I either didn't starch them enough or weren't left to dry long enough as all their pleats unpleated themselves while I was struggling to get them in the right spots.
Fortunately Tilli's bed was much more cooperative. It's fairly basic, just a bed sized slice of foam for the mattress while the headboard is the one that came with the foam house kit. The base of the mattress was covered with a ruffled trim to create a valance while the bed cover is a lilac cotton covered with a white and silver lace.
The bathroom curtains are just as bad as those in the bedroom. They're also too long and hang down behind the toliet. As you can see I'm replacing the so called bath tub that came with this 1/24th scale bathroom set with a larger built in tub. If you recall the original tub was a tad on the small size. The frame is balsa wood and foam while the tub itself is airdry clay. When the clay it dry it'll be trimmed around the top and painted to match the sink and loo.
Downstairs in the lounge is another set of curtains that rest somewhere between the green and the pink ones in terms of success. They are a pre-crinkled fabric with a piece of fancy trim used as a pelmet. Not horrible but not fabulous either.
At the kitchen end of the ground floor, the kitchen has been installed. The cabinets are simple box shapes covered in thin cream card. Extra rectangles of card ontop of the fronts make the cupboard doors. Dashes of gold leadlighting outliner give the impression of hinges while the handles are pieces of gold wire positioned on blobs of outliner. The countertops are balsa wood. The oven is balsa wood with wooden bead feet painted silver. I still need to add a hood over the hotplates.
You may be wondering where Tilli does her washing up and keeps her
refridgerated foods. Unfortunately, the answer is that she doesn't.
There just isn't room to include a sink and a fridge in this house. Infact there are lots of details that there just isn't room for which isn't surprising when you consider the house was intended to be a cheap toy. Next time I do a 1/24th scale house I'll design it from scratch and allow space for everything!
A Randomly Selected Newspaper Headline:
The following is a randomly selected newspaper headline from many years ago:
Welcome to my blog. Please feel free to leave a comment. I assure you I always read and appreciate everything you have to say. Unfortunately, thanks to Blogger being, well . . . Blogger, I can not respond to comments nor leave any on your blogs. They simply disappear into the ether. Occasionally I will remember to respond in the next blog post I put up, but usually these good intentions slip my mind. So if you want to ask a question or get a response to any comments you may have please leave an email address or other contact method in your comment and I will get back to you.
I have also added a separate page to the blog for the Tower of Magic with a brief summary of all the rooms of the ToM in the one spot. The link is just below this and above the main body of the blog, or you can just click here.
Pages
Showing posts with label dolls house. Show all posts
Monday, November 12, 2012
Curtain Call
Labels:
1/12,
1/24,
bedroom,
craft,
doll house,
dolls house,
dollshouse,
mini,
miniature
Tuesday, September 4, 2012
The Nursery
Would you believe this is my 300th blog post? I've shared a total of thirteen different miniatures projects with you over three years and (about) a month to reach this milestone. This is an achievement that sort of snuck up behind me while I wasn't looking or I'd hold a giveaway to celebrate. As it is I have nothing organised, so no giveaway this time. I promise there will be one when we reach 200 followers. I don't know what the prize will be yet, so feel free if you want to make a few suggestions . . . .
The last room in the Georgian house to be furnished was the Nursery. Searching the internet for information and images of appropriate furniture turned up very little of use. So I cast my memory back to an article in Dolls House and Miniature Scene (I think) magazine from a few years ago. Being too lazy to plough through several years worth of old magazines to find the article I worked from the vauge memories I could summoun up. It was a Georgian nursery with blue walls and instructions to make a range of appropriate furniture. The child's bed was enclosed, but more open than the usual cupboard bed. It was more of a "cage" bed. I'm sure there was a reason why the bed was enclosed like that, probably something to do with keeping evil spirits out or maybe it was just the more practical purpose of keeping the child in.
My version looks nothing like the one I remember seeing in the magazine. To start with, the one in the magazine had hinged doors, but I decided to use a sliding door as this fits better in the room I have. As ever, the bed is made from balsa wood and at least one post is crooked, so let's just pretend that it's had a lot of abuse from a lot of active children who didn't want to got to sleep.
Inside the cage the bed has a green cotton sheet decorated with a strip cut from a floral fabric and a pillow made to match. Just to prove that the door really does slide, I've added a quick video of the door in action. I've not (sucessfully) added a video to my blog before so if you find it doesn't work for you, please let me know and I'll keep fiddling with it.
In the front corner of the room is the cradle/crib. This was a bought item to which I added the overhead canopy. I added a balsa wood post skewered with half a toothpick at the top to the head end of the cradle to support the canopy. This was wrapped in the fabric I used to make the canopy so it blends in. The canopy is made from the same fabric you saw in the bedroom last week trimmed with some lace and a few pre-tied bows.
Different parts of the same floral fabric used to trim the child's bed sheets were used to make a small pillow and blanket for the cradle. I decided it would be easiest to make the bed with the baby already in it, so I dressed a Heidi Ott baby in a gown and cap made from a few offcuts of lace and glued the sheets in place around her/him(?).
I collected all the scraps of fabric I made dressing the bed and cradle and folded them up and glued them onto the shelves of the cupboard along with a few extra white sheets (etc). This is the cupboard that was previously in the Laundry. I moved it up here to make room for a large press in the Laundry.
And here is the Laundry complete with a somewhat rickety press. It needs a bit of manipulating to straighten it out. In theory, you turn the handle at the top to lower the top plate to the lower plate to squeeze the wet sheet/dress/etc between them to remove as much water as possible to speed up drying. Unless the servants of this house have learned to levitate, I'll need to change the top handle into some sort of crank on the side where it can actually be reached by 6" tall people.
The other new addition in the laundry is the "lead lined" double sink and water tank of the back wall. These were done the same way as the kitchen sink and tank.
This is (I think) all the key pieces of furniture for the house built. The next step is to finish those items that are still unpainted, not yet fully finished (note to self, buy legs!) or simply in need of a few improvements. Then I need to sit back, look at what I've got so far and decide if a room needs an extra or simply a different piece of furniture.
The desk is back at the front of the Study this week . . . . . Where it will be next week, who knows?
Labels:
1/12,
doll house,
dolls house,
dollshouse,
Georgian,
house,
mini,
miniature
Monday, August 27, 2012
Still Switching . . . .
I've managed to make it through a couple of months without Blogger doing anything weird to me, so I guess I was overdue. Today's mystery error is that the photos aren't loading properly. Some are here in their entirety, some seem to be only partially present and no matter how often they are reloaded, they still aren't coming up. I'll leave these faulty photos in the post, maybe you'll be able to see them properly even though I can't.
As you may be able to see, this week's focus was on the bedroom. The bed itself is the sleigh bed that came out of the house before I started renovating it. I added an overhead canopy draped with a puce coloured silk and an ivory pre-pleated fabric finished off with a few ribbon roses. The frame of the canopy is a half circle of cardboard held up on a balsa wood stand. The bed is covered in more of the silk overlaid with a wide lace. I still need to make lots of pillows and cushions to finish the bed off. On the side wall is the dressing table. Again, this is all cardboard and balsa wood hidden under fabric.
Next a small writing desk was made from more balsa wood, some prebought legs and the tops of some fancy toothpicks. The final item made for the room was a "Duchess Brisee" a sort of chair and footstool all in one that was covered in gold silk. (I still don't have any short legs, so it's currently being held up by my pot of Tacky Wax). All of this, plus an old chest of drawers make the room look like this:
But then it could look like this, or this, or this:
Okay, so you probably can't see what I mean, but let's just say that like in the Drawing Room last week, there are a number of ways I could move things around and I'm not sure yet which is best. The decision is made harder by the fact that the desk also works well in the Study. It fits in the corner by the door or along the "front" wall with the wing chair in the spot the desk isn't.
So, do I use the desk in the bedroom and make another the same size for the Study, or I not have a desk in the bedroom and just use this one in the Study? Where will it go? The wing chair (again, currently leggless) is another creation in balsa wood with a little foam padding for cushions and upholstered in a tapestry fabric.
Hmmmm . . . . . . The styles and fashions of the Georgian era were really quite effeminate by modern standards, but the study was supposed to be the one room in the house that ws a little more "butch", instead it has a desk made for the "girly" bedroom and a chair covered in flowers! Opps!
I made a small sofa for the Drawing room to either replace the chaise or just add to the existing furniture, so I'm still rearranging things in here and trying some of the furniture out in other rooms too.
The photos above and below here should be of the Hall. I doubt you can see them though. I did tell you I was going to add something else in the Hall and these photos should show you the start of it. (If you can't see it here try clicking here to see it in my Flickr). It's a sedan chair and eventually, there will be a lady climbing out of it having just arrived for the dinner party being prepared in the Dining room. It is huge and takes up a lot of the Hall, but as you can see from Dan's modelling, it really couldn't be any smaller than it is.
This week it's time to tackle the last completely unfurnished room in the house, the Nursery. Then all I need to do is figure out which furniture is going in which room and whereabouts in that room it will be.
Labels:
1/12,
australia,
doll house,
dollhouse,
dolls house,
house,
mini
Monday, August 13, 2012
Dining In Style
In my personal philosophy of dollshouse creation, there are five stages to the process. First is Construction, second is Decoration, then comes Furnishing followed by Ornamentation and finally there's Population. I'm very pleased to be able to say that stage two of this house is now, at long last, finished and I can now move on to the next stage; Furnishing.
But before we move on to stage three, I'd like to share some photos of the lights. The main house is now positioned on top of the basment, so for the first time you can see the whole house with all the lights working. There are concealed bulbs in the hallway behind the study over the staircase and another over the basement stairs. The kitchen has a chandelier hanging from the ceiling and the dining room has two candlearbra adapted from identical chandeliers. The rest of the lights were all hand made, that's why its such a shock they all work!
And now for stage three!
The above photo is how the dining room looked last week. Lovely wallpaper, grand fireplace, but otherwise just a table and chairs whacked in the middle of the floor. All the remaining empty space has now been filled in.
Either side of the fireplace is a pedestal, each displaying an ornamental vase. These came out of the pre-renovation house. On the back wall behind the table is a low buffet/chest of drawers. I know a higher display cabinet showing off the best china might be more appropriate, but that would block off a section of the wallpaper and, I think, ruin it's effect. I kept all the furniture as low as possible to leave the scenic vista in full view.
In the back left corner of the room is a small chaise made to fit the space. The shaped legs were pre-bought, but the rest of this piece is entirely from scratch. I think I should have curved it out more to be wider at the back, but I still love it. It's upholsetered in a light blue silk dupion and the seats of the dining chairs have been recovered in the same silk to match.
In the front left corner is a three tiered dessert stand. Yes, I know the upper tiers are crooked and I will fix them. Each tier is made of a plaster ceiling rose. This gives the underside of each level a wonderful decorative feature. The flat tops of each will eventually be covered in a myriad of delectable desserts.
I still need to add a rug to the floor, something in a soft blue I think, and lots of food, cultery, glasses, etc, but would you care to dine in this room?
Next door in the Hall, not much has changed, except that the pieces of, well, junk that had been hanging around has been cleared out. The two tables and chair are all the furniture there will be in this room although I will be adding a feature in the middle of the floor that I'll build as part of the "furnishing" phase . . . . .
Working on furniture for the study has been a much harder task. There are about three essential items to fit in this room; a desk, a wing chair for reading and a free standing circular bookshelf. Using a sample chair, a round table and an assortment of desks and desk sided objects I have tried arranging and rearranging these items in the room and have come to the conclusion that they just won't fit. The problem is the desk. Once you add a desk, regardless of size, shape or position the room instantly looks awkward. Can you have a study/library without a desk? I'm thinking at the moment that I may have to!
One final piece of furniture for the week is this chest of drawers. I bought the kit from the very first doll, bear and miniature fair I ever attended. It was the only fair that I ever saw a good range of DIY items and the only time I have seen House of Miniatures kits available in Australia. If I knew how rare these things were, I'd have bought more way back then. As it is, this kit has been siting largely forgotten at the back of the cupboard since then. I found it while rummaging around in search of furniture for this house and thought it would be perfect for either the bedroom or the nursery (probably the latter).
But before we move on to stage three, I'd like to share some photos of the lights. The main house is now positioned on top of the basment, so for the first time you can see the whole house with all the lights working. There are concealed bulbs in the hallway behind the study over the staircase and another over the basement stairs. The kitchen has a chandelier hanging from the ceiling and the dining room has two candlearbra adapted from identical chandeliers. The rest of the lights were all hand made, that's why its such a shock they all work!
And now for stage three!
The above photo is how the dining room looked last week. Lovely wallpaper, grand fireplace, but otherwise just a table and chairs whacked in the middle of the floor. All the remaining empty space has now been filled in.
Either side of the fireplace is a pedestal, each displaying an ornamental vase. These came out of the pre-renovation house. On the back wall behind the table is a low buffet/chest of drawers. I know a higher display cabinet showing off the best china might be more appropriate, but that would block off a section of the wallpaper and, I think, ruin it's effect. I kept all the furniture as low as possible to leave the scenic vista in full view.
In the back left corner of the room is a small chaise made to fit the space. The shaped legs were pre-bought, but the rest of this piece is entirely from scratch. I think I should have curved it out more to be wider at the back, but I still love it. It's upholsetered in a light blue silk dupion and the seats of the dining chairs have been recovered in the same silk to match.
In the front left corner is a three tiered dessert stand. Yes, I know the upper tiers are crooked and I will fix them. Each tier is made of a plaster ceiling rose. This gives the underside of each level a wonderful decorative feature. The flat tops of each will eventually be covered in a myriad of delectable desserts.
I still need to add a rug to the floor, something in a soft blue I think, and lots of food, cultery, glasses, etc, but would you care to dine in this room?
Next door in the Hall, not much has changed, except that the pieces of, well, junk that had been hanging around has been cleared out. The two tables and chair are all the furniture there will be in this room although I will be adding a feature in the middle of the floor that I'll build as part of the "furnishing" phase . . . . .
Working on furniture for the study has been a much harder task. There are about three essential items to fit in this room; a desk, a wing chair for reading and a free standing circular bookshelf. Using a sample chair, a round table and an assortment of desks and desk sided objects I have tried arranging and rearranging these items in the room and have come to the conclusion that they just won't fit. The problem is the desk. Once you add a desk, regardless of size, shape or position the room instantly looks awkward. Can you have a study/library without a desk? I'm thinking at the moment that I may have to!
One final piece of furniture for the week is this chest of drawers. I bought the kit from the very first doll, bear and miniature fair I ever attended. It was the only fair that I ever saw a good range of DIY items and the only time I have seen House of Miniatures kits available in Australia. If I knew how rare these things were, I'd have bought more way back then. As it is, this kit has been siting largely forgotten at the back of the cupboard since then. I found it while rummaging around in search of furniture for this house and thought it would be perfect for either the bedroom or the nursery (probably the latter).
Monday, July 30, 2012
Tasmanian Miniature Extravaganza 2012
Lorraine's stall is in the foreground with some of her hand dressed beds in the bottom left corner. This photo was taken at a fairly quiet time as it was much busier when I was there.
There were also some lovely roomboxes and houses on display. Here are a few:
| Brambly Hedge scene made by Jill Miller. |
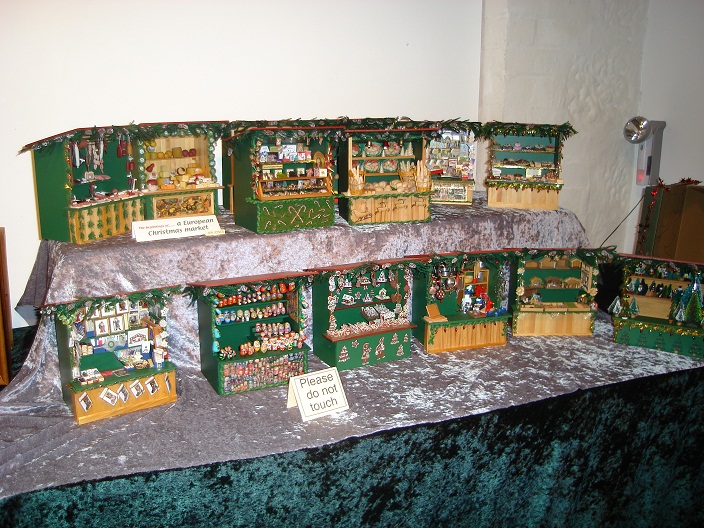
| A selection of Christmas themed stalls |
| 1/24th (1/2") scale Tudor houses |
| Close up of one of the Tudor houses, this one by Pauline Rice |
Aren't those Tudor houses gorgeous! I kept Tilli firmly buried in my pocket as I passed those; I had a feeling if she saw them she'd want something like them creating for her house. I did let her take a look at some of the 1/24th furniture on sale and she picked out this bowfront chest of drawers:
Dan was also riding in the same pocket and was disappointed not to find a new hat to replace the one that came with his suit but was crushed in the mail. In fact all three of us were a little disappointed with the items available at the fair this year. In previous years there were some stall holders with handmade items and some without internet shops meaning you could find items at the fair you hadn't seen before. This year, if you couldn't find it on the internet, it wasn't there. I did manage to collect a few things for the Georgian house though.
There are four Chipendale style chairs for the dining room . . . . and six plates to make six place settings on the dining room table. That's because I still need to find two carver chairs to match the side chairs. Or because I'll only have four place settings and have two plates spare depending on what I decide will look best. I also bought a range of copper items for the kitchen including pots and pans and utencils. In the Georgian era, tea was usually drunk out of small bowls or cups without handles the way it was served in the orient. The oriental style tea set I found is perfect.
Walking back accross Hobart to where I left the car (the only place I know to park for free in Hobart is a fair hike away from the venue) I passed this building and couldn't resist joining the tourists in taking a photo:
It's home to the Law Society and has a marvellously inspiring Georgian facade. I'd love to make it in miniature someday.
Back home, my own Georgian house is looking a lot less grand than the Law Society. In fact from behind it's positively a mess!
Yes, I've been getting wired. I still need to wire up a few wires into plugs and then I need to tidy this mess up, but once that's done I'll finally be able to do something with the outside of the house. Inside, I finally got to turn my fires on and see if my bead and glass paint embers worked. I'm glad to say that they do work, in fact I think they're better than many ready made fires.
| The Drawing room fire alight. |
| The Nursery fire alight. |
The Dining room now has it's two floor standing candlearbra installed in each back corner to illuminate the room. The remaining lights in the house have all been remade since last week's disasters. Instead of curving arms they have simple flat balsa wood supports fitted onto some prebought mirror frames.
The Bedroom has two double sconces. All these lights are made with newfangled bi-pin bulbs. They are so much more sleek and gracile than the old fashioned screw in kind.
The Nursery has three double sconces. These are the simplest in the house as the kids wouldn't have had the best of anything in their room.
A double and two singles for the Drawing room
A double sconce for the study, plus two singles on the bookcases not shown here.
A double wall sconce in the Hall plus a pait of candle sticks on the side table. There are also lights in the basment I haven't photographed. I'll show them to you next week.
When installing the lights I made one big mistake. Most of the fittings have more than one bulb, thus more than one pair of wires coming through the same hole in the back. By the time the wires are poking though a small hole it's impossible to tell which belongs to which bulb and when you try to wire a plug onto the end you don't know if you're attatching wires from the same bulb or different bulbs in the one plug. So a good tip is to mark the wires before installing the lights so you know what you're doing.
It's time for me to go back to putting plugs on the end of wires and trying to figure out why some of the bulbs already wired up aren't working. Then I need to finish the outside of the house, fix the covings, install a few skirting boards and I think I'm finally ready to start furnishing the house!
Labels:
1/12,
australia,
craft,
doll house,
dollhouse,
dolls house,
dollshouse,
mini
Subscribe to:
Posts (Atom)