A Randomly Selected Newspaper Headline:

The following is a randomly selected newspaper headline from many years ago:

Welcome to my blog. Please feel free to leave a comment. I assure you I always read and appreciate everything you have to say. Unfortunately, thanks to Blogger being, well . . . Blogger, I can not respond to comments nor leave any on your blogs. They simply disappear into the ether. Occasionally I will remember to respond in the next blog post I put up, but usually these good intentions slip my mind. So if you want to ask a question or get a response to any comments you may have please leave an email address or other contact method in your comment and I will get back to you.

I have also added a separate page to the blog for the Tower of Magic with a brief summary of all the rooms of the ToM in the one spot. The link is just below this and above the main body of the blog, or you can just click here.
Showing posts with label dollhouse. Show all posts

Tuesday, February 24, 2015

The Next Level


I have to confess . . .   When I figured out the number of steps in the castle a couple of weeks ago I said 25 steps by 5 floors, that's 100 steps.  I hope it doesn't take you as long as it did me to realise how very terribly wrong that little bit of simple mathematics is.  There are, of course, actually 125 steps.  At least I can be certain when I tell you the castle now has double the floors it had last week.


At least I seem to have managed to get the measurements right in building the castle, at least so far as the next floor sits on the basement and matches up with level of the door opening on the stair tower.


One mistake I did make was to put an arched ceiling in the basement dungeon.  I used toothpicks to make bars to secure the dungeon, but continuing the bars up to a curved ceiling and having them fit properly is not easy.  So at the moment anyone wanting to escape the dungeon only has to climb over the top of the bars.  In future I will have another go at sealing off this escape route either with bars or a solid piece of wall.


Above the dungeons are the castle kitchens.  The floors are tiled with pieces of orange EVA foam cut into squares and glued in place.  This was given a wash of brown paint to create a more terracotta tone and 'grouted' with a mix of pollyfiller, water and grey paint.  Under the arch on the left side of the room is an area separate to the kitchen that will probably a scullery or buttery.  The right side of the kitchen is where the kitchen proper will be.  The opening in the back wall is for the ovens.


On the opposite side of the castle I used a door kit from Petite Properties to add a door to the wall dividing the well room from the alchemists lair.  The door itself is quite effective but when you see it against one of the doorway arches I cut you'll notice it looks very short.  It looks even worse against a 48th sized person.


Working to scale, a 48th (1/4") person the equivalent of 6' tall should be about 1 1/2" tall, therefore a doorway should logically be at least that high too, preferably a little higher.  Yet the professionally made to scale door is no more than 1 1/4" high.  Set against my admittedly generous arches, this door really looks wrong.  Worse, I have five more of these doors to use higher up in the castle and they're all going to look silly too.  Up until now I've loved everything I've bought from Petite Properties but it seems items they sell as 48th scale aren't all quite 48th scale.


Above this dwarf door is a pretty swanky room with a smart red and black tiled floor and linenfold panelling look walls.  Like the kitchen, the floor tiles are cut from EVA foam, but this time laid closely enough not to need grout in a smart diamond pattern.  The panelling is just printed paper as is the fire surround and brick backing.  The wall on the right of the room is where the castle's front door will be located, making this room the castle's entry hall.  It will also be the armoury with displays of weaponry and seating for newly arrived guests waiting to be shown further into the castle.


Tuesday, November 12, 2013

Christmas Came Early

Last week the wonderful Lorraine of Fairy Meadow Miniatures sent me a message to let me know she was sending me a surprise.  I was thinking it was so generous of her to send maybe one or two small items.  Then the delivery guy showed up with this:


Once I'd picked my eyeballs up off the floor I opened up this massive parcel to find two boxes absolutely stuffed with wonderful things!


There were kits for all kinds of furniture and embroidered cushions, rugs, all maner of furniture (including the kitchen sink!) and so many little accessories.  There was a set of brass scales (of which Piers the Apothecary has been in dire need).  There were plates of food and ceramic jugs.  Even a wired outdoor light.  Every time I thought there couldn't possibly be anything else squeezed into the boxes something else new and exciting emerged.  There was probably enough in those boxes to furnish and accessorise an entire three story house!


I can't thank Lorraine enough for this bounty of wonderful and infinately useful items.  This is absolutely the best and most appreciated present I have received, possibly ever, but certainly since the Christmas I received a Magic Moves Barbie (hey, it takes a lot to top a doll whose arms move by themselves!  And there's a thought, how come no one makes a 1 /12th scale doll you can wire into the houses electrics so that when you switch on the lights the doll will start drinking tea or flipping the pages in a book?).


Even the empty boxes were enjoyed by Charlie who sat in them and proceeded to shred the cardboard.


Included was this package of books.  I have to admit my first thought on seeing them was 'Oh no, not more books!' having made so many over the past few weeks, but it didn't take long for an idea to form. . . .


I glued the books into a crazy stack and added the victorian cookbook stand that came free with the current Dolls House and Miniature Scene magazine to create this bookstand.  The book displayed on the stand was made from a free printie glued ontop of several layers of plain paper aged with some tea and cut to size which were in turn glued onto a piece of thin leather.


The bookstand only just fits into the Library now the rest of the furniture for the room has been made.


The canopied desk sits at the end of the centre row of shelves.  It has a sloped writing surface and plenty of shelves both above and below the writing slope to store such neccesities as bottles of ink and even more books.


Another open book made in the same way as the book on the stand sits on the writing slope.  Spare scrolls, books and a crystal ball have been piled on top of the canopy above the desk.


For the back corner of the room is this wing chair made from balsa wood with bought oak legs and upholstered with blue satin.  The celestial pattern on the fabric seemed perfect for a wizard's library, I just wish I could have srunk it down so you got more of the pattern on the chair.


To help reach those high shelves there is this set of library steps.  They are again balsa wood with a staircase spindle and some small brackets.


If this chair at the front of the room looks at all familiar, that's because I stole it from the Witch Shop; there were always too many chairs in the reading room anyway and I think the chair looks much more at home in the Library.


The firebox for the fireplace has been started, but still needs work.  The back is cardboard with a thin metal scrapbook decoration and polymer clay lion's head glued ontop.  The front is formed from wire mesh between two short turned posts.

Now you've come to the end of my blog for another week, please everyone (at least those of you in Australia) go and pay a visit to Fairy Meadow Miniatures.  You may not end up overwhelmed by freebies, but you certainly won't be disappointed by the service.

Monday, August 27, 2012

Still Switching . . . .


I've managed to make it through a couple of months without Blogger doing anything weird to me, so I guess I was overdue.  Today's mystery error is that the photos aren't loading properly.  Some are here in their entirety, some seem to be only partially present and no matter how often they are reloaded, they still aren't coming up.  I'll leave these faulty photos in the post, maybe you'll be able to see them properly even though I can't.


As you may be able to see, this week's focus was on the bedroom.  The bed itself is the sleigh bed that came out of the house before I started renovating it.  I added an overhead canopy draped with a puce coloured silk and an ivory pre-pleated fabric finished off with a few ribbon roses.  The frame of the canopy is a half circle of cardboard held up on a balsa wood stand.  The bed is covered in more of the silk overlaid with a wide lace.  I still need to make lots of pillows and cushions to finish the bed off.  On the side wall is the dressing table.  Again, this is all cardboard and balsa wood hidden under fabric.


 Next a small writing desk was made from more balsa wood, some prebought legs and the tops of some fancy toothpicks.  The final item made for the room was a "Duchess Brisee" a sort of chair and footstool all in one that was covered in gold silk.  (I still don't have any short legs, so it's currently being held up by my pot of Tacky Wax).  All of this, plus an old chest of drawers make the room look like this:


 But then it could look like this,  or this, or this: 


Okay, so you probably can't see what I mean, but let's just say that like in the Drawing Room last week, there are a number of ways I could move things around and I'm not sure yet which is best.  The decision is made harder by the fact that the desk also works well in the Study.  It fits in the corner by the door or along the "front" wall with the wing chair in the spot the desk isn't.


So, do I use the desk in the bedroom and make another the same size for the Study, or I not have a desk in the bedroom and just use this one in the Study?  Where will it go?  The wing chair (again, currently leggless) is another creation in balsa wood with a little foam padding for cushions and upholstered in a tapestry fabric. 


Hmmmm . . . . . . The styles and fashions of the Georgian era were really quite effeminate by modern standards, but the study was supposed to be the one room in the house that ws a little more "butch", instead it has a desk made for the "girly" bedroom and a chair covered in flowers!   Opps!


 I made a small sofa for the Drawing room to either replace the chaise or just add to the existing furniture, so I'm still rearranging things in here and trying some of the furniture out in other rooms too.

 The photos above and below here should be of the Hall.  I doubt you can see them though.  I did tell you I was going to add something else in the Hall and these photos should show you the start of it.  (If you can't see it here try clicking here to see it in my Flickr). It's a sedan chair and eventually, there will be a lady climbing out of it having just arrived for the dinner party being prepared in the Dining room.  It is huge and takes up a lot of the Hall, but as you can see from Dan's modelling, it really couldn't be any smaller than it is.

This week it's time to tackle the last completely unfurnished room in the house, the Nursery.  Then all I need to do is figure out which furniture is going in which room and whereabouts in that room it will be.


Monday, August 6, 2012

Outer Space

Thus far all the work on this house has been on the inside, the outside being left a patchwork of original plywood walls, polystyrene extensions, foamboard and paper mached newspaper.  Not at all a pretty sight.  All that changed (or at least began to change) this week.  The first step was to hide all the dodgy alternations under a layer of airdry clay.  After carefully smoothing the clay onto the wall it was given some sound whacks with a scrubbing brush to create a rough stone texture.  I then used the edge of a metal ruler to create the impression of stone blocks.


This was done to both sides of the main house as well as the sides of the basement.  If you're wondering why the front of ths house wasn't also done this way, it's because there won't be a front on this house.  The front from the original house won't cover the added basement, won't fit with the altered roofline and was more Victorian than Georgian so won't be used for this renovation.  I'll give the house a clear perspex front instead.


Once dry, the clay was painted in a creamy sandstoney shade.  The front edges and the nuisance pediment were also painted in the same colour.  Way back when I started work on this house I beat the bejezers out of the pediment with a hammer in an (unsuccessful) attempt to shift it.  Being lazy by nature, I hid the residual hammer marks, as well as some damage on the front wall edges, by adding some texture paste to the paint and just sort of "splodging" it on to create a slight texture that does wonders at hiding imperfections.  Everything could still use another coat of paint, but otherwise the outside of the house is looking remarkably better than it did.


 While waiting for the various stages of the outside work to dry, I spent some time in the kitchen.  The copper utencils I bought at the fair in Hobart last week have been hung above the oven and a high shelf for those rarely used items has gone up on the right side wall.


The table is from the pre-renovation Dawncrest castle's kitchen.  It's a bit basic, but fits the space quite well, I just need to cover up that spot of white paint.  The ceiling light is another of Dawncrest's leftovers.  Technically, a Georgian era kitchen would probably not have a shiny brass ceiling fixture, but again being lazy, it was much simpler to add a single ceiling light than to try and conceal the wires for various wall sconces and handheld candle lamps.  Plus I already had the light and the basement is the only level of the house where the ceilings are high enough to use ceiling lights. 


 Of course, all the lights in the basement were added last week when I did the lights for the main house, but I still can't show you the effect with them turned on as the basement is currently on one side of the room, the main house is on the other so I can't plug the basment lights into the powerboard on the main house.  As soon as the final coat of paint is on (and dry) I can stack the house onto the basement and leave it there permenantly and finally show you the full effect of the lights.  With any luck by next week I will also be able to show you the fully built and decorated house and will have officially moved onto the next stage; furnishing!

Monday, July 30, 2012

Tasmanian Miniature Extravaganza 2012

Saturday and Sunday saw the bi-annual Tasmanian Miniature Extravaganza held in Hobart.  Despite the grandiose name, it is just a fair like any other and the only dedicated miniature fair held in the state.  All the main miniatures shops in Australia had stalls there, including Lorraine from Fairy Meadow Miniatures who hopefully won't be mad at me for "borrowing" this photo from her facebook page:


Lorraine's stall is in the foreground with some of her hand dressed beds in the bottom left corner.  This photo was taken at a fairly quiet time as it was much busier when I was there.

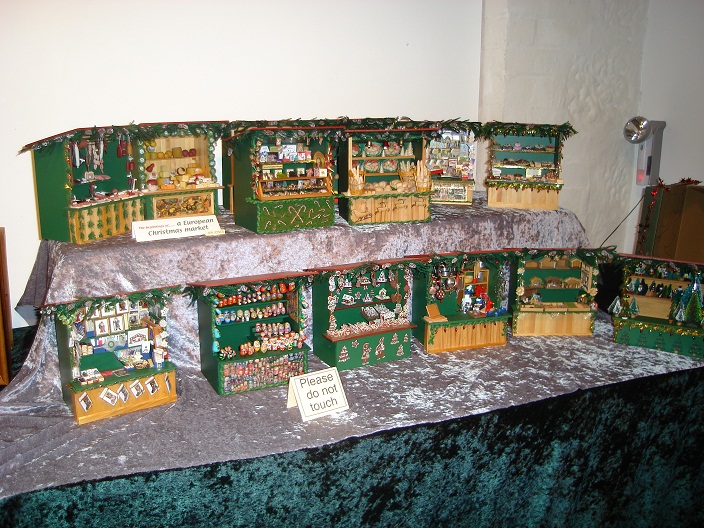
There were also some lovely roomboxes and houses on display.  Here are a few:

Brambly Hedge scene made by Jill Miller.

A selection of Christmas themed stalls

1/24th (1/2") scale Tudor houses

Close up of one of the Tudor houses, this one by Pauline Rice

Aren't those Tudor houses gorgeous!  I kept Tilli firmly buried in my pocket as I passed those; I had a feeling if she saw them she'd want something like them creating for her house.  I did let her take a look at some of the 1/24th furniture on sale and she picked out this bowfront chest of drawers:


Dan was also riding in the same pocket and was disappointed not to find a new hat to replace the one that came with his suit but was crushed in the mail.  In fact all three of us were a little disappointed with the items available at the fair this year.  In previous years there were some stall holders with handmade items and some without internet shops meaning you could find items at the fair you hadn't seen before.  This year, if you couldn't find it on the internet, it wasn't there.  I did manage to collect a few things for the Georgian house though.


 There are four Chipendale style chairs for the dining room . . . . and six plates to make six place settings on the dining room table.  That's because I still need to find two carver chairs to match the side chairs.  Or because I'll only have four place settings and have two plates spare depending on what I decide will look best.  I also bought a range of copper items for the kitchen including pots and pans and utencils.  In the Georgian era, tea was usually drunk out of small bowls or cups without handles the way it was served in the orient.  The oriental style tea set I found is perfect.

Walking back accross Hobart to where I left the car (the only place I know to park for free in Hobart is a fair hike away from the venue) I passed this building and couldn't resist joining the tourists in taking a photo:


It's home to the Law Society and has a marvellously inspiring Georgian facade.   I'd love to make it in miniature someday.


Back home, my own Georgian house is looking a lot less grand than the Law Society.  In fact from behind it's positively a mess!


Yes, I've been getting wired.  I still need to wire up a few wires into plugs and then I need to tidy this mess up, but once that's done I'll finally be able to do something with the outside of the house.  Inside, I finally got to turn my fires on and see if my bead and glass paint embers worked.  I'm glad to say that they do work, in fact I think they're better than many ready made fires.

The Drawing room fire alight.
Not only do the fires glow, they flicker too.  Well, actually it's more of a flash than a flicker but it's still a great effect.  Can you blog a video?  I'll have to see if you can so you can see the flicker/flash yourselves.

The Nursery fire alight.


 The Dining room now has it's two floor standing candlearbra installed in each back corner to illuminate the room.  The remaining lights in the house have all been remade since last week's disasters.  Instead of curving arms they have simple flat balsa wood supports fitted onto some prebought mirror frames.


The Bedroom has two double sconces.  All these lights are made with newfangled bi-pin bulbs.  They are so much more sleek and gracile than the old fashioned screw in kind.


The Nursery has three double sconces. These are the simplest in the house as the kids wouldn't have had the best of anything in their room.


A double and two singles for the Drawing room


A double sconce for the study, plus two singles on the bookcases not shown here.


A double wall sconce in the Hall plus a pait of candle sticks on the side table.  There are also lights in the basment I haven't photographed.  I'll show them to you next week. 

When installing the lights I made one big mistake.  Most of the fittings have more than one bulb, thus more than one pair of wires coming through the same hole in the back.  By the time the wires are poking though a small hole it's impossible to tell which belongs to which bulb and when you try to wire a plug onto the end you don't know if you're attatching wires from the same bulb or different bulbs in the one plug.  So a good tip is to mark the wires before installing the lights so you know what you're doing.

It's time for me to go back to putting plugs on the end of wires and trying to figure out why some of the bulbs already wired up aren't working.  Then I need to finish the outside of the house, fix the covings, install a few skirting boards and I think I'm finally ready to start furnishing the house!