A Randomly Selected Newspaper Headline:

The following is a randomly selected newspaper headline from many years ago:

Welcome to my blog. Please feel free to leave a comment. I assure you I always read and appreciate everything you have to say. Unfortunately, thanks to Blogger being, well . . . Blogger, I can not respond to comments nor leave any on your blogs. They simply disappear into the ether. Occasionally I will remember to respond in the next blog post I put up, but usually these good intentions slip my mind. So if you want to ask a question or get a response to any comments you may have please leave an email address or other contact method in your comment and I will get back to you.

I have also added a separate page to the blog for the Tower of Magic with a brief summary of all the rooms of the ToM in the one spot. The link is just below this and above the main body of the blog, or you can just click here.
Showing posts with label history. Show all posts

Monday, August 6, 2012

Outer Space

Thus far all the work on this house has been on the inside, the outside being left a patchwork of original plywood walls, polystyrene extensions, foamboard and paper mached newspaper.  Not at all a pretty sight.  All that changed (or at least began to change) this week.  The first step was to hide all the dodgy alternations under a layer of airdry clay.  After carefully smoothing the clay onto the wall it was given some sound whacks with a scrubbing brush to create a rough stone texture.  I then used the edge of a metal ruler to create the impression of stone blocks.


This was done to both sides of the main house as well as the sides of the basement.  If you're wondering why the front of ths house wasn't also done this way, it's because there won't be a front on this house.  The front from the original house won't cover the added basement, won't fit with the altered roofline and was more Victorian than Georgian so won't be used for this renovation.  I'll give the house a clear perspex front instead.


Once dry, the clay was painted in a creamy sandstoney shade.  The front edges and the nuisance pediment were also painted in the same colour.  Way back when I started work on this house I beat the bejezers out of the pediment with a hammer in an (unsuccessful) attempt to shift it.  Being lazy by nature, I hid the residual hammer marks, as well as some damage on the front wall edges, by adding some texture paste to the paint and just sort of "splodging" it on to create a slight texture that does wonders at hiding imperfections.  Everything could still use another coat of paint, but otherwise the outside of the house is looking remarkably better than it did.


 While waiting for the various stages of the outside work to dry, I spent some time in the kitchen.  The copper utencils I bought at the fair in Hobart last week have been hung above the oven and a high shelf for those rarely used items has gone up on the right side wall.


The table is from the pre-renovation Dawncrest castle's kitchen.  It's a bit basic, but fits the space quite well, I just need to cover up that spot of white paint.  The ceiling light is another of Dawncrest's leftovers.  Technically, a Georgian era kitchen would probably not have a shiny brass ceiling fixture, but again being lazy, it was much simpler to add a single ceiling light than to try and conceal the wires for various wall sconces and handheld candle lamps.  Plus I already had the light and the basement is the only level of the house where the ceilings are high enough to use ceiling lights. 


 Of course, all the lights in the basement were added last week when I did the lights for the main house, but I still can't show you the effect with them turned on as the basement is currently on one side of the room, the main house is on the other so I can't plug the basment lights into the powerboard on the main house.  As soon as the final coat of paint is on (and dry) I can stack the house onto the basement and leave it there permenantly and finally show you the full effect of the lights.  With any luck by next week I will also be able to show you the fully built and decorated house and will have officially moved onto the next stage; furnishing!

Monday, May 14, 2012

The Mummy Returns


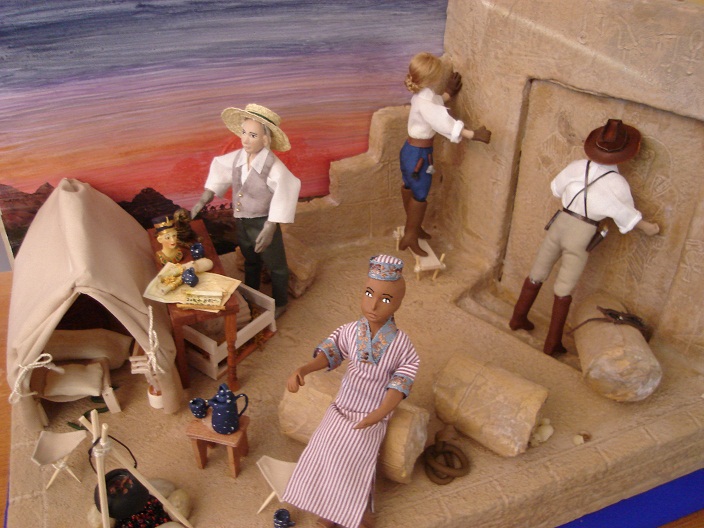
Another week, another pair of pilars.  These two are definately an improvement over the originals, nowhere near as lumpy and uneven . . . . . It's just too bad some idiot painted them in a colour scheme that works best within circus tents.  And the bullseye pattern on the bases is just too much.  But guess what?  I don't know what other colours would look better, so for the time being at least they are staying as they are.  The area over the door is decorated with a fridge magnet depecting an Egyptian style head.  On the whole, the inside space of the Dig Site just hasn't cooperated or gone to plan at all.  I should have been less ambitious and just done an outside scene and skipped the inside bit.


On the plus side though, Kikerikotep (just call him Kiki, it's easier) has turned out wonderfully.  Since last week he's had his wrappings "dirtied" up a little more through the application of a couple of layers of brown paint that had been watered down a little.  Somehow he looks more cheerful than menacing so maybe he has those red eyes not because he possesses some sort of evil power but simply because he's been awake for the past two thousand years.


Right outside the door, Wil now holds a lantern in one hand and a pistol in the other, ready to peer through the hole he's chipped in the door and discover what lies within.  The first thing he'll see is Kiki . . . good thing he's got his gun ready then?  His lantern is a piece of acetate sheet cut into a cross shape and then folded to create a box.  Faux leadlighting outliner covers the corner joints as well as the top and bottom to create the impression of a metal structure/frame.  A loop of black wire pushed into the faux lead while it was still wet creates a handle while a red glass seed bead acts as a flame within.


 The Site is now more or less finished.  The space between Wil, Agnes and Aldo seems a little empty, as does the space between the first two sections of pilar, but I can't think what to put there


 I seem to have managed to forget to take agood photo of it, but one of the finishing touches I've added are logs on the fire.  The logs are bits of real firewood scrounged from the bottom of the woodpile.  I held them over a candle to char them a little then added them to the fire.  In the past I've used black paint to give logs a charred, burned look, but the real thing looks so much more convincing.


 All the lose parts (tools, snakes, arefeacts, cups, etc) have been fixed in place with Tacky Wax.  You may notice Rashid now has hair.  I realised one of the reasons he didn't look right was that he didn't have ears!  (oops!)  That solved the to wig or not to wig debate as I had to cover up his lace of auditory organs once I'd discovered it.  His hair turned out messy and I'm still not entirely happy with him.


 A cheeky little bird has perched atop the bust of Nefertiti.  Let's hope he keeps his bowels under control for the duration of his stay on the priceless artefact.


The entire scene is covered by a clear perspex cover.  No sooner had I glued the pieces together to create said case than a cat decided it looked like a good place to stretch out for a while.  At least now I know the cover is Strong.


So, now do I start work on the Georgian at last?


Monday, May 7, 2012

Show Me The Mummy!


After a week of wrapping, stuffing, stitching and glueing the people of the Dig Site are finished!  All four have head & shoulders, lower arms and lower legs made from polymer clay connected by a wire armature (frame or skeleton).  Their 'bodies' are made of foam wrapped around the wire armature with a little extra polyester fill stuffing down their trousers to give them more shapely legs.  They all wear clothes made out of various cotton fabrics.


This is Rashid.  He's the team's local guide and translator.  Yes, his head is too big.  I was going to leave him bald, but I may go back and give him some hair to see if this makes his head look less out of proporition.  His sandals are made from leather while his clothing is made from a cotton fabric.


Aldo is the most experienced member of the team with a lifetime of treasure hunting under his belt.  His hat is absoulutely the best one I've ever made and I'm now thinking that if I ever get around to making that dress shop it will have to have an extensive millinery section.


Agnes is the only woman of the group and perhaps the most keen to get to work.  She even wears some tools on her belt to help her excavate the ruins.  Her wig is a pre-bought one made by Heidi Ott.


Wil, short for William, is the leader of the group.  You saw his hat and gun last week; they were bought online.  His belt, braces and holsters are real leather. His shirt, like Agnes', has seed bead buttons.


And finally, there is one more "person" at the Dig Site. . . . . 


The Mummy, I call him Kikkerikotep, is a 6" high plastic skeleton wrapped in strips of calico.  Once he was fully wrapped he was painted with a mix of glue, water and brown chalk paint to fix the wrappings in place and start to give them an aged look.  The wrappings will still need a little more aging before he's finished.  His eyes are red glass seed beads.


You may have noticed that I've ripped out the columns by the door.  I will have another go at making some new columns.  Once I've done that and cleaned up the mess I've made of the back wall, the Dig Site will be very close to finished.

Monday, January 31, 2011

Dancing Dragon Inn - Week 21

A few finishing touches were added to the Inn this week. In the "low" bedroom a tapestry was added on the left hand wall, a faux hide mat and a bolster cushion were added to the top of the blanket box, thus elimintating the naked look of this wall.
On the top floor, I added what must be the ultimate cheat in faux windows - closed curtains. I had some extra pleated fabric left from the dividing curtains in the room and glued then to the back wall to look like curtains drawn over a window. This helped correct the naked look of the back wall, but I think it still needs something more back there before it really looks finished. Also, welcome to follower number 75, Fabiola. You can find her blog here: http://fabiolamiominimondo.blogspot.com/

Tuesday, January 25, 2011

Dancing Dragon Inn - Week 20

I have two things to say before starting this week's post.  Firstly, a warm welcome to the newest followers, Kelly and Stitcher.  I can't find a blog link for either of you, but if you have one and would like it added here, just let me know.  Secondly, don't forget there is only one week to go in my Giveaway.  Click on the picture to the right to find out how to enter.

At first I thought I'd dressed enough dolls for a few weeks. Then I reconsidered and decided to go ahead and dress the seven remaining dolls the Inn needed. Like the previous dolls, this batch was supposed to have a Tudor look to them. Mostly they don't. Again something went wrong and the men look more like they should be of a later period. Oh well, at least they look at home in the Inn.

With everybody dressed, I played around positioning and re-positioning them in the Inn until I was happy where everyone was and then played around with various accessories for the people to use. In the tavern I arranged the foodstuffs I made previously and Tacky Waxed them to the tables when I was happy. The beer mugs were all filled with foaming ale (i.e. scenic water pumped full of bubbles) and some eating utencils were pulled out of storage to finish the tables off. much the same treatment was given to the table in the "low" bedroom on the next floor except this table was much more messy, holding not only good and beer but also maps and papers.

Down on ground level I finally made a market stall out of balsa wood scraps and loaded it with a variety of goods including apples (or perhaps they're tomatoes, it's hard to tell as I made them from polymer clay sometime previously), candles, flowers and bananas. Yep, bananas. Not very tudory I know but I made them ages ago and never found a good place to use them and I had an empty spot at the end of the stall . . . . and after all it is a fantasy inn. Basically anything hanging about in my box of miscellanious accessories ended up on the stall.

One or two other small tasks this week include adding handles to the doors. These were made when I had the polymer clay out last week and this week I finally got around to glueing them onto the doors. Also going back to last week are the signs for the Inn. I'm pretty sure I forgot to mention these last time. They are very simple white cardboard rectangles surrounded by a basic balsa wood frame and decorated with a dragon made from faux leadlight paint. The dragon is the same as the one on the front window but in different sizes. There is no writing on the signs because in a society where most people can't read and write a written sign isn't much use.

The Inn is almost finished now. There are a few little things to tend to yet. The market seller at the very least needs a purse to keep her money in. The others may or may not end up with them. The chest in the low bedroom needs some "junk" spread out on top of it, or I might replace it with a different piece of furniture. That's something that needs thinking about. The back wall of the top floor rooms needs something too, tapestries? some exposed brickwork? more beams? They need something else anyway. 

If you have any suggestions or can see anything about the Inn you think is still in need of attention, please feel free to let me know.

I got an email this morning to let me know that my Cumberland Castle kit has been posted! I should be seeing it early next week. As the Inn has been nearing completion I've spent some time flicking through old dollshouse magazines looking to ideas to use in the castle and the other two kits I already have. I found a review of the Cumberland Castle kit from when it was first released in one of them. At the top of the page I'd made some notes and apparently calculated that the kit would cost me $871.00, plus postage from England which would have been about as much again. Now five years later I've finally bought one and thanks to changes in the exchange rate and to Fairy Meadow Miniatures shipping them into Australia it cost me $635 including postage. I probably would have bought the kit from FMM whatever they charged for it, but knowing I would have paid more in times past makes parting with that much money a little easier. Now all I need is FMM to get a Market Cross kit and I'll have all the Dollshouse Emporium kits on my all time most wanted list. At least all the kits DHE still make, they always seem to discontinue the best ones!
 

Tuesday, January 18, 2011

Dancing Dragon Inn - Week 19

  
Firstly, I'd like to welcome the four newest followers to the blog. They are Drora Hed and Eli en Karina, neither of whom appear to have blogs of their own and Susi of Mini Eden and Glenda of Peppercorn Miniatures. Thank you all for choosing to follow my blog and extra thanks to Glenda for her excellent instructions in last April's Dolls House and Miniature Scene, they came in very handy!

After making a start on populating the Inn last week I made a big push this week to get as many people as I could finished. I now have thirteen people dressed, wigged and more or less finished. Some of the dolls vaguely have a tudor look about their clothes, but "vaguely" is as close as they come to any type of authenticity, it is after all a fantasy Inn. In the building and decoration of the Inn, the fantasy aspect wasn't very strong, I was planning to step it up with the people and accessories. So far, this plan has had only minimal success as most of the people are clothed very mundanely. The exceptions are the wizard and his wife for the tavern and the oriental traveller for . . . somewhere in the Inn. The oriental fellow is very striking in vivid red and brocade and is definately not a lowly peasant. Perhaps he should be staying in the high, ie most lavishly expensive, bedroom? As for the wizard and witch, they are very pink-and-purple and decidely not quite right. They either need stripping and re-dressing or perhaps just sitting in the back corner of the tavern where they won't be so noticable. There are still more people needed for the Inn - about eight more. The extra dolls I need arrived in the mail this morning, so I can make a start on the remaining dolls anytime, though after one mamoth sewing effort I may wait until next week to start on them.

Being rather tired of working with fabrics, I sepnt Sunday afternoon working with something completely different - polymer clay. I made some basic door handles, a half dozen ale mugs, some stew, a mass of small pies, one large pie, pieces of bread and a loaf of bread, some jugs and a jug and basin for the washstand in the top floor bedroom. Needless to say, now I'm a bit fed up of clay too. I was going to make some fish for the stream too, but discovered fish are harder to make than you'd expect. I guess my fishing urchin is going to have to go hungry because there are still no fish for the stream. That's okay, I haven't made him a fishing line yet anyway.

The list of major tasks still needing completion is shrinking. It's down to fitting out the downstairs shop, making a stall for the market space and dressing about eight more people. The rest of the "to do" list is small fiddly bits and pieces like making fish and a fishing pole, trying the curtain over the tavern window back, making beer/ale, etc. Hey, maybe I can be finished by the end of January after all?
 

And don't forget to enter my giveaway - Entries close on 31st January.

Tuesday, January 11, 2011

Dancing Dragon Inn - Week 18


 It was one of those weeks were there were lots of bit jobs done, but nothing really seems to have gotten done.  I started the week finishing the furniture for the top floor.  In the left hand room I added feet in the form of wooden beads to a chunky wooden shelf unit, stained it and filled it with linens and other bits.  This fills in the end wall between the two beds.  I rennovated an old desk to create the washstand by the doorway by removing the upper shelf and staining it to match the shelves.


Because people in Inns often have luggage, I made four simple sack like drawstring bags to scatter about the place.  As I had fabric out to do this, I figured I might as well start dressing some of the people for the Inn.  So far there is a barman, sorcerous parton, lady, kidnapped princess and a pauper in the process of being dressed, but none of them are finished yet.  Most only need their wigs and head gear seeing to and a bit of trim on their clothes.  There are a lot more people yet to do for the Inn.  I had thought I might set the goal of having the Inn finished by the end of January so I would be free to play with Cumberland Castle, the Retreat and Stratford B. kits, but having started on the people and remembered how slow it can be to dress them, I really doubt this will happen.

I made the fire for the tavern fireplace from some pre-bought andirons, a couple of twigs, some beads and pva glue diluted in water.  The andirons and twigs were covered in dabs of black paint (for soot/charcoal) and the twigs were glued in place on the andirons.  Some black and red seed beads were mixed in diluted pva glue and tipped over and pushed under the andirons and logs to make embers/coals.  Once the glue is totally dry, which will take several days, the whole lot can be peeled off the plastic sheet it is stilling on and installed in the fireplace.

At long last the doors have hinges.  They were made from faux leadlighting outliner.  I drew a hinge shape on some paper and slipped it into a palastic pocket.  I then traced the design with the outliner and filled it in, moved the paper and repeated the process until I had enough hinges.  Once dry these were simply peeled of and stuck onto the doors.

Finally, while I'm discussing faux leadlighting, here are some photos I don't think I've shown you of a couple of faux leadlighting projects I worked on over the Christmas break.  These aren't in miniature and both designs came from the book "Fairies and Fantasy - Learn to paint watercolour" by Meredith Dillman.  The finished pieces are both mounted on mirror, which is hard to take a good photo of, so please ignore the reflections you can see.

Wednesday, January 5, 2011

Dancing Dragon Inn - Weeks 16 & 17

With time of work between Christmas and New Year, I finally had the time to crack on with the Inn.  Now that I have a Cumberland Castle kit on order (to arrive by the end of January) I have new motivation to complete the Inn so I can clear the way to work on  C. Castle, the Retreat and Stratford Bakery.  I decided that the Inn is going to be finished before starting any of the others and knowing that if I dry built the two kits I already have as I planned to do over Christmas, I would end up not putting them away again.  So for now they remain safely tucked away in a cupboard.

Despite there still being some work to do on the exterior of the Inn, I started the Christmas break going back to the interior.  Okay, so I started the Christmas break by cooking too much, eating too much and trying to act enthusiastic about the present my sister gave me, but all that is another story entirely.  The insides of the Inn were given their basic decor as I built the structure, so the next task was to start on adding furniture.

In the "high" bedroom I has already made a start on the bed and it only needed dressing with curtains, bedspread and pillows.  The pale green fabric used is some kind of satin and not the most practical choice for an Inn, but it is a perfect match for the green leaves on the wallpaper frieze and was the only fabric I could find that was a good colour for the room.  I used the king of sewing machine that has pre-programed cards of embroidery designs to add the design to the centre of the bedspread.  This was plan B.  Plan A had been to use a design from a book of iron on transfers to hand embroider the bedspread all over.  It would have taken longer, but looked better in the finish.  The reason I didn't do this is that when I tried to iron-on the design, it went right through the fabric and ended up on the fabric layer beneath.  Luckily I had a piece of scrap under the good fabric or I'd have had a mess on the ironing board.  I tried this several times, the the design always passed straight through the fabric.  I guess some things just weren't meant to be.


 On the top floor of the Inn are the cheaper rooms.  Here guests don't get a room to themselves but a bed separated from the next by only a curtain.  The right hand top room has four beds made of balsa wood and cardboard covered in mis-matched bedding.  Curtains strung between the beds can be drawn to give each bed an amount of privacy.  Unfortunaly when I made the curtains I forgot to allow for the slope of the roofline, so the section of curtain against the roof does hang a little peculiarly.  Two of the four beds are neatly made ready for the next guest, one has been left in disarray by it's last occupant and the fourth still has it's occupant sleeping within it.  To create a body shape in the bed I used a cheap plastic skeleton rather than a more expensive doll or to try and cobble together something belivable out of scraps.  Some felting wool glued to his head and the bedcovers completely hide the skeleton . . .


. . . unless you turn the bed around and look from the other side.  As the far side of the bed can't be seen when the be is in position this isn't a problem.  The left hand room has three beds with a better quality of manchester, but no privacy curtains.  The beds are covered in a printed cotton fabric.  The white table in the photos will be replaced with a proper wash stand or perhaps just renovated to suit.

Downstairs in the tavern there are now a range of chairs and tables.  The bench seats and rectangular table were made from the same templates I created for the table in the "Dragon's Maiden" kitchen while the round tables are just circles of balsa wood with sticks for legs.  The chairs are popsicle sticks with one end cut off and glued around a circular balsa wood seat.

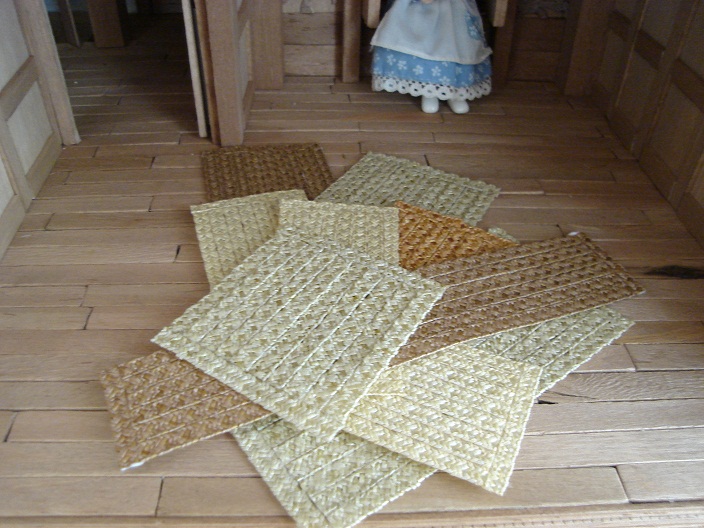
You may have noticed some rush mats on the floors in some of the photos.  These were made with lots of straw braid and the instructions in the April 2010 edition of Dolls House and Miniature Scene magazine, written by Glenda of Peppercorn Miniatures.  At first, I really didn't think the process was going to work fo me - too hard not to get glue everywhere I didn't want it - but after the first couple of mats something clicked and I rather obessively kept working until I ran out of straw.  I will definately be doing this again, it was a lot of fun and the results look fabulous!  (well, at least that's what I think).

 The last major piece of work made for the Inn are the candles sconces and candles. The sconces are simply more bits of balsa wood cut to shape and glued together to create a back board, a shelf and a bracket. The candles are made by dripping wax from a 1:1 candle into cut up drinking straws and poking bits of cotton in the top to create wicks. Once the wax is cool, the candles are removed from the straws and the base of the candle is gently remelted then quickly pressed onto the scone to fix it in place. A little more wax from the 1:1 candle is then dripped over the top of the candle to give the effect of used drippy candles. If you want to try this, it does help if you happen to have asbestos fingers. The finished scones were then glued onto walls all over the Inn.

In a few of the photo you'll see some people trying the Inn for size. They will eventually be re-dressed, or in some cases just dressed, in something more appropriate to the setting.

Finally, I did promise before Christmas that I would be holding a giveaway in the new year.  The items for this have been made and are ready to go, so please keep an eye on this blog as I will be adding a new post offically announcing the start of teh giveaway in the next few days.