A Randomly Selected Newspaper Headline:

The following is a randomly selected newspaper headline from many years ago:

Welcome to my blog. Please feel free to leave a comment. I assure you I always read and appreciate everything you have to say. Unfortunately, thanks to Blogger being, well . . . Blogger, I can not respond to comments nor leave any on your blogs. They simply disappear into the ether. Occasionally I will remember to respond in the next blog post I put up, but usually these good intentions slip my mind. So if you want to ask a question or get a response to any comments you may have please leave an email address or other contact method in your comment and I will get back to you.

I have also added a separate page to the blog for the Tower of Magic with a brief summary of all the rooms of the ToM in the one spot. The link is just below this and above the main body of the blog, or you can just click here.
Showing posts with label doll house miniature. Show all posts

Tuesday, February 1, 2011

Welcome to Castle Starcaster

Many months ago I had a plan; finish the Dancing Dragon Inn and then start work on a new project called the Tower of Magic (or ToM for short). The basic concept of the ToM was inspired by Heather's Wizard Lair which you can see here on her blog http://thislittledollhouse.blogspot.com/2010/06/wizards-lair-finally-furnished.html.  The original idea was to be simple, a series of roomboxes stacked one ontop of the other, each fractionally smaller than the last.  As for what the ToM would contain, I had half a dozen different ideas all going in different directions.

Then Fairy Meadow Miniatures added a Cumberland Castle kit to their website.

Cumberland is a kit I'd always wanted and the moment I saw it on their site, I knew it would be perfect to house the ToM.  I had just bought two other kits, but on the basis that I knew what to do with the Castle, had always wanted one and might never get the chance to buy one again I forged ahead and bought the castle kit.

It arrived early on Friday morning, so the weekend was spent assembling the kit.  First of all I unpacked the four boxes and checked that all the parts were present and undamaged, then it was time to do a dry build.  Despite it's size, the castle is pretty simple and was easy to assemble.  With the castle put together I pulled out some of the furniture I'd been collecting for the ToM (most of it made by Angela Downton and bought from her on ebay.  No, I'm not sharing her username as I can't afford the competition) and arranged it in the castle to see how it looked and how it fitted in the spaces.  Next I got out some lego blocks and made a very rough chimney breast to see how the furniture looked with a fireplace in the rooms.  Normally, I end up deciding to skip the fireplace because there just isn't room for it.  This time I am making sure to include all the fireplaces a draughty old castle needs.

One thing that disappoints me about Cumberland Castle is that the kit has no stairs.  One thing that came as a total surprise is that the East Wing extension comes complete with fake doors to make it look like there is access to this optional extension to the castle.  I spent some time considering different placements of the fake doors and where to add stairs while the castle was dry built and when I had a final decision, I marked the places I needed to cut holes for stairs and one extra "real" doorway before disassembling the castle.  I then made the appropriate cuts and looking at the piles of MDF parts scattered everywhere decided to permanently assemble the castle, then decorate.  I I tried to work the other way around, something would have ended up being damaged by falling, crushing or being stepped on.  So I assembled the castle yet again, this time with glue and then gave the whole thing a coat of sealer.

Now I had just one problem.  I could no longer refer to this project as the ToM as it was a castle and not a Tower, so just what did I call it?  I had no idea until the name popped into my head while driving home yesterday.  Castle Starcaster.  Many years ago when I was in high school and thus had absolutely nothing to do all day, everyday, except keep an eye out for stray spitballs and listen to the boys in the back row and their perpetual argument which consisted of two words (one side said "Ford", the other responed with "Holden" all day, everyday for four years) I passed the time by creating stories.  In one Zoran Starcaster was a magician, which is where the name for the castle originally comes from.  Unfortunately, Zoran never had a castle of his own and worse was one of the bad guys which makes me a little heasitant to name a castle after him. 

But once the name popped in, it wouldn't go away and I like it.  So Castle Starcaster it is, whatever it's connotations.

Monday, January 31, 2011

Dancing Dragon Inn - Week 21

A few finishing touches were added to the Inn this week. In the "low" bedroom a tapestry was added on the left hand wall, a faux hide mat and a bolster cushion were added to the top of the blanket box, thus elimintating the naked look of this wall.
On the top floor, I added what must be the ultimate cheat in faux windows - closed curtains. I had some extra pleated fabric left from the dividing curtains in the room and glued then to the back wall to look like curtains drawn over a window. This helped correct the naked look of the back wall, but I think it still needs something more back there before it really looks finished. Also, welcome to follower number 75, Fabiola. You can find her blog here: http://fabiolamiominimondo.blogspot.com/

Tuesday, January 18, 2011

Dancing Dragon Inn - Week 19

  
Firstly, I'd like to welcome the four newest followers to the blog. They are Drora Hed and Eli en Karina, neither of whom appear to have blogs of their own and Susi of Mini Eden and Glenda of Peppercorn Miniatures. Thank you all for choosing to follow my blog and extra thanks to Glenda for her excellent instructions in last April's Dolls House and Miniature Scene, they came in very handy!

After making a start on populating the Inn last week I made a big push this week to get as many people as I could finished. I now have thirteen people dressed, wigged and more or less finished. Some of the dolls vaguely have a tudor look about their clothes, but "vaguely" is as close as they come to any type of authenticity, it is after all a fantasy Inn. In the building and decoration of the Inn, the fantasy aspect wasn't very strong, I was planning to step it up with the people and accessories. So far, this plan has had only minimal success as most of the people are clothed very mundanely. The exceptions are the wizard and his wife for the tavern and the oriental traveller for . . . somewhere in the Inn. The oriental fellow is very striking in vivid red and brocade and is definately not a lowly peasant. Perhaps he should be staying in the high, ie most lavishly expensive, bedroom? As for the wizard and witch, they are very pink-and-purple and decidely not quite right. They either need stripping and re-dressing or perhaps just sitting in the back corner of the tavern where they won't be so noticable. There are still more people needed for the Inn - about eight more. The extra dolls I need arrived in the mail this morning, so I can make a start on the remaining dolls anytime, though after one mamoth sewing effort I may wait until next week to start on them.

Being rather tired of working with fabrics, I sepnt Sunday afternoon working with something completely different - polymer clay. I made some basic door handles, a half dozen ale mugs, some stew, a mass of small pies, one large pie, pieces of bread and a loaf of bread, some jugs and a jug and basin for the washstand in the top floor bedroom. Needless to say, now I'm a bit fed up of clay too. I was going to make some fish for the stream too, but discovered fish are harder to make than you'd expect. I guess my fishing urchin is going to have to go hungry because there are still no fish for the stream. That's okay, I haven't made him a fishing line yet anyway.

The list of major tasks still needing completion is shrinking. It's down to fitting out the downstairs shop, making a stall for the market space and dressing about eight more people. The rest of the "to do" list is small fiddly bits and pieces like making fish and a fishing pole, trying the curtain over the tavern window back, making beer/ale, etc. Hey, maybe I can be finished by the end of January after all?
 

And don't forget to enter my giveaway - Entries close on 31st January.

Tuesday, January 11, 2011

Dancing Dragon Inn - Week 18


 It was one of those weeks were there were lots of bit jobs done, but nothing really seems to have gotten done.  I started the week finishing the furniture for the top floor.  In the left hand room I added feet in the form of wooden beads to a chunky wooden shelf unit, stained it and filled it with linens and other bits.  This fills in the end wall between the two beds.  I rennovated an old desk to create the washstand by the doorway by removing the upper shelf and staining it to match the shelves.


Because people in Inns often have luggage, I made four simple sack like drawstring bags to scatter about the place.  As I had fabric out to do this, I figured I might as well start dressing some of the people for the Inn.  So far there is a barman, sorcerous parton, lady, kidnapped princess and a pauper in the process of being dressed, but none of them are finished yet.  Most only need their wigs and head gear seeing to and a bit of trim on their clothes.  There are a lot more people yet to do for the Inn.  I had thought I might set the goal of having the Inn finished by the end of January so I would be free to play with Cumberland Castle, the Retreat and Stratford B. kits, but having started on the people and remembered how slow it can be to dress them, I really doubt this will happen.

I made the fire for the tavern fireplace from some pre-bought andirons, a couple of twigs, some beads and pva glue diluted in water.  The andirons and twigs were covered in dabs of black paint (for soot/charcoal) and the twigs were glued in place on the andirons.  Some black and red seed beads were mixed in diluted pva glue and tipped over and pushed under the andirons and logs to make embers/coals.  Once the glue is totally dry, which will take several days, the whole lot can be peeled off the plastic sheet it is stilling on and installed in the fireplace.

At long last the doors have hinges.  They were made from faux leadlighting outliner.  I drew a hinge shape on some paper and slipped it into a palastic pocket.  I then traced the design with the outliner and filled it in, moved the paper and repeated the process until I had enough hinges.  Once dry these were simply peeled of and stuck onto the doors.

Finally, while I'm discussing faux leadlighting, here are some photos I don't think I've shown you of a couple of faux leadlighting projects I worked on over the Christmas break.  These aren't in miniature and both designs came from the book "Fairies and Fantasy - Learn to paint watercolour" by Meredith Dillman.  The finished pieces are both mounted on mirror, which is hard to take a good photo of, so please ignore the reflections you can see.

Wednesday, January 5, 2011

Dancing Dragon Inn - Weeks 16 & 17

With time of work between Christmas and New Year, I finally had the time to crack on with the Inn.  Now that I have a Cumberland Castle kit on order (to arrive by the end of January) I have new motivation to complete the Inn so I can clear the way to work on  C. Castle, the Retreat and Stratford Bakery.  I decided that the Inn is going to be finished before starting any of the others and knowing that if I dry built the two kits I already have as I planned to do over Christmas, I would end up not putting them away again.  So for now they remain safely tucked away in a cupboard.

Despite there still being some work to do on the exterior of the Inn, I started the Christmas break going back to the interior.  Okay, so I started the Christmas break by cooking too much, eating too much and trying to act enthusiastic about the present my sister gave me, but all that is another story entirely.  The insides of the Inn were given their basic decor as I built the structure, so the next task was to start on adding furniture.

In the "high" bedroom I has already made a start on the bed and it only needed dressing with curtains, bedspread and pillows.  The pale green fabric used is some kind of satin and not the most practical choice for an Inn, but it is a perfect match for the green leaves on the wallpaper frieze and was the only fabric I could find that was a good colour for the room.  I used the king of sewing machine that has pre-programed cards of embroidery designs to add the design to the centre of the bedspread.  This was plan B.  Plan A had been to use a design from a book of iron on transfers to hand embroider the bedspread all over.  It would have taken longer, but looked better in the finish.  The reason I didn't do this is that when I tried to iron-on the design, it went right through the fabric and ended up on the fabric layer beneath.  Luckily I had a piece of scrap under the good fabric or I'd have had a mess on the ironing board.  I tried this several times, the the design always passed straight through the fabric.  I guess some things just weren't meant to be.


 On the top floor of the Inn are the cheaper rooms.  Here guests don't get a room to themselves but a bed separated from the next by only a curtain.  The right hand top room has four beds made of balsa wood and cardboard covered in mis-matched bedding.  Curtains strung between the beds can be drawn to give each bed an amount of privacy.  Unfortunaly when I made the curtains I forgot to allow for the slope of the roofline, so the section of curtain against the roof does hang a little peculiarly.  Two of the four beds are neatly made ready for the next guest, one has been left in disarray by it's last occupant and the fourth still has it's occupant sleeping within it.  To create a body shape in the bed I used a cheap plastic skeleton rather than a more expensive doll or to try and cobble together something belivable out of scraps.  Some felting wool glued to his head and the bedcovers completely hide the skeleton . . .


. . . unless you turn the bed around and look from the other side.  As the far side of the bed can't be seen when the be is in position this isn't a problem.  The left hand room has three beds with a better quality of manchester, but no privacy curtains.  The beds are covered in a printed cotton fabric.  The white table in the photos will be replaced with a proper wash stand or perhaps just renovated to suit.

Downstairs in the tavern there are now a range of chairs and tables.  The bench seats and rectangular table were made from the same templates I created for the table in the "Dragon's Maiden" kitchen while the round tables are just circles of balsa wood with sticks for legs.  The chairs are popsicle sticks with one end cut off and glued around a circular balsa wood seat.

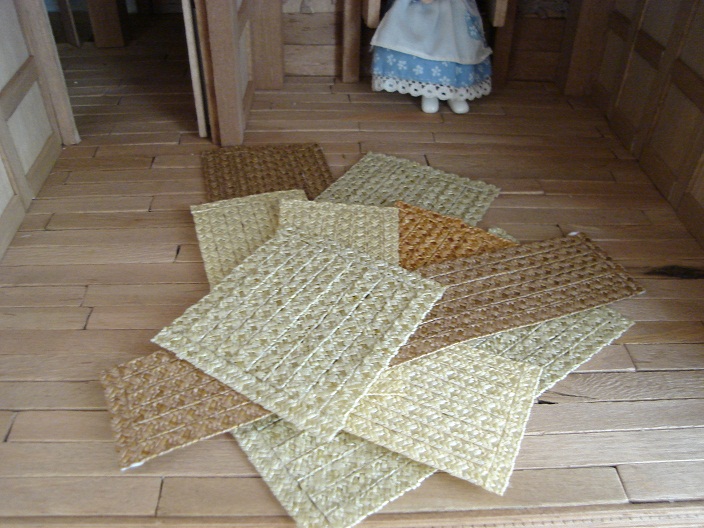
You may have noticed some rush mats on the floors in some of the photos.  These were made with lots of straw braid and the instructions in the April 2010 edition of Dolls House and Miniature Scene magazine, written by Glenda of Peppercorn Miniatures.  At first, I really didn't think the process was going to work fo me - too hard not to get glue everywhere I didn't want it - but after the first couple of mats something clicked and I rather obessively kept working until I ran out of straw.  I will definately be doing this again, it was a lot of fun and the results look fabulous!  (well, at least that's what I think).

 The last major piece of work made for the Inn are the candles sconces and candles. The sconces are simply more bits of balsa wood cut to shape and glued together to create a back board, a shelf and a bracket. The candles are made by dripping wax from a 1:1 candle into cut up drinking straws and poking bits of cotton in the top to create wicks. Once the wax is cool, the candles are removed from the straws and the base of the candle is gently remelted then quickly pressed onto the scone to fix it in place. A little more wax from the 1:1 candle is then dripped over the top of the candle to give the effect of used drippy candles. If you want to try this, it does help if you happen to have asbestos fingers. The finished scones were then glued onto walls all over the Inn.

In a few of the photo you'll see some people trying the Inn for size. They will eventually be re-dressed, or in some cases just dressed, in something more appropriate to the setting.

Finally, I did promise before Christmas that I would be holding a giveaway in the new year.  The items for this have been made and are ready to go, so please keep an eye on this blog as I will be adding a new post offically announcing the start of teh giveaway in the next few days.


Tuesday, December 21, 2010

Merry Christmas!

Merry Christmas to all my followers. However you celebrate I hope you have a wonderful time and keep safe through the holiday season. Ginny the cat is certainly enjoying herself by ensuring all the tinsel is properly flattened. Put anything that makes a rustling noise down in my house and it gets sat on, laid on and slept on! (And tie the tree to the wall or there will be a very loud crash!)

In miniature news for the week, the Inn is still plodding along very slowly. The roof still isn't quite right, but is probably going to stay as it as (at least for now). I've started to make a bed for the "high" bedroom and hopefully I will add a photo to my Flickr account over the next couple of days, so keep an eye on the Flickr thumbnails to the left for it to appear. I really need to pick up the speed on the Inn as this morning I broke down and ordered Cumberland Castle!!! I've put in an order through Fairy Meadow Miniatures' website, but included a message saying not to worry about posting it until next year. That will give me three kits to play with once the Inn is finished, so the Inn needs to get finished because I want to play! Thanks to everyone who commented on my last post - it is partly due to your lack of discouragement that I took the plunge and bought the kit. I know I am going to love it and will adapt my plans for the Tower of Magic to suit. Have I explained about the Tower of Magic yet? I know I've mentioned it before, but have I told you exactly what it is? Oh well, I'll add another post soon with more info about it for anyone whose been wondering what I've been rambling on about.

Wednesday, June 23, 2010

Highcroft Castle - Week Nineteen

 
After last week's gargantuan effort to dress all those people, I spent this week working at a more relaxed pace, mainly fussing with a few of the small bits and pieces that still needed finishing off. Down in the Treasury, I finally covered up the melamine ceiling with some wood veneer and added a wooden beam to cover up where the stone didn't quite meet the ceiling. I moved the gate from the arch to the back wall. Originally, the plan was that the actual Treasury would be at the front, then there would be the gate in the arch, behind which would be the guard room. The problem with this was that when the gate was in place, you couldn't see the guard's table behind it. I bought this table especially for this space and was didn't see the point in it being there if it couldn't be seen. By moving the gate to the back wall, the table becomes visible but the guard room now becomes part of the Treasury rather than being separate from it. This means that the guards on duty in the guard room could nip into the actual treasury and pinch some of the kingdom's valuables with ease. I guess they'll just have to put guards on the guards! With this sorted out, I finished off the Treasury by arranging the crowns I had made previously on stands and adding a selection of bottles, semi-precious stones and other bits and pieces on the shelves. The finishing touch was to add a rug to the floor. Although it looks like animal hide, it is actually a scrapbooking paper. With the exception of one or two details I may have overlooked, this is the Treasury room finished.

When I made the ceiling in the Great Hall, I left three spaces where the balsa wood strips crossed bare so that lights could be hung from these points. If I used lights that "work" I would have had to wire them in long before now, but all the lights in the castle are dummy lights. The two side lights were actually taken out of the house as it was originally decorated (i.e. before I stripped it to turn it into a castle). I merely added some plastic candles and hang them from a hook. I think perhaps they need to be on a slightly longer chain, but otherwise I think they work quite well. The central light was more of a problem. After playing around with all the bits and pieces I had that might be useful, I came up with the design for the light. It consists of two metal scrapbooking embelishments, a cheap hoop earing and some pre-bought candle sconces. The scrapbooking embelishments were secured to the hoop earing by weaving a length of wire through the holes in the embelishments and over the hoop. This made them one solid piece. The candle sconces were simply glued in place around the outside of the embelishments. Unforntunately, I've had these sconces for a while and some were bent out of shape and others had loose arms. After a lot of careful fiddling, they are still a little crooked, but probably as good as they are going to get. Some gold chain attaches the lot to the ceiling.

As you probably already noticed in the picture of the lights, some tapestries have appeared in the Great Hall. There are now also tapestries in the bedroom, the solar and the sorcerer's study. These were all printed on transfer paper, them ironed onto some adia fabric. The texture ot the adia makes them look more like they were stitched than a flat fabric would. They are all hung by glueing loops of ribbon to the top and threading a painted toothpick or skewer (depending on the length needed) through the loops. The toothpicks/skewers were finished off by adding a metal bead to each end.

In the catacombes, I was going to fill the shelves primarily with books, but decided on scrolls instead as they are sooooooooo much easier to make and I was feeling lazy at the time. Some glass jars occupy the bottom shelves holding a range of powders and liquids, including my first attempts at colouring Scenic Water. Food dyes do seem to colourise it quite well, but in a jar no more than an inch high, it's hard to get a small enough amount of dye, hence the liquid in the jars is quite strong in colour.

Lastly, this week I did a little work in the bedroom. As mentioned earlier, I added some tapestries to the walls, two large tapestries over the bathtub and two smaller ones flanking the bed. Next I made some curtains from purple chiffon to enclose the bath. Their purpose is purely decorative and they help to soften the join between the white wallpaper and the black marble. Some off-white lace trim finishes them off and acts as a pelmet around the top. The opposite side of the bedroom still looks wrong somehow. I have decided to panel the bottom two inches or so of the walls at this end of the room in the hope that this will add the warmth and interest the room needs.

This leaves very few things that need attending to in the castle. Most of the remaining tasks won't affect the overall appearance of the castle such as attaching the front panel to the catacombes and finishing the inside of the front cover of the main castle. This, however, does not mean the castle is almost finished. It simple means that the centre and left wing of the castle is almost finished. You might have noticed the doorway in the right hand wall of the Great Hall and wondered where it leads. Well, right now it leads absolutely nowhere. In time it will lead to the castle gardens. I haven't quite decided the final size or layout of the garden yet, but this is roughly the current concept: Beneath the garden (on the level of the kitchen) will be a cave, the home of the dragonets in the castle and their much larger mother dragon. Above this (on the level of the Great Hall) will be the castle gardens. The gardens will have all the usual features - trees, flowers, a water feature of some sort, perhaps some kind of pavillion, etc. It will be inhabited by some of the more mystical of the castle's denizens such as faeries. As with the tower wing on the left of the castle, this garden wing will be a separate unit to the main building.

Tuesday, June 15, 2010

Highcroft Castle - Week Eighteen

  
Last week I started to dress a couple of dolls with the plan of doing a few every week until I had the twenty-odd dolls for the castle all done.  Like most plans it lasted a few days.  At the start of this week I thought I should get out all the dolls I'd collected and assign each doll to a roll in the castle before I started dressing them to make sure I wasn't left needing a doll to sit down when I only had dolls with solid, unbendable legs left (etc).  So on several sheets of scrap paper I wrote the various rolls needed for the castle like "cook" and "banquet guest 1" and placed a doll for the job under each heading, rearranging them until I was pleased that I had the right dolls playing the right parts.  Then I piled the dolls on their papers on one side, leaving just the one page of about five dolls to work on to start with.  I make my dolls clothes partly by sewing and partly by glueing them together so I always like to work on several outfits at a time so I can keep working on outfit A while the glue dries on outfit B.  Once I'd finished some of the dolls on the first page, I still had some left to finish, so I figured while I had all the fabrics out anyway, I'd keep going on the next page of dolls so I still plenty of outfits going at once.  This continued until I had all the dolls dressed (and those that needed wigs, wigged).  I've lost count of exactly how many dolls there are in the castle, but I spent so many hours working on them this week I doubt I'll ever be able to get my back uncurved again.  As usual, no one turned out as I originally intended them and I did cheat on some dolls by not finishing neatly the backs of those dolls that would be positioned facing the front (and vice versa).  Still, i'm quite pleased with the way they turned out on the whole.

The next challenge was positioning the finished dolls in the castle.  Those dolls in a standing position had a little tacky wax put on the soles of their feet and simply stood in place.  It was the seated dolls for the Great Hall that were a challenge.  Although I checked that all the dolls to be seated had soft legs from the knee up I forgot to check whether they had a wire frame or not.  Three of the dolls were pure stuffing and although I could bend their legs, I couldn't make them stay bent.  Luckily, these three were all women in dresses, so wrapping wire around their legs wouldn't show, but when I tried this I decided that it wan't going to be enough to hold them in place.  I felt an awful ghoul to do it, but in the end all I could do to make them sit properly was to cut off their legs.  Again, thank goodness they were in dresses so it wouldn't show!  Much fiddling and a little glue saw everyone seated and ready to enjoy the feast.  Despite depleating my supply of dolls, I was still a few short, so stole a couple of polyresin wizards I've had for years from my ornament collection.  They're the twins Jory and Oswin and by sheer luck happen to be 1/12 scale.  Oswin is in the Great Hall entertaining the guests with some magic tricks while Jory is checking out the catacombes.  At the same time I took a couple of small dragons to join the castle's cast.  One is Hubert, who overcome by the excitement has gone to sleep beneath the table in the Great Hall.   The other is Connar who is playing with the children in the throne room.

The weekend was a long one as most of Australia took the day off to celebrate the Queen's birthday.  Why we do this in June when she was born in April?  Well, I think the answer lies in the fact that politicians choose the nation's public holidays and when did a politician ever do anything logical and rational?  In short, I had a whole extra day to devote to the castle.  Much of this day was taken up sorting out and putting away all the fabrics I'd been pulling out of boxes all week, but I still managed to get a few extra bits and pieces done too.  After intending to finish off the fireplaces for months, I finally added the coals and some logs to the fireplaces in the Great Hall and kitchen.  I arranged the food, plates and cutlery on the table in the Great Hall and used Tacky Wax to hold them in place.  The table setting is now finished with the exception of the candleabras.  The two I have are different sizes with different coloured candles and will be replaced as soon as I get two the same.  I added  a banner of red velveteen and gold trim to the throne room as well as a paper crown and pretend septre for the children to play with.  Finally, I organised the table in the Sorcerer's Study adding a mortar and pestle I made a few weeks ago from polymer clay, a couple of glass jars filled with "magical" ingredients and some books and papers.
For the first time in weeks, I made it through the whole, entire week without breaking anything or having it broken for me by a cat!

Finally, just a reminder that I am currently running a giveaway.  If you would like the chance to win a knole sofa like the one in the castle's solar, please see the post entitled "Dollshouse Daydreams First Giveaway" before Saturday 19th June.

Friday, May 28, 2010

Faux Rag Rugs

Months ago when I first started planning Highcroft I thought I might use some rag rugs on the floors. At the time I knew that a rag rug was as the name suggests made from rags and that they had been around long enough to look at home in a castle. When I did a little more research I discovered that rag rugs were made by essentially crocheting the rags together. This ended the idea of making rag rugs. There are some things that some people just can't do and crochet is definately in my "can't do" list. So I came up with the alternate idea of straw mats. If you've been following this blog, you'll know I recently spent a couple of weeks searching for a store selling mini straw hat braid to make some straw mats/rugs for my castle. You'll also know that I finally ordered some last week.
So what did I do this week?
The solar rug
The Sorcerer's Study Rug
I came up with an idea about how to make a faux rag rug and discovered that the result is quite effective. I found some knitting yarn in the local craft store, the kind that variates in colour and thickness as it goes along. It struck me as perfect for making a rug, so it came home with me. I smeared some tacky glue over a piece of plain fabric and starting at the middle pressed the yarn into the glue in a spiral until the rug was as large as I wanted. The resulting rug is a little bit eccentric in shape, not being a perfect circle, but looks quite effective once in position on the floor of the solar. A second rug soon followed for the Sorcerer's Study and I have more yarn in a colour to suit the bedroom to make some rugs for there too. By the time my order of straw braid arrives, the entire castle will probably already have it's full compliment of rugs. Perhaps the castle's inhabitants will need some straw hats?