A Randomly Selected Newspaper Headline:

The following is a randomly selected newspaper headline from many years ago:

Welcome to my blog. Please feel free to leave a comment. I assure you I always read and appreciate everything you have to say. Unfortunately, thanks to Blogger being, well . . . Blogger, I can not respond to comments nor leave any on your blogs. They simply disappear into the ether. Occasionally I will remember to respond in the next blog post I put up, but usually these good intentions slip my mind. So if you want to ask a question or get a response to any comments you may have please leave an email address or other contact method in your comment and I will get back to you.

I have also added a separate page to the blog for the Tower of Magic with a brief summary of all the rooms of the ToM in the one spot. The link is just below this and above the main body of the blog, or you can just click here.
Showing posts with label scale. Show all posts

Tuesday, February 24, 2015

The Next Level


I have to confess . . .   When I figured out the number of steps in the castle a couple of weeks ago I said 25 steps by 5 floors, that's 100 steps.  I hope it doesn't take you as long as it did me to realise how very terribly wrong that little bit of simple mathematics is.  There are, of course, actually 125 steps.  At least I can be certain when I tell you the castle now has double the floors it had last week.


At least I seem to have managed to get the measurements right in building the castle, at least so far as the next floor sits on the basement and matches up with level of the door opening on the stair tower.


One mistake I did make was to put an arched ceiling in the basement dungeon.  I used toothpicks to make bars to secure the dungeon, but continuing the bars up to a curved ceiling and having them fit properly is not easy.  So at the moment anyone wanting to escape the dungeon only has to climb over the top of the bars.  In future I will have another go at sealing off this escape route either with bars or a solid piece of wall.


Above the dungeons are the castle kitchens.  The floors are tiled with pieces of orange EVA foam cut into squares and glued in place.  This was given a wash of brown paint to create a more terracotta tone and 'grouted' with a mix of pollyfiller, water and grey paint.  Under the arch on the left side of the room is an area separate to the kitchen that will probably a scullery or buttery.  The right side of the kitchen is where the kitchen proper will be.  The opening in the back wall is for the ovens.


On the opposite side of the castle I used a door kit from Petite Properties to add a door to the wall dividing the well room from the alchemists lair.  The door itself is quite effective but when you see it against one of the doorway arches I cut you'll notice it looks very short.  It looks even worse against a 48th sized person.


Working to scale, a 48th (1/4") person the equivalent of 6' tall should be about 1 1/2" tall, therefore a doorway should logically be at least that high too, preferably a little higher.  Yet the professionally made to scale door is no more than 1 1/4" high.  Set against my admittedly generous arches, this door really looks wrong.  Worse, I have five more of these doors to use higher up in the castle and they're all going to look silly too.  Up until now I've loved everything I've bought from Petite Properties but it seems items they sell as 48th scale aren't all quite 48th scale.


Above this dwarf door is a pretty swanky room with a smart red and black tiled floor and linenfold panelling look walls.  Like the kitchen, the floor tiles are cut from EVA foam, but this time laid closely enough not to need grout in a smart diamond pattern.  The panelling is just printed paper as is the fire surround and brick backing.  The wall on the right of the room is where the castle's front door will be located, making this room the castle's entry hall.  It will also be the armoury with displays of weaponry and seating for newly arrived guests waiting to be shown further into the castle.


Monday, October 28, 2013

A Trio of Sorceresses and a Tonne of Books


Chrysta has been joined by new friends Amethyst and Gemma.  Amethyst (Amy for short) wears a purple gown while Gemma is in black.  Like Chrysta, they're all handmade from the same mould (hence they look like triplets).  While Chrysta was made from Cernit clay, Amy and Gemma are both made from Sculpey.  As you can see, the Cernit definately gives the better result, it has more of a 'glow' and a more translucent finish that make it more realistic.  It is however so much harder to work with than the Sculpey.


As you can see with the three ladies standing in the garden, Gemma just gets lost in her black dress, but both she and Amy fit in much better than Chrysta due to their narrower skirts.  Chrysta is still my favourite though and I think either she or Amy will get the job of tending the Crystal Garden permanently.  (I welcome all opinions on who it should be).  The two remaining sorceresses will find homes in later rooms of the ToM.


 The garden itself is practically finished now that water has been added to the fountain.  The pool is made of Solid Water while the fountain is done with Scenic Water trained up thin wires.  The fountain part is a bit messy but somehow looks more like crystal than water - perfect for the Crystal Garden!  Floating in the pool are lily pads (wire and faux leadlighting paint) and flowers (resin beads).


 Hopefully, the garden will be finished by next week and if I'm lucky and actually get to see some sunshine I may even manage to get some decent photos of it.


 Meanwhile, after their modelling job in the garden last week, Saskia and Artie have dropped by the Library on their way back to Castle Starcaster.  After weeks of neglect and being slept in by cats, there is finally some progress for them to see.  I've taken down the arches from the shelf tops and run some coving stained to match the rest of the shelves around the top instead.  I'm not sure about the fancy trim on the top.  I don't have enough to go all the way around, so I was going to just do the ends of the shelves as it is in the photo, but it doesn't look right does it?  And Artie reminded me that it's the same trim used in Castle Starcaster's library and it might look a bit 'samey' if I used it in another library.  So I guess it's time to think up plan B.


 I have installed the mirror in the back corner creating the illusion of continuing shelves.  Everything behind the red curtain is mirror.  I wasn't clever enough to postion the mirror so that it reflected only shelf from every angle so to compensate I hung the curtain to block the side of the mirror where you tend to see things beyond the library.  I'm very pleased with the overall effect, it works really well.  It will be impossible to fill the shelves down this aisle area after the centre shelf is permanently glued in place so I had a marathon book making session and managed to make enough books to fill this area and glued them in place.  Next time I decide to make a room filled with books, someone please hit me.  What I've found to be a good rule of thumb for making books is to make as many as you think you'll need, then make as many again and an extra dozen on top and you may have enough.  By the time I've filled the remaining three quaters of the library I will definately be swearing never to make a book again!

Monday, May 7, 2012

Show Me The Mummy!


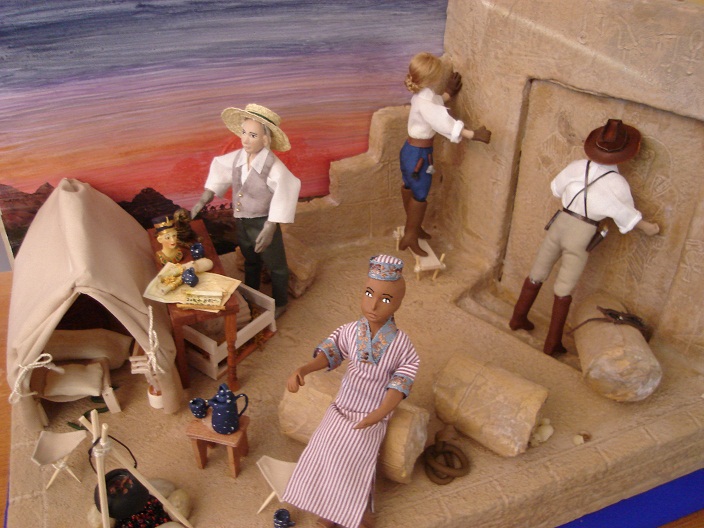
After a week of wrapping, stuffing, stitching and glueing the people of the Dig Site are finished!  All four have head & shoulders, lower arms and lower legs made from polymer clay connected by a wire armature (frame or skeleton).  Their 'bodies' are made of foam wrapped around the wire armature with a little extra polyester fill stuffing down their trousers to give them more shapely legs.  They all wear clothes made out of various cotton fabrics.


This is Rashid.  He's the team's local guide and translator.  Yes, his head is too big.  I was going to leave him bald, but I may go back and give him some hair to see if this makes his head look less out of proporition.  His sandals are made from leather while his clothing is made from a cotton fabric.


Aldo is the most experienced member of the team with a lifetime of treasure hunting under his belt.  His hat is absoulutely the best one I've ever made and I'm now thinking that if I ever get around to making that dress shop it will have to have an extensive millinery section.


Agnes is the only woman of the group and perhaps the most keen to get to work.  She even wears some tools on her belt to help her excavate the ruins.  Her wig is a pre-bought one made by Heidi Ott.


Wil, short for William, is the leader of the group.  You saw his hat and gun last week; they were bought online.  His belt, braces and holsters are real leather. His shirt, like Agnes', has seed bead buttons.


And finally, there is one more "person" at the Dig Site. . . . . 


The Mummy, I call him Kikkerikotep, is a 6" high plastic skeleton wrapped in strips of calico.  Once he was fully wrapped he was painted with a mix of glue, water and brown chalk paint to fix the wrappings in place and start to give them an aged look.  The wrappings will still need a little more aging before he's finished.  His eyes are red glass seed beads.


You may have noticed that I've ripped out the columns by the door.  I will have another go at making some new columns.  Once I've done that and cleaned up the mess I've made of the back wall, the Dig Site will be very close to finished.

Tuesday, February 14, 2012

It Doesn't Match . . . .

One of these rooms just doesn't belong.  Take a look at the castle and tell me which room looks out of place:


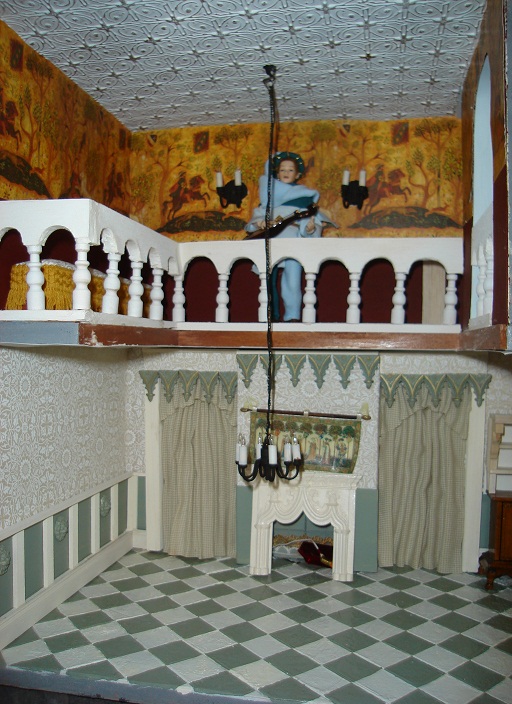
It's the Gallery, isn't it?  All the other rooms have soft, pastel like colours while the Gallery is more bold in it's colours.  The newly made railing does knock back the burgundy on the lower wall but the strong yellow of the Tudor Frieze on top . . . .It just doesn't go anymore.  The problem is that I really like it and want to keep it.  What do I do? 


Well, for the moment I'm just ignoring the issue and forging on ahead regardless.  The ceiling of the Gallery has been covered with a sheet of 'tin ceiling'painted white with gold rub on paint to highlight the pattern.  The railing has been made from prepurchased posts which support lengths of balsa wood which have had arches cut out of the bottom.  At the moment it's just spray painted white and still needs a little sanding and finishing and painting the same soft white as featured in the Hall below.


Adding the railing to the cut out in the Solar wall dramatically changed the look of this room.  All of a sudden the room started making sense.  Finally, the Bespaq chaise looked like it was in the right spot where without the railing it looked all wrong.  So continuing the campagin to ignore the Gallery's issues, I made some curtains from the same fabric as used on the bed upstairs to cover the doorway between the Solar and the Gallery and block the view into the problem zone.  I make curtains by the pin and starch method.  It involves cutting the fabric to length and pinning it out on a piece of foam so that it has nice even pleats, then saturating it with spray starch although some people use hairspray instead.  Once dry the fabric will hold the pleats.  In the Solar the curtains still need a pelmet adding accross the top to finish them off.


While pleating, I made the curtains for the bed.  There is a short curtain against the side wall just to cover over the fact that the fancy cornice/frieze doesn't continue along this wall, curtains at either side of the foot and one at the head end of the side.  I think it will look better with another drop at the foot end of the side as well.  I just hope I have enough fabric.  The fancy trim around the top of the bed was stained and finished at the same time as the rest of the bed with exactly the same colour and in pieces it all looked the same.  Put the trim in place and it suddenly becomes a completely different shade of brown.  Oh dear, another problem.  The only solution is to take it down and re paint it until it decides to be and remain the right colour.  (Oh, and Dan says I need to make proper bedsteps too).


There was progress in the Wardrobe as well with the addition of a rail around the top of the stairs and a new storage unit for the back wall.  The unit is as always mostly balsa wood with a few ready made turnings and accents.  The doors in the middle section open by pivoting on concealed pins.  Now I just need to decide whether to give it a wood look finish or a more colourful paint job.

Monday, January 30, 2012

Down Below and Up Above

 For the first time in a couple of years, Tasmania is experiencing a continuously hot summer.  Why does the rest of the world seem to like hot weather?  I hate it!  Not only did my brains melt about a week and a half ago rendering me incapable of thinking clearly but trying to actually do anything is a little like trying to swim through molases.  No doubt you'll see more typing and spelling errors than usual in this post for which I appologise in advance.  And if I come off sounding wackier than normal, it's because at the moment I am.


Dreaming of cool, damp caverns at least inspired me to get a few more layers of paint on the walls of the Magicians Cave.  They are now looking much more like natural rock although there are still places, especially in the grotto, where there is no paint.  Anyone else who's planing to make a cave; stop and consider how you'll get a paint brush into tall the nooks and crannies first!  The door which was made from impressions in the clay at the same time as the stone walls has been painted a woody brown but needs more work.  A wooden railing of prebought balusters prevents anyone from falling down off the raised platform.  Wires for the lights have been threaded through the back wall but the lights are also not yet finished.


On the top floor, I've done some work in the bedroom and wardrobe.  Strips of balsa wood in a grid pattern make a panelling effect on the walls.  The plaster coving that had been intended for the solar tops the panelling in the bedroom end.  It was painted a creamy white to match the panelling, then the detail of the coving was picked out in red, green, blue and gold.  As expected, I made a mess of the corner, but hopefully once filled and patched it will be less noticable.  Because the original plan was to use the coving in another room, I don't have enough to do the wardrobe as well.  I haven't decided whether to buy more or leave the top of the wardrobe walls plain.  What do you think?


 The bed is made of balsa wood, wooden beads and some fancy panels.  It reaches from floor to ceiling as it holds the ceiling up.  Unfortuantely it is a trifle too tall and actually makes the ceiling arch up a little.  If I decide that I can get it out again with out pulling it to peices, I'll cut it down just a little.  The bedspread is a printed lawn fabric and evtually there will be matching bedcurtains too.  The green behind the fancy panels in the bedhead needs changing to something else.

Finally, I played a little with the lighting in the crypt.  I used part of the clear plastic pack the lights came in, covered it with swirls of blue and green glass paint and put a light bulb inside to create a creepy sort of glow that eminates from behind the stairs.  It looks quite good in real life, but in a photo it looks like this:


Not so good.  Are light effects always hard to capture or am I just a lousy photographer?  I'll use the same method to light the grotto in the Magicians Cave.  Perhaps I'll manage to get a better photo of that.

Monday, September 19, 2011

Meet the Witches


This week I dressed and wigged the dolls for the shop.  To keep with the "no fixed era" feel of the shop, all the dolls have different styles, some that point to a particular era in history and some that are simply "kinda witchy".


Vivienne is definately a witch inspired by Georgian era fashions.  Vivienne herself is made from polymer clay using the female mould that finally arrived a couple of weeks ago.  Her underdress is red silk dupion overlaid with a soft black netting.  Her over gown is brocade in red and black with black lace trim around the neck and cuffs.  Her hat is red straw braid and her hair is pale blonde viscose. 


Gilda is more of a typical witch in a dark velvet coat and tall pointed hat.  She is the owner of the shop on lives in the grand house behind the green door in the garden.  She's a Heidi Ott soft bodied doll. 


Isis is another polymer clay and mould made doll.  She's the most exotic of the witches wearing a chiffon underdress and brocade overgown with ribbon and leather sandals and long black hair parted in the middle.


 Theya and Althea are a pair of junior witches sent out on an errand to collect some supplies from the shop.  Althea's dress was taken off a cheap porcelain doll who was redressed some time ago.  It was shortened and a yellow ribbon belt added.  A black shawl and junior sized witch hat finish off her outfit.  Theya is too young for the dark colours usually associated with witches, so her dark navy dress is covered with a colourful floral pattern and trimmed with pink ribbon.


 Tisha looks much like any of the other witches until you see her in the company of a 1/12th scale doll:


Tisha was made using the 24th scale doll mould.  When her wings are ready, she'll become a Faerie witch.  The doll used to show her scale is Ursa.  Ursa was actually dressed for another scene some time ago, but will likely settle in the witch shop for a while.


And finally, here's Hetty in her shop assistant outfit.  Firstly, let me say that the big blue bow is going to be replaced, perhaps with a nice broach or some such.  Hetty wears a blue and black lace trimmed apron to tie in the the decoration scheme of the shop.

Finally, here are a few pictures of how the new witches are settling in to the shop:


Tuesday, August 2, 2011

Do I Really Need To Think Up Another Title Already?

Firstly this week, I'd like to welcome the newest followers to the blog.  They are: Sharon Rose,   Sandra - Ninha Croche, Ayamontinomaria and pilar garcia.  Thank you all for choosing to follow.

I've had a lot of fun this week spending my tax refund.  I pre-ordered a pile of upcoming books from the Book Depository, I bought some chic clothes from Ezibuy and most importantly for the sake of this blog, some miniatures related items.  Prime among them were some moulds to make 1/12th scale polymer clay dolls from Patricia Rose Studio on ebay.

I have been watching and wishing for the Chelsea and David moulds for months, but patiently waited until now to buy them, not because the moulds themselves are horribly expensive, but the added cost of postage is enough to make your eyeballs spin.  Buying them with my refund from the government is like getting them for free because all I did to get the money was spend fifteen minutes filling out my return.  Most moulds for polymer clay I have seen have faces and figures that are less than beautiful but the thing I love about the Patricia Rose ones is how stunning the faces are.  These people are gorgeous which suits me perfectly: I figure it's easier to take a pretty face and mess it about to be ugly than to make an ugly face pretty.  Not only did I buy the Chelsea and David moulds which make dolls that stand just under 6" tall, I also bought the Lacey mould.  At 3" tall she'll be perfect for when I start experimenting in 1/24th scale.  And because I wasn't really spending my money anyway, I also got the Katie mould.  She stands 5 1/2" tall, has a different face and figure to the Chelsea mould and has pointy elf/fairy ears.  It will be another few weeks before they arrive in the mail, but I can't wait to start playing with them.

With this in mind, I decided that I am going to try and get the castle finished to the point of being ready to populate by the time the moulds arrive.  That way I can start (attempting) to create my own dolls with the moulds to live in the castle straight away.  My push to get the castle finished didn't start out too well however.  One thing that needs doing is to add fires to all the fireplaces.  I had enough "ingredients" to do the kitchen fires last week, but needed more to do the others.  A trip to the craft store proved fruitless, the ##@@*&*^ place didn't have anything that was on my shopping list, so I either wait for them to get their act together (which will probably take a long, long time) or I scour the internet for what I need, either way it'll be a while before I can do the fires.


So, unable to do what I wanted and somewhat peeved about it (I mean basic black seed beads, isn't that something you'd keep on hand if you ran a craft shop?) I fiddled about with what I did have.  I started in the bedroom.  I decided to replace the table on the far side of the bed.  The one that was there was an Angela Downton made one and thus absolutely gorgeous, but behind the bed it was hard to see and it's beauty was hidden.  So I'll save that table for somewhere more prominent and instead made a quick table the same size from balsa wood with a bit of fancy trim around the edge.  A quick rummage through my collection of accessories provided a mirror, some purfume bottles, a wooden box and a candlestick to sit on the table.  More accessories filled up the small shelves on the near side of the bed.

The next thing the room needed was some rugs for the floor.  After a little debate on what would work best, I pulled out the knitting yarn left over from the rugs I made for Highcroft last year and made some faux rag rugs.  The rugs for Highcroft were all circular with the yarn spiralling from the centre.  This time I made rectangular rugs by simply cutting lengths of yarn and glueing them onto a piece of fabric in straight rows.  I think I like this effect better than the spiral rugs so I made another rug the same way for the Centre Room.


Finally in the bedroom and also throughout the castle, I hung some tapistries.  The tapistires were printed on fabric and most had some decorative ribbon glued around the edges with loops of ribbon at the top to create hangers.  The loops were fed through skewers painted gold and decorative metal beads were glued onto the ends of the skewer.   

At this point I think the bedroom is pretty much finished - it just needs a fire in the fireplace.  I don't think there'll even be room for a person to pose in this room, unless they climb into bed.  In other words, if you can see anything you think is missing or wrong with the bedroom, now would be a good time to tell me about it.


Next door in the Centre Room I rearranged the furniture by moving the table back.  I think the arrangement looks better now but I think perhaps I need to find a smaller chest/coffer/other piece of furniture to sit along the right wall.  Once I finish off the candleabra sitting on the chest, this is another room that is pretty close to complete.  Another rug at the back of the room and a cushion for the X frame chair perhaps?


Moving along to the Library, I have finally fixed up the slightly dodgy paintwork on the top of the back wall.  The books and papers on the desk have been arranged messily but I still need some sort of table lamp to finish it off.  I tried various feature ornaments to display on the three empty sections of shelf.  I don't really like what I've got there now, but its the best that I have.  I may have to try making something to fit here, but at the moment have no idea as to what.


Downstairs the biggest task left to go is the lighting.  I want a big, ornate chandiler to hang from the ceiling in the entry hall but haven't figured out how to make it yet.  Yet again, if there were a craft shop in town that actually had stock on it's shelves, I would probably have found some findings that I could adapt and incorporate into a chandelier.  I also need seven wall mounted candle scones for the Entry and Dining halls and I did make some, but they're not right for the castle, so I have to go back to the drawing board.


So, will I finish the castle in the next two to three weeks?  Possibly, if I am lucky enough to find what I need and if I totally ignore the Witch Shop which is pretty much what happened this week.  I did make one piece of furniture for the shop though; a small shelving unit that stands by the front door and outside in the garden I added a flowering vine growing up the back wall between the door and the window.