A Randomly Selected Newspaper Headline:
The following is a randomly selected newspaper headline from many years ago:
Welcome to my blog. Please feel free to leave a comment. I assure you I always read and appreciate everything you have to say. Unfortunately, thanks to Blogger being, well . . . Blogger, I can not respond to comments nor leave any on your blogs. They simply disappear into the ether. Occasionally I will remember to respond in the next blog post I put up, but usually these good intentions slip my mind. So if you want to ask a question or get a response to any comments you may have please leave an email address or other contact method in your comment and I will get back to you.
I have also added a separate page to the blog for the Tower of Magic with a brief summary of all the rooms of the ToM in the one spot. The link is just below this and above the main body of the blog, or you can just click here.
Pages
Showing posts with label medieval. Show all posts
Tuesday, February 24, 2015
The Next Level
I have to confess . . . When I figured out the number of steps in the castle a couple of weeks ago I said 25 steps by 5 floors, that's 100 steps. I hope it doesn't take you as long as it did me to realise how very terribly wrong that little bit of simple mathematics is. There are, of course, actually 125 steps. At least I can be certain when I tell you the castle now has double the floors it had last week.
At least I seem to have managed to get the measurements right in building the castle, at least so far as the next floor sits on the basement and matches up with level of the door opening on the stair tower.
One mistake I did make was to put an arched ceiling in the basement dungeon. I used toothpicks to make bars to secure the dungeon, but continuing the bars up to a curved ceiling and having them fit properly is not easy. So at the moment anyone wanting to escape the dungeon only has to climb over the top of the bars. In future I will have another go at sealing off this escape route either with bars or a solid piece of wall.
Above the dungeons are the castle kitchens. The floors are tiled with pieces of orange EVA foam cut into squares and glued in place. This was given a wash of brown paint to create a more terracotta tone and 'grouted' with a mix of pollyfiller, water and grey paint. Under the arch on the left side of the room is an area separate to the kitchen that will probably a scullery or buttery. The right side of the kitchen is where the kitchen proper will be. The opening in the back wall is for the ovens.
On the opposite side of the castle I used a door kit from Petite Properties to add a door to the wall dividing the well room from the alchemists lair. The door itself is quite effective but when you see it against one of the doorway arches I cut you'll notice it looks very short. It looks even worse against a 48th sized person.
Working to scale, a 48th (1/4") person the equivalent of 6' tall should be about 1 1/2" tall, therefore a doorway should logically be at least that high too, preferably a little higher. Yet the professionally made to scale door is no more than 1 1/4" high. Set against my admittedly generous arches, this door really looks wrong. Worse, I have five more of these doors to use higher up in the castle and they're all going to look silly too. Up until now I've loved everything I've bought from Petite Properties but it seems items they sell as 48th scale aren't all quite 48th scale.
Above this dwarf door is a pretty swanky room with a smart red and black tiled floor and linenfold panelling look walls. Like the kitchen, the floor tiles are cut from EVA foam, but this time laid closely enough not to need grout in a smart diamond pattern. The panelling is just printed paper as is the fire surround and brick backing. The wall on the right of the room is where the castle's front door will be located, making this room the castle's entry hall. It will also be the armoury with displays of weaponry and seating for newly arrived guests waiting to be shown further into the castle.
Tuesday, March 27, 2012
The Second Wizard
The doll I made a couple of weeks ago with the intention of making him into a wizardly companion for the Sorceress turned out looking decidedly un-wizardly So this week I decided to have another go.
Hmmm . . . . Better than last time but I'm not entirely certain he's quite right either.
I don't really know why I'm worried about making a wizard to go into the cave, be barely fits in anyway there's so much already down there. At this point I haven't decided whether to use him in the cave or save him for my next wizardly project.
Meanwhile the Grotto area is still annoying me. It needed some sparkle, so I hung some crystal stars from the ceiling. Unfortunately it still lacks focus. It needs something tall and shimmery and raising the mermaid onto a pedestal doesn't cut it. Is it too late to rip out the Grotto and start again?
In other parts of the cave, some new Gremlins have taken up residence and started causing trouble. This pair was made by Nickycc.
Next door to the cave, the crypt is now more or less finished. I took the ghost lady out, she was too dominating in the space. A few accessories were added to the shelf, a few mice from the Old castle kitchen and a cat to chase them have found their way into the crypt too.
In the Hall, the guest's luggage has finally arrived. The pile of trunks is stacked shoulder high and the servants can't quite figure out how they're going to get those boxes up the narrow spiral stairs of the castle.
I have done a tad of re-organising in the Wardrobe. The "stooll of ease" is now on the right wall under the window making room for some extra storage trunks on the left.
Overall, the castle is getting close to being finished. I have a lot of little accessories to make, but nothing that will really change the way it looks now.
Hmmm . . . . Better than last time but I'm not entirely certain he's quite right either.
I don't really know why I'm worried about making a wizard to go into the cave, be barely fits in anyway there's so much already down there. At this point I haven't decided whether to use him in the cave or save him for my next wizardly project.
Meanwhile the Grotto area is still annoying me. It needed some sparkle, so I hung some crystal stars from the ceiling. Unfortunately it still lacks focus. It needs something tall and shimmery and raising the mermaid onto a pedestal doesn't cut it. Is it too late to rip out the Grotto and start again?
In other parts of the cave, some new Gremlins have taken up residence and started causing trouble. This pair was made by Nickycc.
Next door to the cave, the crypt is now more or less finished. I took the ghost lady out, she was too dominating in the space. A few accessories were added to the shelf, a few mice from the Old castle kitchen and a cat to chase them have found their way into the crypt too.
In the Hall, the guest's luggage has finally arrived. The pile of trunks is stacked shoulder high and the servants can't quite figure out how they're going to get those boxes up the narrow spiral stairs of the castle.
I have done a tad of re-organising in the Wardrobe. The "stooll of ease" is now on the right wall under the window making room for some extra storage trunks on the left.
Overall, the castle is getting close to being finished. I have a lot of little accessories to make, but nothing that will really change the way it looks now.
Tuesday, March 6, 2012
Bits and Pieces
Remember last week I had trouble with one of the lights in the Magician's Cave and no amount of fiddling or twitching would get it to go? It turns out I didn't need to spend all that time trying to cajole it to work; all I needed to do was leave it alone for a few days, then switch the lights on again. Instant success. Are lights always this temperamental or is it just me they don't like?
Moving on from electrics, a lot of little things happened in the castle this week with the result that most of the rooms are really starting to come together. The Wardrobe had perhaps the most dramatic change. The cupboard unit on the back wall has been painted, a small shelf has been added on the left wall, a straw mat has been made for the floor and the, uh, facilities in the form of a "stool of ease" have been added. The stool of ease was used in the Tudor era as a forerunner of the modern toilet. It is essentially a box with a hole in the top. One sits over the hole and fills up the bucket in the cupboard below. My version has a padded velvet seat with closeable lid, opening doors in the side to allow for the bucket to be swapped for an empty one and a sponge on a stick hanging from the side to be used in the manner we would use toiliet paper today.
Next door in the bedroom there have been a few small changes. I made a set of bedsteps out of balsa wood and swapped the side table with the one from the Solar. By using this table as a desk I can put a chair in the room where just a chair on it's own looked out of place before. The fireplace has been dirtied up with a little "soot" (i.e. drybrushed black paint) and the embers have been given a small makeover. The way the embers came the black coals seemed to block too much of the light bulb inside meaning when the fire was turned on, there wasn't much glow. So I pried off a lot of the coals and replaced them with a thin layer of black glass seed beads mixed with a few red ones. The red beads give the effect of glowing coals even when the lights are out and there is more glow when turned on. I did the same for all three of the castle's fireplaces.
There is a new rag style rug for the Solar floor. Those of you who have been following since Highcroft Castle will recognise the way I made the rug. It's a length of varigated knitting yarn coiled into a circle.
There were lots of changes in the Hall. I finally decided on a design for the cupboard for the right back corner. I needed to put something here as this is where the stairs came up from the kitchen in the original castle and the clay floor sunk a little over the patch and needed obscuring. I used a cheap plain cupboard that had been in the original bedroom, added an open shelf on the top and painted the lot white to compliment the Hall. I painted some relief stickers the green used in the hall and added them to the cupboard.
Across the other side of the Hall is the only other piece of furniture the room is going to have. It's a simple bench seat. The base is made of short turned posts connected by arches of balsa wood designed to echo the post and arch design of the Gallery railing above. The seat of the bench is a plank of more balsa. Again, this was painted green and white.
The fire surround has been painted and glued into place. Yet again, more green and white with gold accents. Some of the tapestries from the Old castle have been rehung in the Hall, each selected because green was a predominate colour in it. Alas the one over the fire needs to be popped off the wall and rehung as it managed to get itself crooked.
The chandelier that hangs from the Gallery ceiling has been raised and centred over the new Hall fireplace.
Finally, I've started making a few boxes. They'll go in the Hall, but they're not furniture. I'll leave you to guess at their purpose for now.
Moving on from electrics, a lot of little things happened in the castle this week with the result that most of the rooms are really starting to come together. The Wardrobe had perhaps the most dramatic change. The cupboard unit on the back wall has been painted, a small shelf has been added on the left wall, a straw mat has been made for the floor and the, uh, facilities in the form of a "stool of ease" have been added. The stool of ease was used in the Tudor era as a forerunner of the modern toilet. It is essentially a box with a hole in the top. One sits over the hole and fills up the bucket in the cupboard below. My version has a padded velvet seat with closeable lid, opening doors in the side to allow for the bucket to be swapped for an empty one and a sponge on a stick hanging from the side to be used in the manner we would use toiliet paper today.
Next door in the bedroom there have been a few small changes. I made a set of bedsteps out of balsa wood and swapped the side table with the one from the Solar. By using this table as a desk I can put a chair in the room where just a chair on it's own looked out of place before. The fireplace has been dirtied up with a little "soot" (i.e. drybrushed black paint) and the embers have been given a small makeover. The way the embers came the black coals seemed to block too much of the light bulb inside meaning when the fire was turned on, there wasn't much glow. So I pried off a lot of the coals and replaced them with a thin layer of black glass seed beads mixed with a few red ones. The red beads give the effect of glowing coals even when the lights are out and there is more glow when turned on. I did the same for all three of the castle's fireplaces.
There is a new rag style rug for the Solar floor. Those of you who have been following since Highcroft Castle will recognise the way I made the rug. It's a length of varigated knitting yarn coiled into a circle.
There were lots of changes in the Hall. I finally decided on a design for the cupboard for the right back corner. I needed to put something here as this is where the stairs came up from the kitchen in the original castle and the clay floor sunk a little over the patch and needed obscuring. I used a cheap plain cupboard that had been in the original bedroom, added an open shelf on the top and painted the lot white to compliment the Hall. I painted some relief stickers the green used in the hall and added them to the cupboard.
Across the other side of the Hall is the only other piece of furniture the room is going to have. It's a simple bench seat. The base is made of short turned posts connected by arches of balsa wood designed to echo the post and arch design of the Gallery railing above. The seat of the bench is a plank of more balsa. Again, this was painted green and white.
The fire surround has been painted and glued into place. Yet again, more green and white with gold accents. Some of the tapestries from the Old castle have been rehung in the Hall, each selected because green was a predominate colour in it. Alas the one over the fire needs to be popped off the wall and rehung as it managed to get itself crooked.
The chandelier that hangs from the Gallery ceiling has been raised and centred over the new Hall fireplace.
Finally, I've started making a few boxes. They'll go in the Hall, but they're not furniture. I'll leave you to guess at their purpose for now.
Labels:
1/12,
australia,
castle,
construction,
craft,
doll,
doll house,
fantasy,
medieval,
mini
Tuesday, February 14, 2012
It Doesn't Match . . . .
One of these rooms just doesn't belong. Take a look at the castle and tell me which room looks out of place:
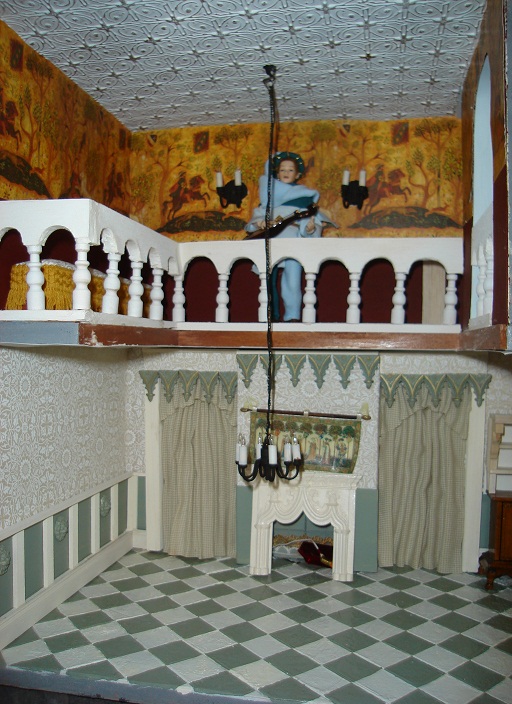
It's the Gallery, isn't it? All the other rooms have soft, pastel like colours while the Gallery is more bold in it's colours. The newly made railing does knock back the burgundy on the lower wall but the strong yellow of the Tudor Frieze on top . . . .It just doesn't go anymore. The problem is that I really like it and want to keep it. What do I do?
Well, for the moment I'm just ignoring the issue and forging on ahead regardless. The ceiling of the Gallery has been covered with a sheet of 'tin ceiling'painted white with gold rub on paint to highlight the pattern. The railing has been made from prepurchased posts which support lengths of balsa wood which have had arches cut out of the bottom. At the moment it's just spray painted white and still needs a little sanding and finishing and painting the same soft white as featured in the Hall below.
Adding the railing to the cut out in the Solar wall dramatically changed the look of this room. All of a sudden the room started making sense. Finally, the Bespaq chaise looked like it was in the right spot where without the railing it looked all wrong. So continuing the campagin to ignore the Gallery's issues, I made some curtains from the same fabric as used on the bed upstairs to cover the doorway between the Solar and the Gallery and block the view into the problem zone. I make curtains by the pin and starch method. It involves cutting the fabric to length and pinning it out on a piece of foam so that it has nice even pleats, then saturating it with spray starch although some people use hairspray instead. Once dry the fabric will hold the pleats. In the Solar the curtains still need a pelmet adding accross the top to finish them off.
While pleating, I made the curtains for the bed. There is a short curtain against the side wall just to cover over the fact that the fancy cornice/frieze doesn't continue along this wall, curtains at either side of the foot and one at the head end of the side. I think it will look better with another drop at the foot end of the side as well. I just hope I have enough fabric. The fancy trim around the top of the bed was stained and finished at the same time as the rest of the bed with exactly the same colour and in pieces it all looked the same. Put the trim in place and it suddenly becomes a completely different shade of brown. Oh dear, another problem. The only solution is to take it down and re paint it until it decides to be and remain the right colour. (Oh, and Dan says I need to make proper bedsteps too).
There was progress in the Wardrobe as well with the addition of a rail around the top of the stairs and a new storage unit for the back wall. The unit is as always mostly balsa wood with a few ready made turnings and accents. The doors in the middle section open by pivoting on concealed pins. Now I just need to decide whether to give it a wood look finish or a more colourful paint job.
It's the Gallery, isn't it? All the other rooms have soft, pastel like colours while the Gallery is more bold in it's colours. The newly made railing does knock back the burgundy on the lower wall but the strong yellow of the Tudor Frieze on top . . . .It just doesn't go anymore. The problem is that I really like it and want to keep it. What do I do?
Well, for the moment I'm just ignoring the issue and forging on ahead regardless. The ceiling of the Gallery has been covered with a sheet of 'tin ceiling'painted white with gold rub on paint to highlight the pattern. The railing has been made from prepurchased posts which support lengths of balsa wood which have had arches cut out of the bottom. At the moment it's just spray painted white and still needs a little sanding and finishing and painting the same soft white as featured in the Hall below.
Adding the railing to the cut out in the Solar wall dramatically changed the look of this room. All of a sudden the room started making sense. Finally, the Bespaq chaise looked like it was in the right spot where without the railing it looked all wrong. So continuing the campagin to ignore the Gallery's issues, I made some curtains from the same fabric as used on the bed upstairs to cover the doorway between the Solar and the Gallery and block the view into the problem zone. I make curtains by the pin and starch method. It involves cutting the fabric to length and pinning it out on a piece of foam so that it has nice even pleats, then saturating it with spray starch although some people use hairspray instead. Once dry the fabric will hold the pleats. In the Solar the curtains still need a pelmet adding accross the top to finish them off.
While pleating, I made the curtains for the bed. There is a short curtain against the side wall just to cover over the fact that the fancy cornice/frieze doesn't continue along this wall, curtains at either side of the foot and one at the head end of the side. I think it will look better with another drop at the foot end of the side as well. I just hope I have enough fabric. The fancy trim around the top of the bed was stained and finished at the same time as the rest of the bed with exactly the same colour and in pieces it all looked the same. Put the trim in place and it suddenly becomes a completely different shade of brown. Oh dear, another problem. The only solution is to take it down and re paint it until it decides to be and remain the right colour. (Oh, and Dan says I need to make proper bedsteps too).
There was progress in the Wardrobe as well with the addition of a rail around the top of the stairs and a new storage unit for the back wall. The unit is as always mostly balsa wood with a few ready made turnings and accents. The doors in the middle section open by pivoting on concealed pins. Now I just need to decide whether to give it a wood look finish or a more colourful paint job.
Labels:
1/12,
australia,
castle,
construction,
craft,
doll,
doll house,
dolls house,
dollshouse,
fantasy,
medieval,
mini,
miniature,
scale,
tudor
Monday, January 30, 2012
Down Below and Up Above
For the first time in a couple of years, Tasmania is experiencing a continuously hot summer. Why does the rest of the world seem to like hot weather? I hate it! Not only did my brains melt about a week and a half ago rendering me incapable of thinking clearly but trying to actually do anything is a little like trying to swim through molases. No doubt you'll see more typing and spelling errors than usual in this post for which I appologise in advance. And if I come off sounding wackier than normal, it's because at the moment I am.
Dreaming of cool, damp caverns at least inspired me to get a few more layers of paint on the walls of the Magicians Cave. They are now looking much more like natural rock although there are still places, especially in the grotto, where there is no paint. Anyone else who's planing to make a cave; stop and consider how you'll get a paint brush into tall the nooks and crannies first! The door which was made from impressions in the clay at the same time as the stone walls has been painted a woody brown but needs more work. A wooden railing of prebought balusters prevents anyone from falling down off the raised platform. Wires for the lights have been threaded through the back wall but the lights are also not yet finished.
On the top floor, I've done some work in the bedroom and wardrobe. Strips of balsa wood in a grid pattern make a panelling effect on the walls. The plaster coving that had been intended for the solar tops the panelling in the bedroom end. It was painted a creamy white to match the panelling, then the detail of the coving was picked out in red, green, blue and gold. As expected, I made a mess of the corner, but hopefully once filled and patched it will be less noticable. Because the original plan was to use the coving in another room, I don't have enough to do the wardrobe as well. I haven't decided whether to buy more or leave the top of the wardrobe walls plain. What do you think?
The bed is made of balsa wood, wooden beads and some fancy panels. It reaches from floor to ceiling as it holds the ceiling up. Unfortuantely it is a trifle too tall and actually makes the ceiling arch up a little. If I decide that I can get it out again with out pulling it to peices, I'll cut it down just a little. The bedspread is a printed lawn fabric and evtually there will be matching bedcurtains too. The green behind the fancy panels in the bedhead needs changing to something else.
Finally, I played a little with the lighting in the crypt. I used part of the clear plastic pack the lights came in, covered it with swirls of blue and green glass paint and put a light bulb inside to create a creepy sort of glow that eminates from behind the stairs. It looks quite good in real life, but in a photo it looks like this:
Not so good. Are light effects always hard to capture or am I just a lousy photographer? I'll use the same method to light the grotto in the Magicians Cave. Perhaps I'll manage to get a better photo of that.
Dreaming of cool, damp caverns at least inspired me to get a few more layers of paint on the walls of the Magicians Cave. They are now looking much more like natural rock although there are still places, especially in the grotto, where there is no paint. Anyone else who's planing to make a cave; stop and consider how you'll get a paint brush into tall the nooks and crannies first! The door which was made from impressions in the clay at the same time as the stone walls has been painted a woody brown but needs more work. A wooden railing of prebought balusters prevents anyone from falling down off the raised platform. Wires for the lights have been threaded through the back wall but the lights are also not yet finished.
On the top floor, I've done some work in the bedroom and wardrobe. Strips of balsa wood in a grid pattern make a panelling effect on the walls. The plaster coving that had been intended for the solar tops the panelling in the bedroom end. It was painted a creamy white to match the panelling, then the detail of the coving was picked out in red, green, blue and gold. As expected, I made a mess of the corner, but hopefully once filled and patched it will be less noticable. Because the original plan was to use the coving in another room, I don't have enough to do the wardrobe as well. I haven't decided whether to buy more or leave the top of the wardrobe walls plain. What do you think?
The bed is made of balsa wood, wooden beads and some fancy panels. It reaches from floor to ceiling as it holds the ceiling up. Unfortuantely it is a trifle too tall and actually makes the ceiling arch up a little. If I decide that I can get it out again with out pulling it to peices, I'll cut it down just a little. The bedspread is a printed lawn fabric and evtually there will be matching bedcurtains too. The green behind the fancy panels in the bedhead needs changing to something else.
Finally, I played a little with the lighting in the crypt. I used part of the clear plastic pack the lights came in, covered it with swirls of blue and green glass paint and put a light bulb inside to create a creepy sort of glow that eminates from behind the stairs. It looks quite good in real life, but in a photo it looks like this:
Not so good. Are light effects always hard to capture or am I just a lousy photographer? I'll use the same method to light the grotto in the Magicians Cave. Perhaps I'll manage to get a better photo of that.
Labels:
1/12,
australia,
castle,
construction,
craft,
doll,
doll house,
dollhouse,
dolls house,
dollshouse,
fantasy,
house,
medieval,
mini,
miniature,
scale,
tudor
Monday, September 19, 2011
Meet the Witches
This week I dressed and wigged the dolls for the shop. To keep with the "no fixed era" feel of the shop, all the dolls have different styles, some that point to a particular era in history and some that are simply "kinda witchy".
Vivienne is definately a witch inspired by Georgian era fashions. Vivienne herself is made from polymer clay using the female mould that finally arrived a couple of weeks ago. Her underdress is red silk dupion overlaid with a soft black netting. Her over gown is brocade in red and black with black lace trim around the neck and cuffs. Her hat is red straw braid and her hair is pale blonde viscose.
Gilda is more of a typical witch in a dark velvet coat and tall pointed hat. She is the owner of the shop on lives in the grand house behind the green door in the garden. She's a Heidi Ott soft bodied doll.
Isis is another polymer clay and mould made doll. She's the most exotic of the witches wearing a chiffon underdress and brocade overgown with ribbon and leather sandals and long black hair parted in the middle.
Theya and Althea are a pair of junior witches sent out on an errand to collect some supplies from the shop. Althea's dress was taken off a cheap porcelain doll who was redressed some time ago. It was shortened and a yellow ribbon belt added. A black shawl and junior sized witch hat finish off her outfit. Theya is too young for the dark colours usually associated with witches, so her dark navy dress is covered with a colourful floral pattern and trimmed with pink ribbon.
Tisha was made using the 24th scale doll mould. When her wings are ready, she'll become a Faerie witch. The doll used to show her scale is Ursa. Ursa was actually dressed for another scene some time ago, but will likely settle in the witch shop for a while.
And finally, here's Hetty in her shop assistant outfit. Firstly, let me say that the big blue bow is going to be replaced, perhaps with a nice broach or some such. Hetty wears a blue and black lace trimmed apron to tie in the the decoration scheme of the shop.
Finally, here are a few pictures of how the new witches are settling in to the shop:
Monday, September 5, 2011
Finished! . . . . Well, Almost
Thirty-One weeks, or about seven months, after starting work on the castle it's finally finished. Well . . . almost finished anyway. It's at the point where it's close enough to "done" that I need to ignore it for a couple of weeks then come back and look at it with fresh eyes so that all the flaws still needing to be fixed stand out. So for the moment it's "done" even though it still needs work.
The one area that still needed the most attention at the start of the week was the exterior. All that grey had to get broken up, so I added some "Wacky Wisteria" vines to the two side front panels. Why is it Wacky? Look closely and you'll notice that it has holly leaves instead of wisteria-type leaves and that the blooms are composed of three different colours, none of them the lavender purple wisteria is meant to be. It was a case of making do with what I had on hand rather than wait weeks for the right supplies to arrive in the mail. I figure it is a fantasy castle, so some fantasy wisteria is in order anyway. The leaves were made from paper using a paper punch while the flowers are three shades of flowersoft mixed in together. A piece of green wire dipped in extra tacky glue was rolled in this to create the flower.
The centre front panel has no wisteria on it, but I think I need to add some around the bay window and perhaps at the top as well. Above the front door and under the bay window some decorative brackets were glued on to add some interest.
The other task of the week was to finish off and arrange the dolls in the castle and here are the results:
I told you Artie would prefer Ana once she grew some hair! They've snuck off to the Dining Room for a quiet chat.
Theron and Chester exchange stories of their adventures while Garnett listens politely, not believing a word of it.
With a castle full of hungry people, the kitchen staff are working flat out.
Katie shows young Cailin her treasured magical sphere in the bedroom.
May convinced Arianne to move out of my first (and soon to be renovated) castle to come and help her make music in Starcaster.
Almos is still asleep in the Library and a little dragon has decided to curl up on his lap. Like Arianne, Glennis has decided she prefers Starcaster to the old castle and has moved in to help organise the library. Her first decision was to relocate the library desk to the Dragon Study room upstairs. Little Omyr the book-wyrm dragon refused to leave the library so jumped off the desk and settled on the top of the library steps instead.
Glennis' decision to move the desk upstairs meant that the cupboard had to get the boot. I have to admit I like this room better without the cupboard but the catch is that the desk leaves only the narrowest space between itself and the top of the stairs meaning a person needs to be very skinny and agile to make it into the room. Perhaps I should cut the desk down a little, but you can't actually see anything is wrong from the front so why risk ruining the desk?
As you can see, the castle is a very busy place. If you'd like so see more photos of the (almost) finished castle, you'll find all them from the very start here in my Flickr.
Labels:
1/12,
australia,
castle,
construction,
craft,
doll,
dolls house,
dollshouse,
fantasy,
medieval
Subscribe to:
Posts (Atom)