One of these rooms just doesn't belong. Take a look at the castle and tell me which room looks out of place:
It's the Gallery, isn't it? All the other rooms have soft, pastel like colours while the Gallery is more bold in it's colours. The newly made railing does knock back the burgundy on the lower wall but the strong yellow of the Tudor Frieze on top . . . .It just doesn't go anymore. The problem is that I really like it and want to keep it. What do I do?
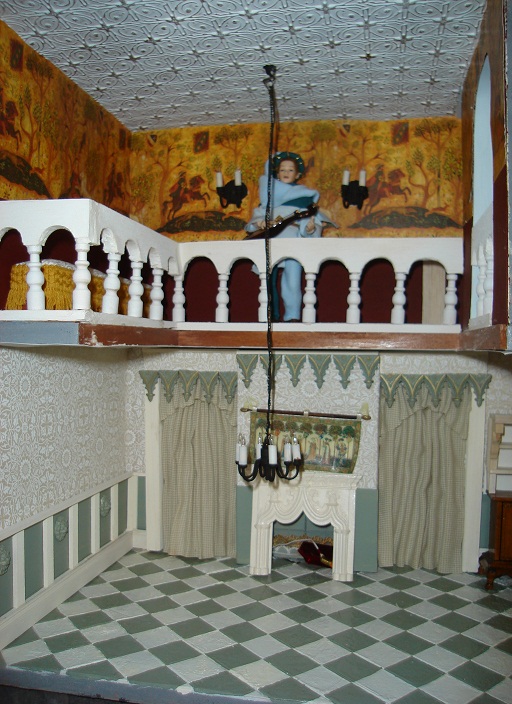
Well, for the moment I'm just ignoring the issue and forging on ahead regardless. The ceiling of the Gallery has been covered with a sheet of 'tin ceiling'painted white with gold rub on paint to highlight the pattern. The railing has been made from prepurchased posts which support lengths of balsa wood which have had arches cut out of the bottom. At the moment it's just spray painted white and still needs a little sanding and finishing and painting the same soft white as featured in the Hall below.
Adding the railing to the cut out in the Solar wall dramatically changed the look of this room. All of a sudden the room started making sense. Finally, the Bespaq chaise looked like it was in the right spot where without the railing it looked all wrong. So continuing the campagin to ignore the Gallery's issues, I made some curtains from the same fabric as used on the bed upstairs to cover the doorway between the Solar and the Gallery and block the view into the problem zone. I make curtains by the pin and starch method. It involves cutting the fabric to length and pinning it out on a piece of foam so that it has nice even pleats, then saturating it with spray starch although some people use hairspray instead. Once dry the fabric will hold the pleats. In the Solar the curtains still need a pelmet adding accross the top to finish them off.
While pleating, I made the curtains for the bed. There is a short curtain against the side wall just to cover over the fact that the fancy cornice/frieze doesn't continue along this wall, curtains at either side of the foot and one at the head end of the side. I think it will look better with another drop at the foot end of the side as well. I just hope I have enough fabric. The fancy trim around the top of the bed was stained and finished at the same time as the rest of the bed with exactly the same colour and in pieces it all looked the same. Put the trim in place and it suddenly becomes a completely different shade of brown. Oh dear, another problem. The only solution is to take it down and re paint it until it decides to be and remain the right colour. (Oh, and Dan says I need to make proper bedsteps too).
There was progress in the Wardrobe as well with the addition of a rail around the top of the stairs and a new storage unit for the back wall. The unit is as always mostly balsa wood with a few ready made turnings and accents. The doors in the middle section open by pivoting on concealed pins. Now I just need to decide whether to give it a wood look finish or a more colourful paint job.
A Randomly Selected Newspaper Headline:
The following is a randomly selected newspaper headline from many years ago:
Welcome to my blog. Please feel free to leave a comment. I assure you I always read and appreciate everything you have to say. Unfortunately, thanks to Blogger being, well . . . Blogger, I can not respond to comments nor leave any on your blogs. They simply disappear into the ether. Occasionally I will remember to respond in the next blog post I put up, but usually these good intentions slip my mind. So if you want to ask a question or get a response to any comments you may have please leave an email address or other contact method in your comment and I will get back to you.
I have also added a separate page to the blog for the Tower of Magic with a brief summary of all the rooms of the ToM in the one spot. The link is just below this and above the main body of the blog, or you can just click here.
Pages
Showing posts with label tudor. Show all posts
Tuesday, February 14, 2012
Monday, January 30, 2012
Down Below and Up Above
For the first time in a couple of years, Tasmania is experiencing a continuously hot summer. Why does the rest of the world seem to like hot weather? I hate it! Not only did my brains melt about a week and a half ago rendering me incapable of thinking clearly but trying to actually do anything is a little like trying to swim through molases. No doubt you'll see more typing and spelling errors than usual in this post for which I appologise in advance. And if I come off sounding wackier than normal, it's because at the moment I am.
Dreaming of cool, damp caverns at least inspired me to get a few more layers of paint on the walls of the Magicians Cave. They are now looking much more like natural rock although there are still places, especially in the grotto, where there is no paint. Anyone else who's planing to make a cave; stop and consider how you'll get a paint brush into tall the nooks and crannies first! The door which was made from impressions in the clay at the same time as the stone walls has been painted a woody brown but needs more work. A wooden railing of prebought balusters prevents anyone from falling down off the raised platform. Wires for the lights have been threaded through the back wall but the lights are also not yet finished.
On the top floor, I've done some work in the bedroom and wardrobe. Strips of balsa wood in a grid pattern make a panelling effect on the walls. The plaster coving that had been intended for the solar tops the panelling in the bedroom end. It was painted a creamy white to match the panelling, then the detail of the coving was picked out in red, green, blue and gold. As expected, I made a mess of the corner, but hopefully once filled and patched it will be less noticable. Because the original plan was to use the coving in another room, I don't have enough to do the wardrobe as well. I haven't decided whether to buy more or leave the top of the wardrobe walls plain. What do you think?
The bed is made of balsa wood, wooden beads and some fancy panels. It reaches from floor to ceiling as it holds the ceiling up. Unfortuantely it is a trifle too tall and actually makes the ceiling arch up a little. If I decide that I can get it out again with out pulling it to peices, I'll cut it down just a little. The bedspread is a printed lawn fabric and evtually there will be matching bedcurtains too. The green behind the fancy panels in the bedhead needs changing to something else.
Finally, I played a little with the lighting in the crypt. I used part of the clear plastic pack the lights came in, covered it with swirls of blue and green glass paint and put a light bulb inside to create a creepy sort of glow that eminates from behind the stairs. It looks quite good in real life, but in a photo it looks like this:
Not so good. Are light effects always hard to capture or am I just a lousy photographer? I'll use the same method to light the grotto in the Magicians Cave. Perhaps I'll manage to get a better photo of that.
Dreaming of cool, damp caverns at least inspired me to get a few more layers of paint on the walls of the Magicians Cave. They are now looking much more like natural rock although there are still places, especially in the grotto, where there is no paint. Anyone else who's planing to make a cave; stop and consider how you'll get a paint brush into tall the nooks and crannies first! The door which was made from impressions in the clay at the same time as the stone walls has been painted a woody brown but needs more work. A wooden railing of prebought balusters prevents anyone from falling down off the raised platform. Wires for the lights have been threaded through the back wall but the lights are also not yet finished.
On the top floor, I've done some work in the bedroom and wardrobe. Strips of balsa wood in a grid pattern make a panelling effect on the walls. The plaster coving that had been intended for the solar tops the panelling in the bedroom end. It was painted a creamy white to match the panelling, then the detail of the coving was picked out in red, green, blue and gold. As expected, I made a mess of the corner, but hopefully once filled and patched it will be less noticable. Because the original plan was to use the coving in another room, I don't have enough to do the wardrobe as well. I haven't decided whether to buy more or leave the top of the wardrobe walls plain. What do you think?
The bed is made of balsa wood, wooden beads and some fancy panels. It reaches from floor to ceiling as it holds the ceiling up. Unfortuantely it is a trifle too tall and actually makes the ceiling arch up a little. If I decide that I can get it out again with out pulling it to peices, I'll cut it down just a little. The bedspread is a printed lawn fabric and evtually there will be matching bedcurtains too. The green behind the fancy panels in the bedhead needs changing to something else.
Finally, I played a little with the lighting in the crypt. I used part of the clear plastic pack the lights came in, covered it with swirls of blue and green glass paint and put a light bulb inside to create a creepy sort of glow that eminates from behind the stairs. It looks quite good in real life, but in a photo it looks like this:
Not so good. Are light effects always hard to capture or am I just a lousy photographer? I'll use the same method to light the grotto in the Magicians Cave. Perhaps I'll manage to get a better photo of that.
Labels:
1/12,
australia,
castle,
construction,
craft,
doll,
doll house,
dollhouse,
dolls house,
dollshouse,
fantasy,
house,
medieval,
mini,
miniature,
scale,
tudor
Monday, September 19, 2011
Meet the Witches
This week I dressed and wigged the dolls for the shop. To keep with the "no fixed era" feel of the shop, all the dolls have different styles, some that point to a particular era in history and some that are simply "kinda witchy".
Vivienne is definately a witch inspired by Georgian era fashions. Vivienne herself is made from polymer clay using the female mould that finally arrived a couple of weeks ago. Her underdress is red silk dupion overlaid with a soft black netting. Her over gown is brocade in red and black with black lace trim around the neck and cuffs. Her hat is red straw braid and her hair is pale blonde viscose.
Gilda is more of a typical witch in a dark velvet coat and tall pointed hat. She is the owner of the shop on lives in the grand house behind the green door in the garden. She's a Heidi Ott soft bodied doll.
Isis is another polymer clay and mould made doll. She's the most exotic of the witches wearing a chiffon underdress and brocade overgown with ribbon and leather sandals and long black hair parted in the middle.
Theya and Althea are a pair of junior witches sent out on an errand to collect some supplies from the shop. Althea's dress was taken off a cheap porcelain doll who was redressed some time ago. It was shortened and a yellow ribbon belt added. A black shawl and junior sized witch hat finish off her outfit. Theya is too young for the dark colours usually associated with witches, so her dark navy dress is covered with a colourful floral pattern and trimmed with pink ribbon.
Tisha was made using the 24th scale doll mould. When her wings are ready, she'll become a Faerie witch. The doll used to show her scale is Ursa. Ursa was actually dressed for another scene some time ago, but will likely settle in the witch shop for a while.
And finally, here's Hetty in her shop assistant outfit. Firstly, let me say that the big blue bow is going to be replaced, perhaps with a nice broach or some such. Hetty wears a blue and black lace trimmed apron to tie in the the decoration scheme of the shop.
Finally, here are a few pictures of how the new witches are settling in to the shop:
Tuesday, June 21, 2011
All Booked Up . . .
Being a report on Castle Starcaster Week 20 and Witch Shop Week 9
Wow! 99 Followers! How amazing! Welcome to Oberon's Wood who is a pagan artist and miniaturist. Her miniatures shop can be found at Sorceress Hollow.
I started out the week making books, lots and lots of books. Some are from a kit and consist of a book sized block of wood around which a piece of leather is wrapped like a book cover. Some are made from old phone books and covered with printed paper covers. (I plan to do a tutorial on this method of book making soon, so be sure and check back later in the week!) Everytime I finished a book I tossed it onto the floor of the Castle's library. Eventually, the entire floor of the library was knee deep in books. I knew I still didn't have enough books, but was so tired of making them that I decided to stop and put what I had on the shelves to get an idea of how many more I needed. To my surprise I had enough books to fill all the shelves in the Library. It's remarkable how much better the room looks with books on the shelves (especially compared to when they were on the floor!) The bad news is that I have no books left over for the witch shop and thus still have about as many books yet to make as I have already made.
Before I could fill the shelves, I had to remove the dragons who had decided they were a safe place to perch while work was underway in the castle. Remember last week I worked on the Dragon Study room? Well, silly me, those dragons in the library were supposed to be in that room, but I had forgotten all about them! So when they came out of the library, they went into the Dragon room and set about causing mischief in there. One of the additions the room still needs is a nest for the little dragons to rest in when their mischief is done. There are now seven of Nicky Cooper's little dragons in the room, can you spot them all?
Speaking of Nicky, I have another of her lovely creatures to add to the Witch Shop too. He's the Monster-Under-the-Bed and came in a little cage looking very droopy and miserable. I bought him thinking to make him an item for sale in the shop, but have since very carefully pried him out of his cage and am now thinking he will be in one of two possible places. First is hiding under Hetty's bed which will surely make him feel more at home. The second possiblity is to add a collar and leash and have him in the reading room under one of the chairs as the pet of one of the gathered witches waiting forlornly for all the cackling to subside so he can get a bit of rest.
As you can see in the photo, I have finished some more furniture for the shop. The glossy white cabinet that's been seen in earlier photos of the shop has been repainted in black paint crackled to reveal the metallic blue beneath. I "borrowed" a counter from a much earlier shop and found this a better fit than the counter I had been planning to use in the shop, so I swapped counters and repainted the smaller one to match the rest of the shop furniture. Going back to the dragons of Nicky Cooper, some of them came in clear plastic cases with padded bases. These cases were turned into display tables by adding a strip of balsa wood around the base and glueing some Georgian style pre bought legs underneath. A little bit of faux leadlighting outline tape around the edges of the clear tops finished them off and now all they need is something to be displayed in them.
Flipping back over to the Castle, I did a little work in the long neglected dining room. There needed to be a thick fuzzy rug under the table to conceal the fact that the floor is sagging in the middle. The fabric I used for the rug is really weird stuff called feather fabric. It's not as dense as a fur fabric and has a long but sparse pile. The vivid white of the fabric didn't look right against the black floor, so I soaked it in some watered down metallic platinum coloured paint which gave it more of a shipskin or fleece look. The two chairs in the room were recovered with red velveteen and a bench seat was made for the front side of the table. A table runner was made from green velveteen and more of the metallic ribbon used around the tops of the walls. I bought this table specifically to go in this room, but right from the first time I put the table into the room I worried that the table was too big. I still think maybe the table should get the boot and this room should become some sort of sitting room, or at least a dining room with a smaller table. But then what do I do with the very gorgeous table?
While I'm sharing problems, I still don't know what to do with the centre room! It's the room in the exact centre of the castle being on the second of three floors and the middle of the three rooms accross. It has to be a public space (not a bathroom etc) as it opens into the library, has a fake door accessing the supposed back of the castle and has stairs up to the next level. The dining table is not a good fit for this room either, besides a dining room upstairs between a library and a bedroom doesn't seem right. So what can it be? I'm seriously lacking in ideas for this one and any suggestions would be welcome. And no, I don't believe in subtlety when dropping hints.
Wednesday, June 8, 2011
Witch Shop - Week Seven
Yikes! Another new follower to welcome! Hello and welcome to Agata of http://idolcidiagata.blogspot.com/ When I first took a look at the photos on her blog (its written in Italian, so reading it was out without waiting to get it translated) I thought "Wow, that is some impressive miniature food!" but when I looked at the photos more closely I realised Agata makes 1:1 scale food. Real food that really looks incredibly good.
At the start of the week I decided that yes, there was room for fireplaces in the two upstairs rooms of the shop. One of the things that had made me heasitant to add a fireplace in the reading room was the opening roof above the fireplace. How could I make a chimney that looked good both when the roof was closed and open? I solved the problem by creating the impression of a chimney without bothering with an actual chimney. This was done with a sheet of paperclay the width of the fireplace unit and the height of the wall, angled at the top to match the angle of the roof. I used my herringbone brick impress mould to create the impression of bricks in the clay and when dry, painted them to look like bricks and glued the sheet to the wall. The fireplace itself was made from corrugated cardboard. It has a high hearth and two openings in the front, one for a store of firewood and one for the fire itself. The design was based on my hazy recollection of a Tudor fireplace I think I saw in a dollshouse magazine once. It is finished off with more clay, another impress mould and brick coloured paints. Because the fireplace juts out from the wall but the "chimney" doesn't, there is a nice wide ledge ontop of the fireplace to display some heatproof witchy items. The afternoon tea spread for the withes reading group will have to go on the little table to the side of the fireplace or on the coffee table in the middle of the group of chairs. I do have an old tea trolley in my box of miscellaneous furniture, but there is no where for it to go. What ever gave me the idea the rooms in this kit were big and spacious? I could do with them being at least half as big again!
In the Bedsit I made a simple rectangular fireplace that covers about two thirds of the back wall of the room. It was made out of thick corrugated cardboard which was then coated with some polyfilla and painted white to resemble rough plasterwork. The hearth was covered in a thin layer of paperclay on which I used my herringbone brick impress mould. The back of the fireplace is prebought MDF brickboard. Both this and hearth were painted first in mortar grey, then dry brushed successive layers of brick tones of reds and browns before the lot was covered in "soot" (black paint). A thin strip of balsa wood accross the top of the opening creates the look of a lintel while some bits of black wire bent into hooks and stuck up the chimney make pot hangers (or do I mean cauldron hangers?). Now Hetty has somewhere to cook her meals and can keep warm in winter. There's just one problem in this room though, I can't fit a table in it. So Hetty can cook over a fire, but doesn't have anywhere to prepare the meal before it goes in the pot, nor anywhere to sit down and eat. The only solution I hve for this is to make a folding table attached to the wall that takes up no space when not in use, the only problem no one will be able to get in or out of the room when it is in use. It may not matter anyway as I have just bought a shiny brass bed for the room that I hope will fit. There is a good chance that when it arrives I will have to completely rethink the room to fit it in. So I won't be making any changes in this room for a couple of weeks until the bed arrives and I have the chance to see how it looks.
Labels:
1/12,
australia,
bedroom,
construction,
craft,
doll,
doll house,
dolls house,
dollshouse,
fantasy,
follower,
house,
kit,
medieval,
miniature,
scale,
tudor,
welcome,
witch
Tuesday, May 31, 2011
Witch Shop - Week Six
It's the last day of my giveaway, so be sure to enter now if you haven't already! The winner will be drawn later in the week.
Do you remember the sideboard from last week that I was debating whether or not to use or to put a fireplace in the space instead? Well, regardless of whether I do add a fireplace (and at the moment I'm thinking I will) the sideboard won't be going in the upstairs room. That's because it now looks like this:
I transformed it into a shelving display unit for the shop downstairs by making a unit of shelves to sit on top of it. The shelves are balsa wood while the more decorative front pieces of the shelves are cardboard. The unit was finished by painting with a coat of a silvery metallic blue, a coat of crackle medium and then a coat of black which obligingly cracked to reveal the blue beneath. I'm really pleased with how it turned out, but unfortunately I haven't been able to get a really good photo of it. As of tomorrow it is officially winter in my part of the world and the sunlight, when we get it, has been pretty lousy. Using a flash just doesn't show the detail of the cracked paint very well.
In the background of the photo you can see another unit for the shop. This is just a cheap sideboard, the only change made to is was to paint it the same way as the shelves. It was meant to be the shops hat display stand, but as you can tell from the two hats displayed on it I either need smaller hats, a larger stand or accept that the shop will have very few hats on offer. The hats both on the stand and in the photo below were also made for the shop this week.
I don't know what the manufacturers treat the straw braid with, but it's addictive. When I first used it to make floor mats, I kept going until I ran out of straw. With hats it takes longer to run out of straw as they are more complicated and hence slower to make, but they are just as addictive as the mats were. I'm especially proud of the tall, crooked two tone purple hat. All four of these hats still need finishing with some trim, but I'll leave that until I've made a final decision which hat will be for sale in the shop and which will be being worn by the shops customers so I can be sure to accessorise the hat to match the outfit. I have just one question about witches hats though . . . . When a hat is purchased it should be packed into a suitable hat box for the customer to carry home, but how do you make a hat box to fit a pointy witch hat? I have a feeling the process will involve a lot of cursing.
Do you remember the sideboard from last week that I was debating whether or not to use or to put a fireplace in the space instead? Well, regardless of whether I do add a fireplace (and at the moment I'm thinking I will) the sideboard won't be going in the upstairs room. That's because it now looks like this:
I transformed it into a shelving display unit for the shop downstairs by making a unit of shelves to sit on top of it. The shelves are balsa wood while the more decorative front pieces of the shelves are cardboard. The unit was finished by painting with a coat of a silvery metallic blue, a coat of crackle medium and then a coat of black which obligingly cracked to reveal the blue beneath. I'm really pleased with how it turned out, but unfortunately I haven't been able to get a really good photo of it. As of tomorrow it is officially winter in my part of the world and the sunlight, when we get it, has been pretty lousy. Using a flash just doesn't show the detail of the cracked paint very well.
In the background of the photo you can see another unit for the shop. This is just a cheap sideboard, the only change made to is was to paint it the same way as the shelves. It was meant to be the shops hat display stand, but as you can tell from the two hats displayed on it I either need smaller hats, a larger stand or accept that the shop will have very few hats on offer. The hats both on the stand and in the photo below were also made for the shop this week.
I don't know what the manufacturers treat the straw braid with, but it's addictive. When I first used it to make floor mats, I kept going until I ran out of straw. With hats it takes longer to run out of straw as they are more complicated and hence slower to make, but they are just as addictive as the mats were. I'm especially proud of the tall, crooked two tone purple hat. All four of these hats still need finishing with some trim, but I'll leave that until I've made a final decision which hat will be for sale in the shop and which will be being worn by the shops customers so I can be sure to accessorise the hat to match the outfit. I have just one question about witches hats though . . . . When a hat is purchased it should be packed into a suitable hat box for the customer to carry home, but how do you make a hat box to fit a pointy witch hat? I have a feeling the process will involve a lot of cursing.
Wednesday, May 25, 2011
Witch Shop - Week Five
I'll lead this week with another reminder about my giveaway. It's been open for over a month now and it closes on the 31st May . . . And I have four entries. Four. It's really quite embarrassing. Other bloggers start giveaways and in under an hour they have more than four entries, in fact some can have close to forty. I know I can't produce the amazingly jaw-dropping fabulous prizes other bloggers can but please, please take pity on me and enter anyway. All you have to do is leave a comment suggesting a name for my Witch Shop and it doesn't even have to be a good name. Please. Oh, please. . . . .
Now I've finished crawling, i'd better get on to the Witch Shop. Most of the progress for this week was in the large room upstairs. This room is destined to house the shop's book section, so it really needed some bookshelves. These were made from balsa wood to fit in the right side back corner of the room. I'm quite pleased with how they turned out, but I think they could use some fancy trim along the top to finish them off. Between these shelves and the castle's library, I have a lot of books to make in the near future. Could a hand made book be among the mystery items in the giveaway prize?
After the shelves were in position, the room started to look more like a room than just an empty box, but it was the addition of rails around the stair well that really transformed the room. The rail is just pre bought spindles and posts with a balsa wood handrail, but the effect on the room was amazing. There is one problem with the position of this staircase however. When I decided to put it there way back when I assumed the door from the external steps would be hinged on the side of the back wall. As it turns out, it is hinged from the other side. Thus to enter the room through this door you have to open the door about halfway (which is when it hits the railing and can't open any more), shuffle into the small triangle of room open to you, climb over the stair rail and close the door while balancing precariously and hoping there's no one downstairs positioned to see up your skirt, then clambour back over to the right side of the rail. I'm thinking there should be a big pot plant or something in this corner to make it clear that the door fell out of use after the internal staircase was added.
The main floor area in this room will be occupied by a variety of eccentricly miss-matched chairs where the witches book club meets. On the left hand wall there is currently a sideboard where there will be a range of cakes and other treats for the witches to snack on durring their meetings. On the other hand, this is the only place in the room there could be a fireplace. I really want a fireplace in this room, but is it more important than delicatable, sugary treats? And the chimney would be a real b****r to try and make and instal as the roof over this wall opens and is angled. What to do? What to do?
I borrowed the bed from the castle to play around with the layout of the bedsit next door to the reading room. After trying the bed in various positions I decided that the room worked best with the bed in the least likely place; along the front wall. Because the door opens back toward the reading room rather than into the bedsit, there is just enough room to get in and out around the foot of the bed. This arrangement leaves plenty of space in the room for other furniture and a maximum of wall space which can be used to add a fireplace either on the back wall or either of the side walls.
Finally, don't forget that there is a separate post each week for the castle so be sure and go back to take a look for it and it you haven't already done so, Please enter my giveaway!
Labels:
1/12,
australia,
construction,
craft,
doll,
doll house,
dolls house,
dollshouse,
draw,
fantasy,
giveaway,
house,
kit,
medieval,
miniature,
rug,
scale,
stairs,
tudor,
witch
Tuesday, May 3, 2011
Witch Shop - Week Two
The obvious component missing at the end of last week was a roof so this week I pulled out yet more air dry clay and another impress mould to "tile" the roof. I bought the roof tile mould at the same time as the brick moulds nearly twelve months ago, but hadn't used it before. You may be wondering why I didn't use it for the roof of the Dancing Dragon Inn and spent weeks cutting individual tiles from cardboard instead. The simple answer to that question is that I forgot all about the mould! I didn't remember it until the next time I opened up the box that holds the various moulds I have and lo! there it was.
As usual when using these types of mould I started by rolling out a sheet of clay about 2mm thick and glueing it onto the roof of the shop. Most of this was then covered with cling film, leaving exposed only the area I was working on. The mould was then pressed down onto the flat clay to create the impression of tiles. I then smoothed the clay over to erase what I had just done, turned the mould up the other way and started again. If you ever want to try using one of these moulds, I'd reccommend using a marker pen to draw a big arrow on the back so you can't mistake which way is up. Unlike the brick moulds that work beautifully by pressing straight down and pulling straight up again, the roof tile mould needs to be pushed down into the clay and slid up it a little, then pulled off by sliding down and pulling up to get a good impression. Otherwise all you get is the vertical lines and nothing of the horizontal ones. It took a couple of tries to get the right technique, but from there the rest of the roof was a breeze. I used a metal palette knife and a ball tipped stylus to add the tile impressions in the tight spots where the mould wouldn't fit and to fix up where the impressions left didn't come out quite right.
The next day when the clay was dry, I started painting it. A couple of coats of a medium brown were followed by dry brushing some burnt sienna (a reddish-brown) over the top. I had been going to add some more layers of colour, but the roof looked so good at that point I decided not to risk messing it up.
Inside, I used a tessalated tile paper to cover the floor of the ground floor. Yes, using paper is a cheat and not as effective as a dimensional floor (i.e real tiles) but by the time the shop is full of stuff, I don't think enough floor will be visible for this to make much difference. I'm still trying to decide the best way to lay out the shop on this level. Lots of shelves around the walls and a variety of display tables in the middle is most likely, but I keep running out of space for a counter. In fact, I keep running out of space period. When I dry built the kit it seemed like the inside space was massive and I'd never be able to fill it. Now I think it's shrunk and needs to be bigger!
The shop still doesn't have a name and I'm still appealing for suggestions. If seeing what I've done so far has given you any inspirations as to what the shop should be called, please enter my Suggest-A-Name Giveaway. The prized include all manner of oddments from a faux window to a meat pie, all hand made and I'll be adding more items to the prize before the giveaway closes. All you have to do to enter is suggest a name for the shop or suggest something to include in the shop by leaving a comment on the Giveaway post. I have managed to come up with one idea myself; "The Crack'd Cauldron". What do you think?
The next day when the clay was dry, I started painting it. A couple of coats of a medium brown were followed by dry brushing some burnt sienna (a reddish-brown) over the top. I had been going to add some more layers of colour, but the roof looked so good at that point I decided not to risk messing it up.
Inside, I used a tessalated tile paper to cover the floor of the ground floor. Yes, using paper is a cheat and not as effective as a dimensional floor (i.e real tiles) but by the time the shop is full of stuff, I don't think enough floor will be visible for this to make much difference. I'm still trying to decide the best way to lay out the shop on this level. Lots of shelves around the walls and a variety of display tables in the middle is most likely, but I keep running out of space for a counter. In fact, I keep running out of space period. When I dry built the kit it seemed like the inside space was massive and I'd never be able to fill it. Now I think it's shrunk and needs to be bigger!
The shop still doesn't have a name and I'm still appealing for suggestions. If seeing what I've done so far has given you any inspirations as to what the shop should be called, please enter my Suggest-A-Name Giveaway. The prized include all manner of oddments from a faux window to a meat pie, all hand made and I'll be adding more items to the prize before the giveaway closes. All you have to do to enter is suggest a name for the shop or suggest something to include in the shop by leaving a comment on the Giveaway post. I have managed to come up with one idea myself; "The Crack'd Cauldron". What do you think?
Labels:
1/12,
australia,
construction,
craft,
doll,
doll house,
dollhouse,
dolls house,
dollshouse,
fantasy,
giveaway,
house,
kit,
medieval,
miniature,
scale,
tudor
Monday, January 31, 2011
Dancing Dragon Inn - Week 21
A few finishing touches were added to the Inn this week. In the "low" bedroom a tapestry was added on the left hand wall, a faux hide mat and a bolster cushion were added to the top of the blanket box, thus elimintating the naked look of this wall.
Labels:
1/12,
australia,
castle,
construction,
craft,
doll,
doll house,
doll house miniature,
dollhouse,
dolls house,
fantasy,
follower,
history,
house,
medieval,
scale,
tudor,
welcome
Thursday, January 27, 2011
Dry Building the Retreat and Bakery
After a short break I decided to take the chance that the pieces I thought were the right ones and had to be the right ones because nothing else looked anywhere near right. I'm guessing there must be a reason why the lower rear roof comes in so many pieces when the upper rear roof is all in one, but it isn't very good for the sanity of the kit builders. With a few more pauses to scratch my head, I got the rest of the roof together. The front roof over the overhang room was a nuisance. Because the overhang tended to droop a little, the room pulled itself off square and so the roof didn't quite fit right and when you tried to jiggle it to go together it all came down. It will detinately be a good idea to secure the posts and beams underneath this room before trying to put the roof on permanently.
I still have a lot of thinking to do over both kits before I unbox them again for their permanent builds. I bought both because I liked them and knew I might not have the chance to buy them in Australia again, not because I had really brilliant plans for them. The (hopefully) rapidly approaching Cumberland Castle kit is different. I always know what to do with a castle, but I'll blather on about my ideas for that a little later on. For now, I'll share a photo of Ginny the cat with you. I said in my last post that I'd been looking though old miniatures magazines to look for ideas, well here's the proof that I have been doing that, but not on my own.
Labels:
1/12,
australia,
castle,
construction,
craft,
doll,
doll house,
dollhouse,
dolls house,
dollshouse,
fantasy,
house,
kit,
scale,
tudor
Tuesday, January 25, 2011
Dancing Dragon Inn - Week 20
At first I thought I'd dressed enough dolls for a few weeks. Then I reconsidered and decided to go ahead and dress the seven remaining dolls the Inn needed. Like the previous dolls, this batch was supposed to have a Tudor look to them. Mostly they don't. Again something went wrong and the men look more like they should be of a later period. Oh well, at least they look at home in the Inn.
With everybody dressed, I played around positioning and re-positioning them in the Inn until I was happy where everyone was and then played around with various accessories for the people to use. In the tavern I arranged the foodstuffs I made previously and Tacky Waxed them to the tables when I was happy. The beer mugs were all filled with foaming ale (i.e. scenic water pumped full of bubbles) and some eating utencils were pulled out of storage to finish the tables off. much the same treatment was given to the table in the "low" bedroom on the next floor except this table was much more messy, holding not only good and beer but also maps and papers.
Down on ground level I finally made a market stall out of balsa wood scraps and loaded it with a variety of goods including apples (or perhaps they're tomatoes, it's hard to tell as I made them from polymer clay sometime previously), candles, flowers and bananas. Yep, bananas. Not very tudory I know but I made them ages ago and never found a good place to use them and I had an empty spot at the end of the stall . . . . and after all it is a fantasy inn. Basically anything hanging about in my box of miscellanious accessories ended up on the stall.
If you have any suggestions or can see anything about the Inn you think is still in need of attention, please feel free to let me know.
Labels:
1/12,
australia,
castle,
construction,
craft,
doll,
doll house,
dollhouse,
dolls house,
dollshouse,
fantasy,
follower,
history,
house,
medieval,
miniature,
scale,
tudor,
welcome
Subscribe to:
Posts (Atom)