A Randomly Selected Newspaper Headline:

The following is a randomly selected newspaper headline from many years ago:

Welcome to my blog. Please feel free to leave a comment. I assure you I always read and appreciate everything you have to say. Unfortunately, thanks to Blogger being, well . . . Blogger, I can not respond to comments nor leave any on your blogs. They simply disappear into the ether. Occasionally I will remember to respond in the next blog post I put up, but usually these good intentions slip my mind. So if you want to ask a question or get a response to any comments you may have please leave an email address or other contact method in your comment and I will get back to you.

I have also added a separate page to the blog for the Tower of Magic with a brief summary of all the rooms of the ToM in the one spot. The link is just below this and above the main body of the blog, or you can just click here.
Showing posts with label egypt. Show all posts

Monday, May 14, 2012

The Mummy Returns


Another week, another pair of pilars.  These two are definately an improvement over the originals, nowhere near as lumpy and uneven . . . . . It's just too bad some idiot painted them in a colour scheme that works best within circus tents.  And the bullseye pattern on the bases is just too much.  But guess what?  I don't know what other colours would look better, so for the time being at least they are staying as they are.  The area over the door is decorated with a fridge magnet depecting an Egyptian style head.  On the whole, the inside space of the Dig Site just hasn't cooperated or gone to plan at all.  I should have been less ambitious and just done an outside scene and skipped the inside bit.


On the plus side though, Kikerikotep (just call him Kiki, it's easier) has turned out wonderfully.  Since last week he's had his wrappings "dirtied" up a little more through the application of a couple of layers of brown paint that had been watered down a little.  Somehow he looks more cheerful than menacing so maybe he has those red eyes not because he possesses some sort of evil power but simply because he's been awake for the past two thousand years.


Right outside the door, Wil now holds a lantern in one hand and a pistol in the other, ready to peer through the hole he's chipped in the door and discover what lies within.  The first thing he'll see is Kiki . . . good thing he's got his gun ready then?  His lantern is a piece of acetate sheet cut into a cross shape and then folded to create a box.  Faux leadlighting outliner covers the corner joints as well as the top and bottom to create the impression of a metal structure/frame.  A loop of black wire pushed into the faux lead while it was still wet creates a handle while a red glass seed bead acts as a flame within.


 The Site is now more or less finished.  The space between Wil, Agnes and Aldo seems a little empty, as does the space between the first two sections of pilar, but I can't think what to put there


 I seem to have managed to forget to take agood photo of it, but one of the finishing touches I've added are logs on the fire.  The logs are bits of real firewood scrounged from the bottom of the woodpile.  I held them over a candle to char them a little then added them to the fire.  In the past I've used black paint to give logs a charred, burned look, but the real thing looks so much more convincing.


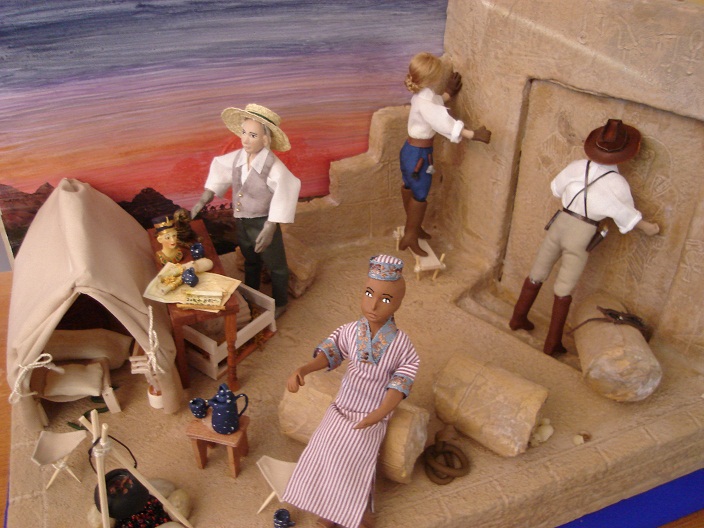
 All the lose parts (tools, snakes, arefeacts, cups, etc) have been fixed in place with Tacky Wax.  You may notice Rashid now has hair.  I realised one of the reasons he didn't look right was that he didn't have ears!  (oops!)  That solved the to wig or not to wig debate as I had to cover up his lace of auditory organs once I'd discovered it.  His hair turned out messy and I'm still not entirely happy with him.


 A cheeky little bird has perched atop the bust of Nefertiti.  Let's hope he keeps his bowels under control for the duration of his stay on the priceless artefact.


The entire scene is covered by a clear perspex cover.  No sooner had I glued the pieces together to create said case than a cat decided it looked like a good place to stretch out for a while.  At least now I know the cover is Strong.


So, now do I start work on the Georgian at last?


Monday, May 7, 2012

Show Me The Mummy!


After a week of wrapping, stuffing, stitching and glueing the people of the Dig Site are finished!  All four have head & shoulders, lower arms and lower legs made from polymer clay connected by a wire armature (frame or skeleton).  Their 'bodies' are made of foam wrapped around the wire armature with a little extra polyester fill stuffing down their trousers to give them more shapely legs.  They all wear clothes made out of various cotton fabrics.


This is Rashid.  He's the team's local guide and translator.  Yes, his head is too big.  I was going to leave him bald, but I may go back and give him some hair to see if this makes his head look less out of proporition.  His sandals are made from leather while his clothing is made from a cotton fabric.


Aldo is the most experienced member of the team with a lifetime of treasure hunting under his belt.  His hat is absoulutely the best one I've ever made and I'm now thinking that if I ever get around to making that dress shop it will have to have an extensive millinery section.


Agnes is the only woman of the group and perhaps the most keen to get to work.  She even wears some tools on her belt to help her excavate the ruins.  Her wig is a pre-bought one made by Heidi Ott.


Wil, short for William, is the leader of the group.  You saw his hat and gun last week; they were bought online.  His belt, braces and holsters are real leather. His shirt, like Agnes', has seed bead buttons.


And finally, there is one more "person" at the Dig Site. . . . . 


The Mummy, I call him Kikkerikotep, is a 6" high plastic skeleton wrapped in strips of calico.  Once he was fully wrapped he was painted with a mix of glue, water and brown chalk paint to fix the wrappings in place and start to give them an aged look.  The wrappings will still need a little more aging before he's finished.  His eyes are red glass seed beads.


You may have noticed that I've ripped out the columns by the door.  I will have another go at making some new columns.  Once I've done that and cleaned up the mess I've made of the back wall, the Dig Site will be very close to finished.

Tuesday, July 20, 2010

The Pyramid - Week Two


Long ago I collected an assortment of Egyptian themed ornaments which have been boxed away for many years.  After a lot of searching, I finally found the box and discovered within it things I'd totally forgotten about.  Unfortunately all these treasures turned out to be too big to fit inside the Pyramid (including them in the Pyramid is of course why I'd pulled them out).  I did try positioning some of them in the Egyptian Hall I did in 1/12th scale some years ago.  This freed up the pair of small sphinxes from the Egyptian Hall for use in the Pyramid.  I also means that at some point in the future I have to do another Egyptian themed roombox so I can include the left over ornaments.

The main focus of work on the Pyramid this week was the decoration of the inside walls, however.  For the upper walls which angle in with the slope of the pyramid I cut three triangles of cardboard painted a dark midnight blue.  I used glass painting / faux leadlighting relief paint to create gold stars positioned in rows on the cardboard.  Once dry, the carboard panels were glued in place on the walls of the Pyramid.  For the lower walls I also cut pieces of thin card to the correct size and shape.  These were also decorated with faux leadlighting paints using patterns of Egyptian figures traced from books and downloaded from the internet.  For anyone reading this who's never tried it, try going to Google images and typing in "free glass pattern" or just "free pattern" and you will be amazed by how many patterns are out there for free.  The images were first outlined with relief paint and when this was dry they were "coloured-in" with faux leadlightng paint.  Again, the wall panels were glued in place when dry.


The walls still need some trim adding around the edges to tidy everything up.  Once that is done, it's on to the contents of the tomb!

Finally before I go, a warm welcome to new follower Minnie Kitchen.  You'll find her blog here.  As her name suggests she makes extremely appetising miniature food.