A Randomly Selected Newspaper Headline:

The following is a randomly selected newspaper headline from many years ago:

Welcome to my blog. Please feel free to leave a comment. I assure you I always read and appreciate everything you have to say. Unfortunately, thanks to Blogger being, well . . . Blogger, I can not respond to comments nor leave any on your blogs. They simply disappear into the ether. Occasionally I will remember to respond in the next blog post I put up, but usually these good intentions slip my mind. So if you want to ask a question or get a response to any comments you may have please leave an email address or other contact method in your comment and I will get back to you.

I have also added a separate page to the blog for the Tower of Magic with a brief summary of all the rooms of the ToM in the one spot. The link is just below this and above the main body of the blog, or you can just click here.

Friday, April 18, 2014

Restoration


Last week the Dragon's Maiden looked like this.  The window had come off the front roof section, both front pieces no longer sat in position well; they had a tendency to fall off if you so much as looked at them.  The original roof tiles had all slid off and been replaced with a rather ghastly tile look paper.  Now all those problems have been fixed and the Tower restored to it's original glory.


The same vinyl tile that was originally on the roof has been used to restore the roof.  The first time I didn't put any glue under the tile, just relied on the self adhesive nature of the tile to stick them on.  Big mistake.  Every hot day a few more of the tiles would come sliding off the roof as the adhesive warmed up and lot it's grip.  Having learned that lesson, this time the tiles have a good strong glue holding them in place.


The moulding around the top of the walls makes hinging the front difficult as it leaves no room for it to swing open.  So instead I've screwed a magnetic catch in place to hopefully hold the front more securely.


The felled tree has been restored to it's proper place and the tower now looks much as it originally did.


 Next task was to fix up this shop box.  It was originally a magic/fantasy shop, but over the years I had stripped quite literally everything out of it to use for other projects.  I as I didn't want to spend a lot of time on it, I needed to think of something for the shop to sell that I could make with what I already had on hand.  The answer was perfume, sold in bottles made of beads.


I bought this shop very early in my miniatures adventures, long before I discovered how very much I hate top access only rooms/scenes.  Sadly, the front is glued in place too securely to remove it and hinge it to create a front opening room, so top opening it has to remain.


The jewelled plant in the front window is actually an item original to the magic shop.  I'd removed it to try it in another project, decided it wasn't right for that, but never put it back where it came from.  It is now restored to it's original place and surrounded by sparkly perfume bottles on trays.


The left side wall is decorated with some marbled brackets displaying a range of bottles, jewellery on black eva foam panels and the clock taken from the Regency room below.


I was fortunate enough to find this slightly damaged counter at the local Doll, Bear and Miniature fair held over the weekend.  Again, it has been filled with bead perfume bottles, jewellery displays and some other odds and ends that were on hand.


In the centre of the shop is a display case made from a Reutter porcelain container and some pre turned legs.


 On the right side wall is a large mirror in a scrapbooking frame and a seat that I started ages ago for another project before deciding it wasn't going to work in that space.


On the back wall is a large shelf unit filled with assorted perfume bottles.  Silver paper lines the back of the shelves to create a more delicate, feminine look.


You saw the start of the changes to this Regency room last week.  It has now been finished off with a new Reutter porcelain clock and vase set on the mantelpiece and the previously naked lady being dressed in a simple lavender gown.
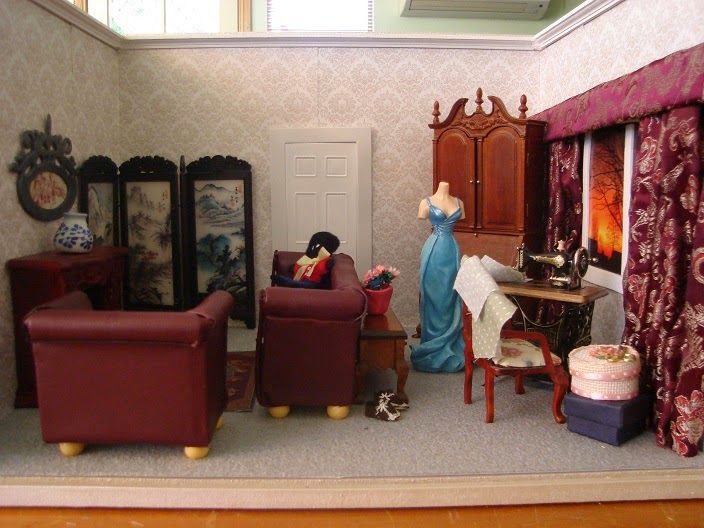


And finally, there is this room.  This is the roombox that originally held the painted bedroom set I started last week's post off with.  I couldn't just leave and empty box sitting around so basically just filled it with whatever I had on hand.  The secretary desk in the back corner was bought for Preston House but was actually taller than the very low ceilings in the house so couldn't be used.


The sewing machine you will remember from a few weeks ago was something of an impulse bargain buy.  The window is a cut out from a miniatures magazine with white eva foam strips to give the impression of a window.  The curtains are brocade.  Apparently brocade doesn't do the pleat and starch thing very well and so the curtains are very second rate.


 The Chesterfield chair and sofa are made from kits that were included in the freebies I received from Lorraine at Fairy Meadow Miniatures last year.  They are covered in faux leatherette in burgundy.  At some point in the future I will probably come back and do something more inspiring with this room but for now it is going back on the shelf while I work on some new projects.


These two 48th (1/4") scale kits are made by Petite Properties in the UK.  I've been wanting to try some more in 48th scale and the moment I saw "La Petit Palais" I knew I had to have it.  I was designed to be done in Shabby Chic style, but I will be using it to create a chatteu of the 1700's (I hope).  The "Old Rectory" I am hoping to make into a medieval or Tudor hall.  I am also hoping to embark upon my long planned 24th scale steampunk airship.  At this point I'm not sure which of these ideas scares me the most!


Tuesday, April 8, 2014

A Few Changes . . .


The Master's Chamber received a few finishing touches this week, most notably some trim around the ceiling.


This trim is a 3/4" wide strip of the same fabric used for the ceiling wrapped around the top of the wall with black braid along the bottom and top of the fabric.


The depth of the trim meant I had to replace the picture frame over the bed with something shallower.  I'm now calling this room finished despite the fact that it really does need another hit of red along the back wall to help tie the "red" theme together.  As I can't think of what to add to do this the Chamber will be staying like this.  At least for now.

Now that the Lab and Master's Chamber are finished, I'm taking a break from the Tower of Magic for a while and first off I'm doing a little restoration on some older projects.


You may recall this roombox from a couple of years ago.  There was nothing really wrong with it but somehow it just never really appealed to me.  So I swapped the room with another old roombox that was a little long in the tooth and denuded by my 'borrowing' things from it for other projects.  This other box is shallower but wider and allows for a better layout of the furniture.  I repapered the walls of this alternate box in a plain lavender coloured paper and moved the new furniture in to create this:


I think it works a lot better than the original.  The box in which the white furniture was originally will also be redone over the next few weeks.


But first, I worked on this old conservatory.  Over the years I'd pinched everything out of this room and let's face it, the décor was never that fab to begin with.  So now it looks like this:


I repainted the walls in plum and raided by stash of furniture.  The planter is a plastic cradle with the rockers cut off.


Although hard to see in the photos there is a bird in the birdcage.  You may notice the cross pieces in the doors are still blue; I can't repaint them unless I take the doors completely apart and as you would normally be looking into the room from the front and unable to see them I don't think it's worth the risk of serious damage.


Looking in from the front there is one slight mistake in this room.  Can you spot it?  There is no knob on the faux door on the back wall.  Oops!


This roombox also suffered from furniture thieving and is in the process of being restored.  I've added the desk that was in the roombox that became the lavender walled bedroom.  I still need to do a few things in here, such as dress the second lady.  I'm hoping to find a matching pair of vases (or other ornaments) for the mantle at the local Doll, Bear and Miniature fair this weekend.


The "Dragon's Maiden" is in the need of the most attention.  After years of being climbed over by cats, the front garden has been decimated, thanks to the way DHE designed the kit, the front pieces will only go back in place and stay there if you don't breathe on them, the roof needs totally re-shingling and the insides just need tizzy-ing up.  This is a lot of work when you consider that I want to have it all finished by Easter so I can use my few days off to start something completely new.


Tuesday, April 1, 2014

Wizards and Wallpapers


Would you believe I've found the room to squeeze even more into the Lab this week?  There are a few more jars and accessories wedged in there than there were last week, but the main additions were Chrysta and a newly made wizard to work in the Lab (though I still don't think Chrysta has the right outfit on for the setting).


As usual the Wizard, Felix, has polymer clay head, hands and feet (made with moulds) connected on a wire armature with a foam body.


He wears a fairly basic wizarding robe and a silly, very tall pointy hat.


He carries a staff which started life as the top/dipstick in a $2 perfume bottle.


When in the Lab, you can see why he needed the ridiculously tall hat - without it he'd get completely lost from view back there.


Chrysta is naturally at the front so you can see her glamorous dress more clearly.


I think the Lab is more or less finished now, certainly it's getting very hard to find empty spots in there.


The Master's Chamber now has it's own resident, the Master himself who admittedly looks much more like a Georgian gentleman than a wizard.  He wears his dressing gown and matching nightcap.


He is standing by his open wardrobe trying to decide what to wear for the day.


I finally made the decision to replace the black and white wallpaper with a softer grey and white one.  The damask pattern of the new paper gives the room a more feminine touch, something I had been trying to avoid in this room but I reached the conclusion that the pattern on the walls needed to be less harsh.  I also had tried to avoid replacing the paper because despite the fact it was one of the things that just wasn't working in the room I did really like it as a paper.


The room does work better with the new paper, although it's still not a particularly great looking room.


All the accessories have been added including things like books, candles, a spare wizarding hat and the sort of junk that tends to accumulate in bedrooms.


I still need to add some type of coving around the ceiling and possibly add a few more hits of red around the room to help tie it together a little more.


Monday, March 24, 2014

The Best and The Worst


The two current rooms on the Tower of Magic are shaping up to be the best and the worst of the rooms done for the ToM so far.  The 'worst' is the Master's Chamber.  Since you last saw this room I've rearranged the layout by ripping out the fireplace and moving it to the opposite wall and adding a chimney breast behind it.  The bed has moved over to where the fire used to be.  The sample furniture you saw last time has either been replaced with a more suitable counterpart or repainted to match the scheme of the room.  The furniture in here is a real mix of qualities from the good quality JiYai bedside/nightstand to a slightly crooked handmade washstand.  The wardrobe is made from a kit with some missing and damaged parts I picked up on ebay a few months ago and the plastic desk was part of the huge parcel of freebies Lorraine at Fairy Meadow Miniatures sent me before Christmas.


By rearranging the room and taking out those rather nasty windows and curtains, I think this room will work when I get to put it all together.  Maybe.  Hopefully.  It will never be my favourite room though.  I'm not sure if it's because the black and white pattern on the wallpaper is too bold, if it's all the red or if the whole thing is just a really bad design scheme.  Well, at least I've gotten things right in the Lab . . .


 Last time you saw the Lab it was pretty much a blank slate ready and begging to be filled, so fill it I did.  First off the furniture was stained in a mix of walnut and mahogany stains to make it as close a match to the Angel Downton side table as possible.  Then I trawled through my stash for suitable accessories pulled out the polymer clay to make what I didn't have.


On the central main table a spell book rests open (totally hiding the bookrest beneath it).  The wizard working in here is a little sort sighted so a large magnifying glass is attached to the table and positioned over the text to make it easier to read.


Whatever the spell in progress, it seems to involve a quantity of mushrooms and is progress is being supervised by one of Nicky Cooper's cute little dragons.  An agate slice serves as the chopping board.


Books are stacked on the opposite corner of the table with candles left burning on them until the melted wax has run down the stack.


In the corner of the room a fire burns in the fireplace.  Glass bottles have been stored on the lip around the hood of the fireplace and a selection of utencils hangs from the bar to the front.


From the side you can see the pair of cauldrons hung over the fire so their contents can bubble away.


Next to the fire on the back wall is the lectern.  This is filled with a range of scrolls and books.


Atop the lectern is an open spell book.  It's rather obvious in these photos that it's made from an old telephone directory with a cut out from a dollshouse magazine glued between the pages.  It has a metallic red leather cover.


On the right wall are the open shelves.  These have been stacked with a range of pots and jars and even more books and scrolls.


The side table rests along the opposite wall.  This holds more jars, books and another of Nicky's little dragons.


Over the side table, a range of jars hang from the overhead shelf.  These were supposed to hang from a large rack over the centre table, but there wasn't really enough height and it made the room look too crowded so I bent some short pins with pliers and  pushed them into the underside of the balsa wood shelf to create quick hangers for the jars.


This little imp in a cage was also supposed be be on the central rack but for now is hanging from the ceiling hook intended for the defunct rack alone.


As you might imagine, after collecting and making all these bits and pieces it took an entire day just to position them in the Lab and fix them down.


The Lab is shaping up to be my favourite room in the ToM so far.


 Those of you who follow Daydreamer at About My Dollhouses will remember a few weeks ago when she showed off her newly aquired sewing machine.  Well, I hate to be a copycat, but here's my version of her picture of two sizes of vintage sewing machine:


I really couldn't believe it when after reading her post and marvelling at the detail of the miniature I clicked over to ebay to see if there were any bargains going and found an identical Bodo Hening machine listed as part of a bulk lot with other furniture.  And more unbelieveable was the starting price and no one else was bidding on it.  I couldn't resist and  put on a bid for 1c more than the starting price expecting to be outbid, but no.  Clearly the seller nor the other buyers on ebay in Australia realised quite what was on offer and I was thrilled to snap it up for a bargain price.  The detail of the miniature really is astounding, especially when you see it next to a 'real' machine (in this case my Grandmother's).  In fact if the miniature had a hole in the needle I think you could almost actually sew with it.  I guess now I have to start planning a sewing room somewhere . . . .

And other side note to finish for this week, this one aimed at my fellow Australians.  Since I started miniatures I've been trying to find some thin, supple leather for upholstery, clothing and accessories but never been able to find anything really suitable.  It was all either too thick or too stiff.  Last week I went into my local Spotlight and found something new called 'faux leatherette' in the fabric dept.  It is no more than a millimetre thick and as soft and supple as a regular fabric and looks enough like real leather for all but the most finicky.  If your local Spotlight is like mine they will sell what they have in stock and never get any more in again.  So my tip if you want some leather suitable for miniatures is to head into Spotlight now and grab some before it's gone.