

More work on the fireplaces this week with the fire inserts being made. Unfortunately, the inserts are basically black, most of them on a black background and therefore they do not take good photos.
 |
| Nusrery Fire without surround |
The two bedroom fireplaces each have a slighly curved recessed back with a small oval shaped firebasket. The firebasket is a block of balsa wood carefully carved to shape. A big block was then cut out of the middle top of the balsa creating a hole for the "fire" to sit in. The front of this hole was covered with some lace to act as a grate to hold the coals in. As the fireplaces are back to back I decided to cut down on the number of light blubs needed by cutting a hole in the backs of the fires. This was actually a necessity for these fires as the bulbs I have are flickering units, two bulbs per unit and one of them about an inch long - no way it would fit in just one of theses small fires.
 |
| Bedroom fire with surround |
The coals and embers were added over the top of the bulbs by cutting some clear acetate sheet to size and covering it with a messy mix of black and red seed beads and yellow and orange faux leadlighting paints. Once dry, the paints glue the beads firmly in place and the acetate simply slots into place and can be easily removed if I need to get at the bulbs beneath. Having done all this, most people would immediately plug the bulbs in to test the effect. Unfotunately, although I have fed the wires out to the back of the house I haven't hooked everything up yet. Hopefully everything will work and look OK. Hopefully . . . . . Still, they look quite fire like even unlit.

One floor down, the fireplaces in the Study and Drawing room were made much the same way. The fire baskets are of a different design and made out of cardboard, balsa wood and some mesh, but everything else was done the same way. For the back of the fire in the Study I used some of the leftover marble tile paper from the Hall floor. Not the smartest idea as it highlights the difference between my hand painted marble attempt and the way a marble effect should look, but by the time it's been dirtied up with a little soot, hopefully it will all blend together.
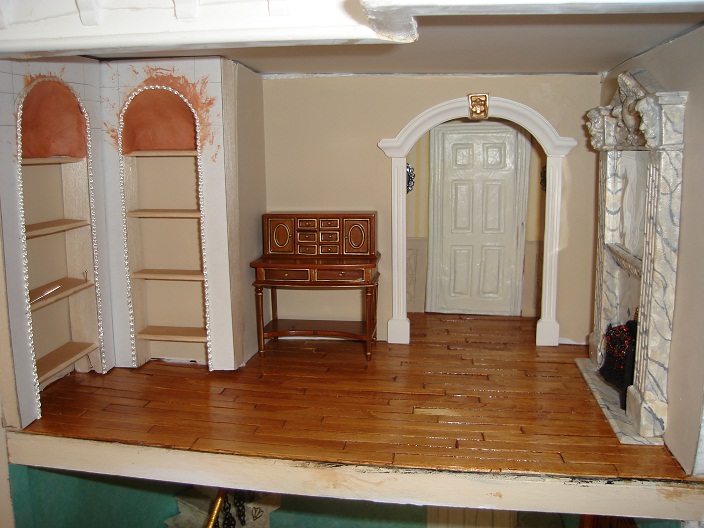
Staying in the study for a while, I've installed the arch over the doorway and made a start on the bookshelves. The shelves are balsa wood with cardboard fronts. Some air dry clay was used to make the backs of the top shelves curve forward to meet the front edges.

Perhaps the biggest changes this week are in the drawing room. Not only does it now have a fireplace, it also has some dado frieze wallpaper , coving/cornicing around the ceiling, windows and niches.

Here you can see one of the men who lived in the house before I started to renovate it has dropped by to check on the progress. It's a relief to see that he looks right at home in this setting - It means I must be getting something right!

If you look closely, you'll see the joins in the coving are very badly done. It's partly because the pieces of coving themselves were different thicknesses and partly because the house is made of ply wood and has been taken apart and reassembled so many times that nothing is quite straight or square anymore. Some filler and touch up paint should disguise this problem in this room . . . . But I'm not sure what to do about the Dining room coving.

The wider coving makes the poor alignment show up even more than it does upstairs. What is really annoying is that I had this coving perfectly positioned, I just didn't keep watching it until the glue was totally dry. It looks like it got up and had a disco between when I put it there and when the glue dried. The only way I can think to fix this is to take the coving off and start again. . . . . but I'm almost sure to rip the wallpaper if I do that, not to mention break the plaster coving. Nothing seems to go right in this house, perhaps it's cursed?

Anyway, here's the Dining room fire place. Again a slightly different design, but made the same way as all the others. I've also made embers to cover the fire in the kitchen range, but seem to have neglected to take a photo of it.
The next major task for this house are the lights. Yes, I know most people would have installed them before now, but I change my mind too much to be able to position the lights until the house is almost ready for furniture (if not until after it has furniture). The lighting will be fairly minimal - no ceiling lights as the ceilings are all too low to handle them, just wall sconces and floorstanding candlearbra suplimented by some hidden lights. Sigh, do you know how many things can go wrong with lights? Somehow, adding electricity to a cursed house is not something I'm looking forward to.
This is an important and elegant house. I like the delicate bedroom.
ReplyDeleteBye Faby
Ciao!! Piacere di conoscerti!! Sono una tua nuova amica ..ti seguo con grande piacere!!!! La tua casa di bambola e' meravigliosa ..mi piace tantissimo ..!!! La camera da letto e' elegantissima!!! Complimenti ...!!!
ReplyDeleteUn bacio
Elvira
Your rooms look perfect and so realistic. I love the classical look. Well done
ReplyDeleteYou're making great progress with this. I like the study with all its arches.
ReplyDelete