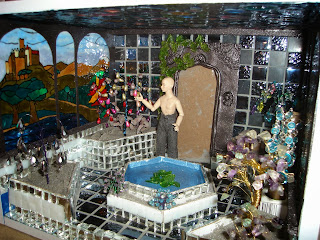
In Spring, some people go outside to work in the garden. In Tasmania you only go outside in Spring if you want to drown or be blown half way to New Zealand. So sensibly, I've been doing some gardening indoors.
I started making the tallest plants for the Crystal Garden first and will fill in the shorter plants around them later on. They're all made the same basic way with a few variations along the way. Here's a quick tutorial on how the plants are made. Please excuse the poor video quality, I needed both hands to work so had to record by wedging the camera under my chin.
Cut some jewellery wire into lengths about three-four inches long (this measurement varies depending on how high you want the finished plant to be, cut the wire about 1 1/2" longer than you want the finished height to be). You want between 20-40 lengths of wire per plant. Next thread a bead onto the end of a piece of wire and fold the end of the wire back and twist it around the main stem of wire to secure the bead. Repeat this for all the lengths of wire.
When you have secured beads on all the pieces of wire, pick all the wires up by pinching the middle and buch them together with all the beads at one end. Pinching the bunch of wire in the middle, twist the ends together tightly so that the bundle stays together (you may want to use pliers to do this). Trim any uneven bits of wire from the ends of the stem. Tease out the bead 'flowers' and plant the plant by pushing into some oasis foam which has been inserted into a pot or garden bed.
Another way to create 'crystal' flowers is to use wire and faux leadlighting paints.
To do this cut some wire into 1 1/2" lengths. Twist the ends of each piece of wire together to form a loop. If you want, use pliers to manipulate the shape of the loop into a more petal like shape.
Sit the loop on a clean plastic document pocket and fill with faux leadlighting paint. It is instinct to try and hold the end of the loop to hold it still while filling, but it actually works better if you refrain from touching the loop at all. Leave several hours to dry. When dry the glass paint will peel off the plastic pocket and you can trim and overflow from around the outside of the wire with a fine pair of scissors.
Twist the stem of a few petals together to form a flower. You can glue a small bead into the centre of the flower if desired.
Ten plants down . . . Many, many more to come . . . .


I LOVE this Fantasy Garden you are making, Alennka!!! It is so Awesomely Sparkly!!! I will have to look at your videos later... but thank you for the tutorials... they are always a help! Sometimes ideas "stick" it the brain and are so useful later... even if you can't remember where you saw it!
ReplyDelete