
Monday, March 1, 2010
Highcroft Castle - Week Three
Still being fed up with stonework, I decided to start work on the interior of the Great Hall this week. Having been too busy lately to sit down and think things through properly, I pretty much made up the plan for the Hall as i went along by rummaging through my cupboard and shelves until I found something that would work. Normally when I decorate a room I start with the ceiling, then the walls and cover the floor last. Although I haven't quite figured out the ceiling yet, I do know that I am going to do an ornate panelled ceiling that I will assemble outside the house/castle and install as one piece when it's finished. This means that it will be easier to add the ceiling after finishing the walls. As I wanted to add a 'fake' wall at the back of the room to create the impression of a corridor beyond with flooring that continued under the wall, I decided to start with the floor and reverse my usual order of decoratiion.
I considered (very breifly) using more of my stencilled stone for the floor, but as I've said, I'm sick of doing that, so quickly dismissed the idea. Next I considered using teracotta tile and pulled out some terracotta coloured air drying clay. After playing with the clay for a few minutes to see how much it would cover when rolled flat, I decided I didn't have enough for the whole floor, but did cover a piece of round MDF I'm planning to use as a floor in the 'tower' section of the castle when I get as far as working on the tower. By adding grooves in a grid pattern, I created the look of a tiled floor. Now I just have to hope that the tower will work as I hope it will when I get around to building it! With tiles dismissed, I went through my collection of assorted floor papers. There was plain floorboard (a little dull), leftover parquet floor (not enough), various carpet (not enough and not very great hall-ish), ornate victorian style tiles (too Victorian and again not enough) and lastly some black and white chequerboard scrapbooking paper. This paper was absoultely perfect and there was just enough left (this paper having been left over from the first time I decorated the house!). I gave it a couple of coats of spray gloss and (after cutting it to fit of course) stuck it into place with double sided tape.
Next job to tackle was the walls. I started by cutting the back wall out of foamboard and cutting the arched openings and two fireplace openings from this piece. At this point I realised the probably wan't enough height for the balcony/gallery that was going to run accross the upper back wall. For the time being I've left them out, but may add two smaller balconies in the back corners of the room later on.
I had been considering creating a wood panelled effect for the hall and as a test run decided to try a panelled wall in the corridor behind the 'back wall' as it would be at the back and largly obscured by the back wall, so if it didn't look good, maybe no one would really notice when it was finished. I found some pieces of oak veneer (left over flooring from my last castle) and stuck these pieces to a piece of sturdy cardboard. Next I cut strips of balsa wood and glued them over the veneer in a grid to create a panelled look. Lastly the whole thing was stained with watered down brown paint and sealed with gloss varnish.
When glued in postion with the fake back wall in front, the panelling is quite effective, but I don't think with would work so well if you could see the walls more clearly. Plus, I didn't have anywhere near enough veneer to cover all the walls this way. So it was back to rumaging, but I couldn't find anything that really seemed to work, until I remembered the embossed paper I had used on the ceilings of Madame Bellerose's house. Beacuse I was worried about crushing the pattern, I had stored this away in a different place to my other papers and it took a while to find it, but when I did I realised this was perfect for the castle. There wasn't enough to cover the walls floor to ceiling, but I think that would have been too much anyway. I painted come pieces of thin cardboard cut to size for the top half of the walls in a beige stain. The embossed paper was the wrong colour, so I gave it s couple of coats of acrylic stain in ruby and went over that with a rub on paint in silver to highlight the pattern of the paper. All this was then stuck on the walls.
I was going to show you a picture of the result of all this here, but Blogger seems to be having an issue adding photos again, so if you want to see the Hall, you'll need to broswe over to my flickr account ).HERE
I still need to add a rail/beam around the walls where the two wall papers meet and of course finish around the arches and the fireplaces. Lastly, I need to create a ceiling and the basic decoration of the Hall will be finished! After what seemed like an eternity of stenciling stone, I finally feel like I am making progress! (just don't tell me that I still have to finish that stonework
Friday, February 26, 2010
Highcroft Castle - Week Two
Offically, I'm still working on the stonework for the castle. Unoffically, I've had more than enough of smearing paste over walls and washing stencils and so am planning to work on other tasks for a while before I finish the stone. I have also ordered a stone-look paper which i hope will make finishing the exterior of the tower much faster and easier, I just need to put the two finishes together (paper and liquid stenciled stone) to make sure they look OK in close proximity to each other.
Meanwhile, the "Treasury" room is progressing well having had all it's walls 'stoned'. It just needs a good strong door to hold all those pesky thieves at bay and some treasure! (Okay, and some lights, chests, guards, etc). The kitchen next door is the only other room I have started to work on. It looks rather messy at the moment, but should improve once the fireplace is finished. I do have one very big problem with the kitchen however. The finished castle will (hopefully) be hosting a banquet in the Hall that is well underway. This means that in the kitchen, the cooking will be done and it will be time to clear away the leftovers and wash the dishes (etc). I've seen many miniature hung geese, turkeys, rabbits, etc, to hang in the kitchen ready to cook and many dishes prepared and ready to eat, but what I've never seen is the goose when it's been reduced to bones and the odd scrap too small to throw to the dogs. For example, what does a roasted boar's head look like after it's been eaten, or rather, what do the uneaten bits look like? What is left over? When a peacock is roasted and presented 'dressed' in it's feathers, what happens to the feathers afterwards? They aren't eaten, but do they end up back in the kitchen on the scrap heap? Do the diners keep them? I haven't had much luck finding answers to these sorts of questions yet. There is a lot of information out there about how food was prepared in past times, but very little about what happened after that.
Wednesday, February 17, 2010
Sandstone and more Sandstone
Everytime I decide to stencil stone I forget how time consuming and numbinlg dull it is. Still, here is a sample of how it is going.


Monday, February 15, 2010
Highcroft Castle Week One
There's not much to report this week. Progress is slow at the moment. This is partly because I'm working on the exterior stonework which is tedious and time consuming. I'm using a stencil again and a 'paste' made from texture paste and a product called "Liquid Sandstone". The Liquid Sandstone is designed for use outdoors on patios and walls etc to give a sandstone look and like the real thing it is made of millions of tiny grains of sand and when dry it really does look like the real thing. The problem is I have to wait for one patch to dry before I can stencil the next and as I have the front pannel of the castle laid flat on my table for the durration, I have no space to work on another part of the house until I finish "stoning" the front. So while I wait for one stencil area to dry I go away and read a chapter of a book, or mop the floor, etc, and by the time I get back to the Castle, the last patch of stone has been dry for hours!
I haven't even gotten around to taking a photo of the stonework to date, but take a look at my flickr account over the next couple of days as hopefully I'll get organised enough to upload one soon.
Meanwhile, my recent spending spree is starting to pay off with the various orders for miniatures starting to arrive. First was a (roughly) twelth scale suit of armour (I don't know where in the castle it's going, but what's a castle without at least one ornamental suit of armour? Okay, so real medieval castles didn't actually display armour, that came later, but what the heck.) Next to arrive was my order from Dollshouse Miniatures in New Zealand. This consisted mainly of small items, bowls, pitchers, tankards, cats, etc, that I won't be needing for a long time yet, but they were having a 20% off sale and who's to say they'll have another one when I do need to start worrying about accessories? I'm still wating on an order from an ebay seller called, from memory, dollhouserunner in the US. This is mainly trim and architectural details that I'm mostly planning to use for the furniture in the castle.
Wednesday, February 10, 2010
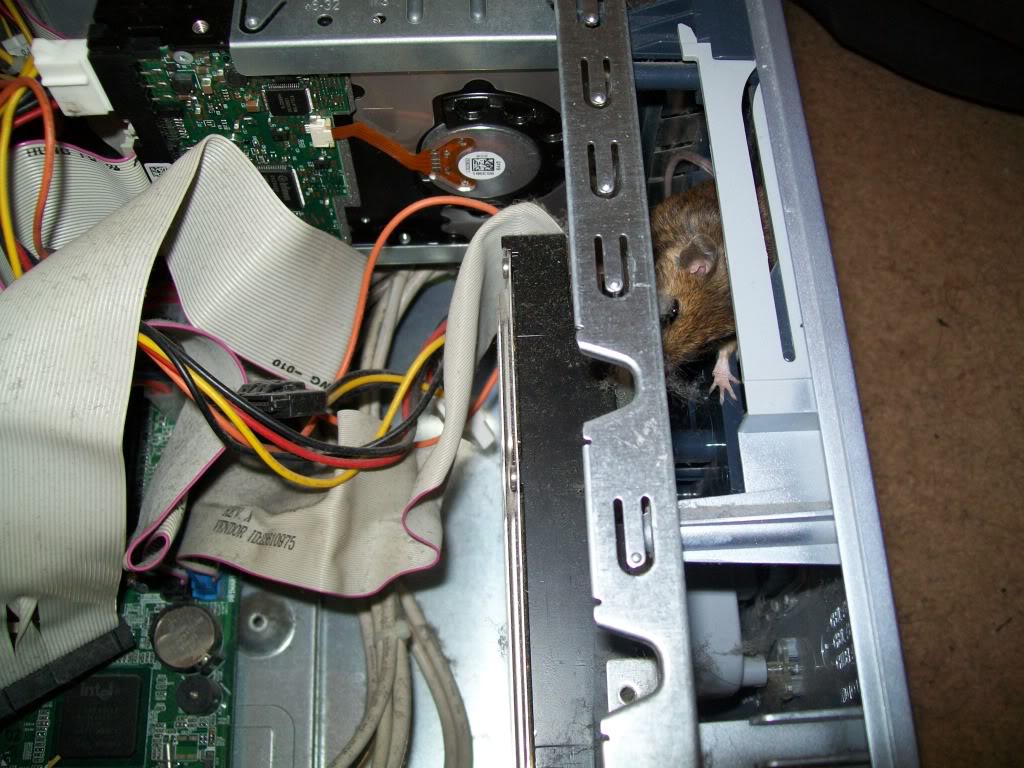
Have you cleaned out your PC lately?
Any geek will tell you that you ought to crack open the case of your PC and give it a thorough clean out every now and then (because if you don't, it's the geek that has to do it for you when something goes wrong!). Below are a few links that make the reasons for clean PCs pretty obvious:
Image One
Image Two
Image Three
In extreme cases the dirt build up in the PC can even catch fire! What does the inside of your case look like?
Monday, February 8, 2010
Highcroft Castle - Deconstruction
Well, for better or worse I've started to work on my behemoth which is called Highcroft Castle. The main section of the castle is to be built in an old kit house I never really liked, so the first job was to strip out the old house. After carefully removing the furniture and other items that can be reused, I pulled, peeled and pried all the wallpapers, lights and internal fittings out of the house. When it was stripped out, it was time to start re-arranging the walls and floors. Becuase I had used glue in addition to the screws that came with the kit to hold everything together, it took a few good blows with a hammer to removeeach piece. The dividing internal walls were removed and the third floor to create a double height room for the Great Hall. I also took out the top floor and lowered it by about 3.5cm to increase the ceiling height of the top floor.
With all the re-arranging done, it was time to start cutting. As I'm not certain which side of the house my tower will be, or whether to do a tower on each side, I cut a doorway on both sides of the house on the level of the Great Hall (ie the middle floor). If I don't use both as access to a tower, one can be a window or a balcony. Because the original house came with a faux basement, the base of the house projected 15cm or so past the front of the house to accomodate the steps and basement effect attached to the opening front. This always made the house very deep and hard to find a place to put it, not to mention very back heavy. At one point I was going to leave this extended front in position so I could add a drawbrigde to the castle front, but once I started working with the house I very quickly discarded this notion. Instead I cut the extended base back so there is just enough protruding from the front of the building to support a pair of stairs that run flat against the front wall in a sort of inverted 'V' shape. A larger hole was cut for a new, more grand front door. The really messy job that came next was of course sanding the whole lot.
All this has made the old house ready to start becoming a castle. The next step is to give the whole lot a coat of sealer and start to finish the exterior with a stone effect. While in the local hardware store I found a product called "Liquid Sandstone". It is designed for use outdoors to make paving and walls look like real sandstone. I've done some experimenting with it and discovered that it is really effective, dries quite quickly but probably won't work well with a stonework stencil. By mixing a little Texture Paste into the Liquid Sandstone, it becomes much more workable, dries less quickly and dries a lighter colour (which is a good thing as the straight sandstone is a little darker than I had in mind).
Blogger seems to be having a problem loading my photos, but I do have all of them on Flickr here in a new set called Highcroft Castle in the Dollshouse Miniatures collection.
Wednesday, February 3, 2010
My Next Project - The Behemoth
 I bought and decorated this house some years ago. It was the first proper kit house I'd bought and it taught an important lesson - don't buy cheap (well, comparitively cheap) houses. That's not to say that I had any problems with it, it was easy to assemble, the exterior finish is quite good for the price and it has concealed magnetic catches to hold the front closed. The problem I found with this house were it's dimensions. The rooms are 35cm deep, the height from floor to ceiling on the three lowest floors is only 20cm, the top floor only 17cm. This means that the back of the rooms is hard to see into and tend to be very dark. Electric lighting would fix the latter problem, but any sort of hanging light would hang so low that the dolls would poke their eyes out on them as they wandered about their home! In addition to the depth of the rooms, there is another 21cm of depth in the faux basement. I bought the house because I liked the basement look and houses with basements are hard to find down under, but it made the house so deep it was hard to find a suitable place to put it, both while I was working on it and after.
I have another similar kit house (without the basement) and a couple of years after I first decorated it, I took it apart and reduced the floors from three to two, making the ceiling heights of each floor 1/2 as high again as they had been. The final result of this work is the "Victorian House" which is a vast improvement over the original. Of course the windows in the front of the house were left at the wrong heights and I decided to leave the front that came with the kit off the house and use a clear covering. Basically, the house became a big box with a shelf in the middle and a clear front. I could have made that myself from scratch!
The moral of the story is that it's best to buy good quality houses with good dimensions in the first place or to make your own houses from scratch. Conesquently, although I was more or less satisfied with the house pictured above when I first decorated it, I was never thoroughly pleased with it. Then a few weeks ago I was walking past this house and suddenly saw, not a house, but an entire castle trying to break free! I could see the crenellations across the bottom of the roof, the front steps turned into a drawbridge (etc). At first I just said "well that's just plain crazy" and tried to ignore the idea, but like all the best crazy ideas, it refused to go away.
Eventually I had to sit down and think it through properly. The bottom floor/basement could still be below ground level and house a kitchen, catacombes, a treasury, dragons cave or dungeon. The next floor up could be the Great Hall. The next floor would be removed to make the Great Hall double the height, allowing more light in and providing space for a gallery of some kind. The top floor could be the royal bedchamber. But what about a solar, armoury, still room, library, servants quaters and other castle type rooms? Not to mention, where were the staircases going to be? Soon, the idea had expanded from the original house to include an added tower housing these extra rooms. Typically, towers are taller than main buildings which will make the castle at least one metre tall and about 3/4 of a metre wide. At this point I stopped and said no, you can't possibly do this, it's too big and there will be no room to put it.
I bought and decorated this house some years ago. It was the first proper kit house I'd bought and it taught an important lesson - don't buy cheap (well, comparitively cheap) houses. That's not to say that I had any problems with it, it was easy to assemble, the exterior finish is quite good for the price and it has concealed magnetic catches to hold the front closed. The problem I found with this house were it's dimensions. The rooms are 35cm deep, the height from floor to ceiling on the three lowest floors is only 20cm, the top floor only 17cm. This means that the back of the rooms is hard to see into and tend to be very dark. Electric lighting would fix the latter problem, but any sort of hanging light would hang so low that the dolls would poke their eyes out on them as they wandered about their home! In addition to the depth of the rooms, there is another 21cm of depth in the faux basement. I bought the house because I liked the basement look and houses with basements are hard to find down under, but it made the house so deep it was hard to find a suitable place to put it, both while I was working on it and after.
I have another similar kit house (without the basement) and a couple of years after I first decorated it, I took it apart and reduced the floors from three to two, making the ceiling heights of each floor 1/2 as high again as they had been. The final result of this work is the "Victorian House" which is a vast improvement over the original. Of course the windows in the front of the house were left at the wrong heights and I decided to leave the front that came with the kit off the house and use a clear covering. Basically, the house became a big box with a shelf in the middle and a clear front. I could have made that myself from scratch!
The moral of the story is that it's best to buy good quality houses with good dimensions in the first place or to make your own houses from scratch. Conesquently, although I was more or less satisfied with the house pictured above when I first decorated it, I was never thoroughly pleased with it. Then a few weeks ago I was walking past this house and suddenly saw, not a house, but an entire castle trying to break free! I could see the crenellations across the bottom of the roof, the front steps turned into a drawbridge (etc). At first I just said "well that's just plain crazy" and tried to ignore the idea, but like all the best crazy ideas, it refused to go away.
Eventually I had to sit down and think it through properly. The bottom floor/basement could still be below ground level and house a kitchen, catacombes, a treasury, dragons cave or dungeon. The next floor up could be the Great Hall. The next floor would be removed to make the Great Hall double the height, allowing more light in and providing space for a gallery of some kind. The top floor could be the royal bedchamber. But what about a solar, armoury, still room, library, servants quaters and other castle type rooms? Not to mention, where were the staircases going to be? Soon, the idea had expanded from the original house to include an added tower housing these extra rooms. Typically, towers are taller than main buildings which will make the castle at least one metre tall and about 3/4 of a metre wide. At this point I stopped and said no, you can't possibly do this, it's too big and there will be no room to put it.
 At around the same time I had the idea for a story set in a new fantasy world. Not surprisingly for a fantasy story, there was a castle that featured prominently - the home of the monarch. As you would expect in a castle it had a Great Hall, a dungeon, a sorcerer's library, catacombes, secret passages, etc. As the world and story began to develop, I looked again at the plans for the dollshouse castle and realised that Highcroft Castle, the home of the kings of Oronia, was in fact the same castle I had been planning to make. This then led to my knowing exactly what was going to be happening in the dollshouse castle's Great Hall - the coronation feast for the new queen, attended by all the different peoples of Oronia (including elves, fairies, centaurs, etc) just as it happens at the end of the story. It also gave me more definate ideas for a few other rooms too. This put the castle idea back on the table. Or rather on the floor as I am currently thinking that the castle should be designed to be floor-standing mainly on account of I don't have a cupboard or table large enough to accommodate it. Of course, I doubt I have enough floor left to accommodate it either, but I'll worry more about that later.
At this point, I've more or less given up worrying about practacallity; keeping the house/castle to a reasonable size (I'm even toying with the notion of yet another tower!) and restricting my ideas to things I can reasonably expect to be able to make. How for example am I going to make a centaur? I can't even make a believable loaf of bread our of polymer clay. Horses and men are far more tricky than bread and a combination of the two - yikes! It'll probably end up being a good likeness of a pile of dragon dung! But again, this is something to worry about later on. More immediate concerns are questions like "what will the tower be made of?" and "where do I need to cut holes for stairs, windows and doors?".
Another problem is the exterior finish. To go for a more realistic effect like using real stone pieces or stenciling with stone-look compound will be both expensive and incredibly time consuming when you consider the amount of exterior there is going to be. The same can be said of making a stone effect with clay (much as I did the roof of the Bakery). That leaves some sort of paint effect. At the moment I'm thinking of using one of my stonework stencils and a can of spray stone effect paint. It should be reasonably fast (especially working in the Aussie summer when the paint will dry almost instantly) and hard-wearing although probably not as realistic as some of the other options. I need to do some experiments to see what works and what doesn't.
First of course I have to strip out the existing house. I've already pinched the people (they're now redressed and inhabit the bakery). I should be able to remove the skirting board and other details intact (I hope) for later use. Then it is a matter of disassembling the whole house, cutting door/s in the side to give access to the tower, then the house will be ready to become a castle!
At around the same time I had the idea for a story set in a new fantasy world. Not surprisingly for a fantasy story, there was a castle that featured prominently - the home of the monarch. As you would expect in a castle it had a Great Hall, a dungeon, a sorcerer's library, catacombes, secret passages, etc. As the world and story began to develop, I looked again at the plans for the dollshouse castle and realised that Highcroft Castle, the home of the kings of Oronia, was in fact the same castle I had been planning to make. This then led to my knowing exactly what was going to be happening in the dollshouse castle's Great Hall - the coronation feast for the new queen, attended by all the different peoples of Oronia (including elves, fairies, centaurs, etc) just as it happens at the end of the story. It also gave me more definate ideas for a few other rooms too. This put the castle idea back on the table. Or rather on the floor as I am currently thinking that the castle should be designed to be floor-standing mainly on account of I don't have a cupboard or table large enough to accommodate it. Of course, I doubt I have enough floor left to accommodate it either, but I'll worry more about that later.
At this point, I've more or less given up worrying about practacallity; keeping the house/castle to a reasonable size (I'm even toying with the notion of yet another tower!) and restricting my ideas to things I can reasonably expect to be able to make. How for example am I going to make a centaur? I can't even make a believable loaf of bread our of polymer clay. Horses and men are far more tricky than bread and a combination of the two - yikes! It'll probably end up being a good likeness of a pile of dragon dung! But again, this is something to worry about later on. More immediate concerns are questions like "what will the tower be made of?" and "where do I need to cut holes for stairs, windows and doors?".
Another problem is the exterior finish. To go for a more realistic effect like using real stone pieces or stenciling with stone-look compound will be both expensive and incredibly time consuming when you consider the amount of exterior there is going to be. The same can be said of making a stone effect with clay (much as I did the roof of the Bakery). That leaves some sort of paint effect. At the moment I'm thinking of using one of my stonework stencils and a can of spray stone effect paint. It should be reasonably fast (especially working in the Aussie summer when the paint will dry almost instantly) and hard-wearing although probably not as realistic as some of the other options. I need to do some experiments to see what works and what doesn't.
First of course I have to strip out the existing house. I've already pinched the people (they're now redressed and inhabit the bakery). I should be able to remove the skirting board and other details intact (I hope) for later use. Then it is a matter of disassembling the whole house, cutting door/s in the side to give access to the tower, then the house will be ready to become a castle!
Tuesday, February 2, 2010
The Bakery - Stage Two - Week Five
To start where I left off last post, I should explain those waggon wheels, but at this point it's easier just to show you a picture of the finished item:
 The wheels go on the cart of an ale seller who has stopped outside the bakery to try and sell some ale to go with the shoppers' bread. The cart itself is a little unstable once I added a heavy barrel to the top of it; hence the supporting leg that can be seen underneath. The barrel itself is a short wooden cylinder surrounded by air clay to create a barrel shape (or at least a close approximation of a barrel shape).
The major task of the week was dressing and wigging the dolls for this house. As with the rest of this project, the dolls are dressed to be "roughly tudor" but are not meant to be historically acurate. The men are the most noticably out of style.
The wheels go on the cart of an ale seller who has stopped outside the bakery to try and sell some ale to go with the shoppers' bread. The cart itself is a little unstable once I added a heavy barrel to the top of it; hence the supporting leg that can be seen underneath. The barrel itself is a short wooden cylinder surrounded by air clay to create a barrel shape (or at least a close approximation of a barrel shape).
The major task of the week was dressing and wigging the dolls for this house. As with the rest of this project, the dolls are dressed to be "roughly tudor" but are not meant to be historically acurate. The men are the most noticably out of style.
 From the left are: the baker's wife (with baby), a shop assistant, the bookkeeper, the ale seller, another shop assistant and a customer. The baby is as purchased, the other dolls have all been dressed enitrely by me. The two men and the second assistant (in red) have also been wigged by me. The first shop assistant is just a cheap plastic doll and when I get brave enough, i'll try repainting her face as she is wearing far too much makeup. As usual the clothes were made without the benefit of patterns and the hats on the wigged dolls are what keep their hair from standing on end!
 Once the dolls were done, I looked at the house and made a list of all the things that needed finishing and was surprised how short it was! Top of the list was finish the bedspread. I had started the bedspred last week and with some dedicated effort, it has now been finished (as you can see above). The other items on the list were all small things like making a fire basket for the fireplace, make cushions for the settle (etc) which didn't take long to knock off. Before I knew it, the house was finished! At the start of the week there seemed like an awful lot of things let to do and I had expected it to take another couple of weeks but there doesn't seem to be anything left to do, so it must be finished. The idea that the house was finished came as a complete surprise, but not an unwelcome one as my ideas for my next project have been gaining momentum over the past couple of weeks, but I'll start discussing that in my next post. For now I'll just give you the clues that my next project involves re-doing an old house I was never happy with.
 As usual, the complete set of photos for this project are in my Flickr photostream. Click here for a direct link to the bakery photos on Flickr
Monday, January 25, 2010
The Bakery - Stage Two - Week Four
In this week's post, it would be far easier to meantion what I haven't done rather than list all the things that I have done! I started by making furniture for all three room, some air-clay wheels and a barrel (I'll explain this later), then polymer clay accessories (mainly pots and plates) and started embriodering a beadspread.
 The furniture was made from balsa wood, with a few wooden beads and staircase railing spindles for extra detail. The bedroom, which was going to has a large tester style bed, chest, cradle and other items, gets only a single bed and a nightstand, and it's not easy to fit just them in! Oh well, I guess the rest of the family will have to sleep in hammocks suspended from the ceiling or out on the balcony perhaps! The first floor furniture consists of a dresser, a table and benches and a settle/bench seat. Again, this is all that can be realistically squeezed into the space (alas, no spinning wheel!). The panelling on the settle was all done by hand by very carefully cutting grooves out of the wood. By some miracle, these grooves are mostly straight and even and the finished effect is quite passable. Downstairs in the shop, shelves are supported on wooden brackets and the bookkeeper now has a desk and a stool to work at.
 Once the shelves were in place, I added some of the loaves of bread I made earlier (while I was working on stage One)and instantly the shop started to look like, well, a shop. An inkwell which is actually a black pawn from a small plastic chess set with a feather for a quill pen as well as a book made from polymer clay left over from some long forgotten project were added to the bookkeeper's desk to almost finish the "shop" room. It now just needs people and a few finishing touches!
 The first floor is also starting to look 'finished'. The dresser shelves needed to be filled, so I made a range of plates (a couple of plain, a couple of decorative), half a dozen 'tankards' (although only a couple of these are for this space) and a couple of jugs out of polymer clay. The plates were made using moulds made from plates I had used in an earlier project with scupley mould maker. Both plates and tankards were painted with a 'wood' effect. The jugs/pitchers were given a stone effect paint to look like 'earthernware'. Both came up really well, but unfortunately my camera can't focus on small details up close and thus, I can't take a good photo of these to show you. Two vases/pots from barehaven miniature pottery help to fill the second shelf. Like the shop, this room needs an occupant and some other finishing touches such as a cushion or two on the settle.
 In the attic, I made a bowl and pitcher and a chamber pot for the nightstand from polymer clay and finished it in the same way as the 'earthernware' jugs on the dresser downstairs. The bowl is decidedly 'wobbly' but that aside, the nightstand is looking good. It needs a mirror of some kind and a hanging towel/cloth to be finished. The question is what sort of mirror. In a tudor house there wouldn't have been modern glass mirrors, but more likely mirrors would have been made of polished metal of some kind. I need to figure out what to use that will look right. The bed still needs a bedspread. This, I am attempting to embroider by hand. I found some medieval patterns online HERE and am using one to create the bedspread.
While I had the polymer clay out, I also made fake hinges and handles for the doors. I know I promised at the start of this post to explain the wheels and barrel, but I'm out of time for the moment, hopefully I'll add another post explaining this soon!
In the attic, I made a bowl and pitcher and a chamber pot for the nightstand from polymer clay and finished it in the same way as the 'earthernware' jugs on the dresser downstairs. The bowl is decidedly 'wobbly' but that aside, the nightstand is looking good. It needs a mirror of some kind and a hanging towel/cloth to be finished. The question is what sort of mirror. In a tudor house there wouldn't have been modern glass mirrors, but more likely mirrors would have been made of polished metal of some kind. I need to figure out what to use that will look right. The bed still needs a bedspread. This, I am attempting to embroider by hand. I found some medieval patterns online HERE and am using one to create the bedspread.
While I had the polymer clay out, I also made fake hinges and handles for the doors. I know I promised at the start of this post to explain the wheels and barrel, but I'm out of time for the moment, hopefully I'll add another post explaining this soon!
Wednesday, January 20, 2010
The Bakery - Stage Two - Week Three
Picking up where I left off last time, I painted the roof slate grey. By some miracle, I managed to paint only the roof slate grey (except for a couple of patches under the eaves!). More than that, I managed not to fall off the ladder while I was doing it (although there were one or two close calls!). As the house sits on a quite deep basement block, it stands a little too high to see what you're doing to the top of roof while standing on the floor, hence the two step ladder. Of course the other option was to lift the entire structure off the cupboard and onto the floor, but that would have been doing things the easy way!
 The roof was painted with a couple of coasts of dark grey, then given a coat of matte varnish. When that was dry I went over this with a lighter grey paint that was well watered down and used an old cloth to remove most of it. A very important tip is to only press straight down and remove the cloth straight up or you risk rubbing off the eariler coats of paint. I repeated the paint/sponge off process a couple of times until I was happy with the result and finished by giving the whole lot a couple more coats of matte varnish. I used the same grey as the roof's base coat to paint some thin cardboard that became the flashing around the chimney.
Next, I pulled out some air clay and moulds made from sculpey mould maker of some things I thought would prove useful and played around. I used a mould of a wooden bracket to make some decorative brackets for the outside of the house. A mould made from a decorative bead was used for some square 'carvings'. A length of undyed braid soaked in my 'wood stain' paint mix became strips of 'carved wood' adorning the eaves, the beam between the ground and first floors and over the windows. A strip of 'gingerbread' trim bought from a dollshouse supplier last year for that I decided not to use for what I bought it for decorates the beam above the balcony.
The roof was painted with a couple of coasts of dark grey, then given a coat of matte varnish. When that was dry I went over this with a lighter grey paint that was well watered down and used an old cloth to remove most of it. A very important tip is to only press straight down and remove the cloth straight up or you risk rubbing off the eariler coats of paint. I repeated the paint/sponge off process a couple of times until I was happy with the result and finished by giving the whole lot a couple more coats of matte varnish. I used the same grey as the roof's base coat to paint some thin cardboard that became the flashing around the chimney.
Next, I pulled out some air clay and moulds made from sculpey mould maker of some things I thought would prove useful and played around. I used a mould of a wooden bracket to make some decorative brackets for the outside of the house. A mould made from a decorative bead was used for some square 'carvings'. A length of undyed braid soaked in my 'wood stain' paint mix became strips of 'carved wood' adorning the eaves, the beam between the ground and first floors and over the windows. A strip of 'gingerbread' trim bought from a dollshouse supplier last year for that I decided not to use for what I bought it for decorates the beam above the balcony.
 Some time ago when I made the ceiling light for the bakery itself, I made some extra candles and have now used these in some candle sconces made of balsa wood scraps and metal beads as light fixtures.
After three weeks (well, three and a half really) the basic structure and decoration of the house is mostly finished. The roof is painted, extra beams have been added in the attic and decorative brackets and trim have been added to the exterior. There are a few small details that are yet to be attended to, these are mostly fall into three categories: "I need something I haven't got to finish it", "I want to make the furniture first before I make the final decision about it" and "I haven't figured out how to do it yet". This includes decorative door hinges and handles, chimney pots and apex trim on the roof. So for now at least, I'm saying that the construction phase is over and it's time to start working on the furniture.
Now as usual, I want to add more furniture than there is space to put it. I'd love to do a large tudor style four poster or tester bed, but not only will it not fit under the slope of the roof, there won't be room for any other furniture in the attic. In fact any bed larger than a cradle won't leave a lot of space for anything else. On the first floor, I'd like a table and benches (where the inhabitants eat, prepare food, etc), a tudor style 'dresser' or cupboard of some sort, a settle and one or two people. If I put all that in I think it'll be piled up one ontop of the other! I guess next time I'll just have to make a larger house! Perhaps another castle?
Some time ago when I made the ceiling light for the bakery itself, I made some extra candles and have now used these in some candle sconces made of balsa wood scraps and metal beads as light fixtures.
After three weeks (well, three and a half really) the basic structure and decoration of the house is mostly finished. The roof is painted, extra beams have been added in the attic and decorative brackets and trim have been added to the exterior. There are a few small details that are yet to be attended to, these are mostly fall into three categories: "I need something I haven't got to finish it", "I want to make the furniture first before I make the final decision about it" and "I haven't figured out how to do it yet". This includes decorative door hinges and handles, chimney pots and apex trim on the roof. So for now at least, I'm saying that the construction phase is over and it's time to start working on the furniture.
Now as usual, I want to add more furniture than there is space to put it. I'd love to do a large tudor style four poster or tester bed, but not only will it not fit under the slope of the roof, there won't be room for any other furniture in the attic. In fact any bed larger than a cradle won't leave a lot of space for anything else. On the first floor, I'd like a table and benches (where the inhabitants eat, prepare food, etc), a tudor style 'dresser' or cupboard of some sort, a settle and one or two people. If I put all that in I think it'll be piled up one ontop of the other! I guess next time I'll just have to make a larger house! Perhaps another castle?
Tuesday, January 12, 2010
Bakery - Update
At long last I have decided on a name for the Bakery! It will be known as Becke's Bakery. 'Becke' is from middle high german and means 'baker'. Perhaps not a very original name, but very fitting.
Monday, January 11, 2010
The Bakery - Stage Two - Week Two
I started the week with the quick and simple task of fixing the balcony railings in place. The 'spindles' are made from a wooden fan, cut down and stained to match. As I had already done the cutting and staining all I had to do was glue them in place and add a top/handrail of balsa wood. This took all of five minutes. The rest of the weekend was spent working on the roof.
 Having spent most of a week trawling the internet for pictures of tudor-ish houses for ideas as well as looking at miniatures sites for available products and how other mini rooves were created, I decided to tile my roof. Rather than spend a lot of maoney and wait a long time to buy premade tiles or tile sheets, I chose to make my own tile effect with paper clay. Actually, that should be I chose to TRY and make my own tile effect as there was no guarentee that I wouldn't end up placing an order for roof tiles after I made the attempt. I chose paper clay because it is lightweight and doesn't tend to crack when it dries as much as normal air-drying clay and is a lot cheaper to use than polymer clay. The disadvantage with it is that it remains so soft when dry - the first time a cat tries to climb on the roof it'll be torn to shreds! It's quite a steep roof, so maybe the blighters will have the sense not to try and curl up on it!
I started by cutting pieces of foamboard the size and shape of each side of the roof and porch roof, cutting an opening for the chimney to pass through in the appropriate place. I finished the inside sides of the roof pieces the same as the walls. To be acurate, they should probably be finished to look like the underside of the tiles, but my way was easier and I can always change it later if I decide to.
For the outside side of the roof, I started by rolling some paperclay into a rectangle a bit under 1/2cm thick the size of the roof panel. I spread some PVA glue on the piece of foamboard and laid the clay over the top. With wet fingers I carefully rubbed the clay until it was smoothed down and carefully curled over the sides of the foamboard. I then trimmed the excess clay off from around the edges. I pressed a plastic ruler on it's edge into the clay to make horizontal lines accross the roof marking the height of each row of tiles. I then sprinkled a little more water over the clay and wrapped it in cling wrap to keep it moist, leaving only the bottom row uncovered. A good tip here is don't use air drying clays in 30+ degree heat. I used a palette knife to press the top of the bottom row of tiles down along the ruler impression so that it looked like the bottom row emerged from under the row above (as tiles usually do). A blunted toothpick pressed (not dragged) into the clay marked out the horizontal lines to separate the row into individual tiles. I then peeled back the cling wrap and repeated the process on the next row, then the next, then the next . . . etc. All this was done 'by eye' without measuring. Some rows are higher than others, some tiles are wider than others and some are simply crooked. The plan is that the end result will look 'rustic' or 'traditional' rather than just plain crooked.
Having spent most of a week trawling the internet for pictures of tudor-ish houses for ideas as well as looking at miniatures sites for available products and how other mini rooves were created, I decided to tile my roof. Rather than spend a lot of maoney and wait a long time to buy premade tiles or tile sheets, I chose to make my own tile effect with paper clay. Actually, that should be I chose to TRY and make my own tile effect as there was no guarentee that I wouldn't end up placing an order for roof tiles after I made the attempt. I chose paper clay because it is lightweight and doesn't tend to crack when it dries as much as normal air-drying clay and is a lot cheaper to use than polymer clay. The disadvantage with it is that it remains so soft when dry - the first time a cat tries to climb on the roof it'll be torn to shreds! It's quite a steep roof, so maybe the blighters will have the sense not to try and curl up on it!
I started by cutting pieces of foamboard the size and shape of each side of the roof and porch roof, cutting an opening for the chimney to pass through in the appropriate place. I finished the inside sides of the roof pieces the same as the walls. To be acurate, they should probably be finished to look like the underside of the tiles, but my way was easier and I can always change it later if I decide to.
For the outside side of the roof, I started by rolling some paperclay into a rectangle a bit under 1/2cm thick the size of the roof panel. I spread some PVA glue on the piece of foamboard and laid the clay over the top. With wet fingers I carefully rubbed the clay until it was smoothed down and carefully curled over the sides of the foamboard. I then trimmed the excess clay off from around the edges. I pressed a plastic ruler on it's edge into the clay to make horizontal lines accross the roof marking the height of each row of tiles. I then sprinkled a little more water over the clay and wrapped it in cling wrap to keep it moist, leaving only the bottom row uncovered. A good tip here is don't use air drying clays in 30+ degree heat. I used a palette knife to press the top of the bottom row of tiles down along the ruler impression so that it looked like the bottom row emerged from under the row above (as tiles usually do). A blunted toothpick pressed (not dragged) into the clay marked out the horizontal lines to separate the row into individual tiles. I then peeled back the cling wrap and repeated the process on the next row, then the next, then the next . . . etc. All this was done 'by eye' without measuring. Some rows are higher than others, some tiles are wider than others and some are simply crooked. The plan is that the end result will look 'rustic' or 'traditional' rather than just plain crooked.
 This was repeated for all four roof sections. When the clay was dry, I gave it a quick coat of a grey blue acrylic stain. This is primarily to get rid of the white in the hard to reach places between tiles so that if later coats of paint miss a spot it won't show up as much as if it were still white. Next three of the roof panels were glued in place. The fourth panel, the left hand main roof, was glued on later, after I had cut a hole in it to allow access to the attic. The hole was careully cut along the lines formed by the grooves between the tiles so that when the cut out section is put back in the hole, the join will (hopefully) be almost invisible. The exposed edges of foambaord along the cut were given a thin coat of texture paste to help stop the foam from falling out of the board and toughen it up.
 The roof stills need painting, but that will have to wait until it's a little cooler, just enough so that the paint doesn't bake before I even get it onto the brush! I'm planning to make it look like a greyish slate as this will look better on a lavender house than, say, a terracotta tile.
While waiting for various bits and pieces to dry, i also made the steps to connect the first floor to the attic. They are very steep; steps often seem to have been in times past. I really don't know how the miniature residents are supposed to haul a bed up them, but I have found a solution on how to put a big four poster in an attic. Click here to see the beds I want to try and copy . I still need to do some measuring and thinking, but I think something like that might work and it's such an obvious answer to the problem!
The roof stills need painting, but that will have to wait until it's a little cooler, just enough so that the paint doesn't bake before I even get it onto the brush! I'm planning to make it look like a greyish slate as this will look better on a lavender house than, say, a terracotta tile.
While waiting for various bits and pieces to dry, i also made the steps to connect the first floor to the attic. They are very steep; steps often seem to have been in times past. I really don't know how the miniature residents are supposed to haul a bed up them, but I have found a solution on how to put a big four poster in an attic. Click here to see the beds I want to try and copy . I still need to do some measuring and thinking, but I think something like that might work and it's such an obvious answer to the problem!
Wednesday, January 6, 2010
The Bakery - Stage Two - Part Two
 With the ground floor structure finished, it was on the the first floor. I was really surprised how fast things were going at this point as it was only the start of day two of work! After a little consideration I decided to lay the floor before placing the posts for the walls - it just seemed easier than cutting the floor around the posts. The floor is made from three strips of 4mm thick balsa wood with a faux floorboard effect.
 The floorboard look was achieved by using a ballpoint pen with no ink left in it. By running the pen over the balsa wood - just as though I you were drawing a line only pressing a little harder - you can create grooves that make the one piece of wood look like separate boards. This works just fine as long as you go with the grain of the wood. When you have to go accross the grain, be careful and always press gently or the wood will splinter. Once the wood for the floor was 'boarded' on both the top and bottom (the floor is also the dowstairs ceiling)it was stained and varnished. Lastly, using a pen with some ink in it this time I drew on the 'nails' at the ends of each board and applied another coat of varnish. The floor was then fitted in place over the ground floor beams.
The posts and beams for the first floor were fitted in the same way as those for the ground floor. Rather than repeat myself, I'll just refer you to my earlier post The Bakery - Stage Two - Part One. The only difference here is that the majority of the posts are balsa wood rather than hard wood, mainly on account of the fact I was running short on the hard wood. The top floor/attic was constructed in the same way as the first floor with the floor being laid first, then the posts added. The differences were that a 'hole' was left in the floor for access from the lower level and that the posts, instead of going straight up, were angle together to form an 'A'. I thought very carefully about the angle of the 'A'. If it was too shallow, there would be no room inside, if it were too steep, the house would become too tall. From memory (and keep in mind I'm trying to remember more than a week - quite a hard ask) the angle I chose in the end was about 55 degrees. Whatever it actually was, it leaves a reasonable amount of 'head room' inside without being too high. Unfortunately, my vague plans of putting a grand four poster or half tester bed on the top floor probably won't work out, but then I don't suppose the miniature people could have carried such a big, bulky bed up all those stairs anyway!
Next came the chimney and the walls. The chimney is merely cardboard painted mortar grey and then 'bricked' with my brick stencil and paste mixture. The bricks should be the same colour as the bricks in the basement block, but I ran out of that mixture back when I finished the basement's brickwork and there is no chance that I could ever mix the exact same colour again. Rather than spend hours trying to match the exact colour, I just mixed a reddish colour and hoped no one would notice. Perhaps the basement structure was already there when the house above was built, and so two different bricks were used? Perhaps a fire burned down the original structure? In any event, the chimney bricks are a much better colour than the basement bricks.
The floorboard look was achieved by using a ballpoint pen with no ink left in it. By running the pen over the balsa wood - just as though I you were drawing a line only pressing a little harder - you can create grooves that make the one piece of wood look like separate boards. This works just fine as long as you go with the grain of the wood. When you have to go accross the grain, be careful and always press gently or the wood will splinter. Once the wood for the floor was 'boarded' on both the top and bottom (the floor is also the dowstairs ceiling)it was stained and varnished. Lastly, using a pen with some ink in it this time I drew on the 'nails' at the ends of each board and applied another coat of varnish. The floor was then fitted in place over the ground floor beams.
The posts and beams for the first floor were fitted in the same way as those for the ground floor. Rather than repeat myself, I'll just refer you to my earlier post The Bakery - Stage Two - Part One. The only difference here is that the majority of the posts are balsa wood rather than hard wood, mainly on account of the fact I was running short on the hard wood. The top floor/attic was constructed in the same way as the first floor with the floor being laid first, then the posts added. The differences were that a 'hole' was left in the floor for access from the lower level and that the posts, instead of going straight up, were angle together to form an 'A'. I thought very carefully about the angle of the 'A'. If it was too shallow, there would be no room inside, if it were too steep, the house would become too tall. From memory (and keep in mind I'm trying to remember more than a week - quite a hard ask) the angle I chose in the end was about 55 degrees. Whatever it actually was, it leaves a reasonable amount of 'head room' inside without being too high. Unfortunately, my vague plans of putting a grand four poster or half tester bed on the top floor probably won't work out, but then I don't suppose the miniature people could have carried such a big, bulky bed up all those stairs anyway!
Next came the chimney and the walls. The chimney is merely cardboard painted mortar grey and then 'bricked' with my brick stencil and paste mixture. The bricks should be the same colour as the bricks in the basement block, but I ran out of that mixture back when I finished the basement's brickwork and there is no chance that I could ever mix the exact same colour again. Rather than spend hours trying to match the exact colour, I just mixed a reddish colour and hoped no one would notice. Perhaps the basement structure was already there when the house above was built, and so two different bricks were used? Perhaps a fire burned down the original structure? In any event, the chimney bricks are a much better colour than the basement bricks.
 While waiting for the sections of chimney to dry, I cut out the remaining walls. They were then given a thin coat of texture paste to resemble rough plaster. I prefer texture paste to something like polyfilla as it remains flexible when dry, unlike polyfilla which crumbles all too easily. The inside side of the walls were painted 'soft white'. For the outside, I didn't want to go with white - EVERYBODY makes white tudor style houses and I like what I do to be a little different. I have seen tudor houses painted soft yellow and light terracotta and thought it might try one of those colours, but soon discovered they clashed with the very pink basement bricks (that were supposed to be an orangey-red). I the end I chose a very pale lavender for the walls - it tones well with the pinkish bricks even if it is a long, long way from being an authentic colour.
When finished both the chimney and most of the walls were glued in place. I cut 'window holes' in the three remaining walls before they too were put in place.
Doors came next. Naturally, all three places I intended to put doors I had made different sizes requiring me to make three different-but-identical templates. The doors are again balsa wood, each door and it's surround cut from a single piece. I used the same technique on the doors as I did on the floors to make them look like they were made from a number planks. The doors open and close by pivoting on pins that pass through the top and bottom of the frame. Later on, I'll add some hinges and other door furniture to give the impression they work more like normal doors. The 'shop windows' on the ground floor were made and work in much the same way except they go up and down rather than in and out.
While waiting for the sections of chimney to dry, I cut out the remaining walls. They were then given a thin coat of texture paste to resemble rough plaster. I prefer texture paste to something like polyfilla as it remains flexible when dry, unlike polyfilla which crumbles all too easily. The inside side of the walls were painted 'soft white'. For the outside, I didn't want to go with white - EVERYBODY makes white tudor style houses and I like what I do to be a little different. I have seen tudor houses painted soft yellow and light terracotta and thought it might try one of those colours, but soon discovered they clashed with the very pink basement bricks (that were supposed to be an orangey-red). I the end I chose a very pale lavender for the walls - it tones well with the pinkish bricks even if it is a long, long way from being an authentic colour.
When finished both the chimney and most of the walls were glued in place. I cut 'window holes' in the three remaining walls before they too were put in place.
Doors came next. Naturally, all three places I intended to put doors I had made different sizes requiring me to make three different-but-identical templates. The doors are again balsa wood, each door and it's surround cut from a single piece. I used the same technique on the doors as I did on the floors to make them look like they were made from a number planks. The doors open and close by pivoting on pins that pass through the top and bottom of the frame. Later on, I'll add some hinges and other door furniture to give the impression they work more like normal doors. The 'shop windows' on the ground floor were made and work in much the same way except they go up and down rather than in and out.
 With the doors in place I went to work on the windows. I stared each window with a basic rectangular frame that fitted exactly the hole in the wall left for it. For the large windows I added 'crossbars' inside the frame. Next I cut an acetate sheet to the same size a the frames and using faux leadlighting outliner in a pewter colour and a pattern drawn on a piece of graph paper to create the 'glass' for the windows. Once dry, the glass pannels were glued to the inside of the window frames and the windows glued in place in the house.
Next came the fake beams on the walls that give the impression of an authentic tudor style building. I started with the strips around the windows as these help hold the windows in place. I then went on to add them on all the remaining walls, inside and out.
With the doors in place I went to work on the windows. I stared each window with a basic rectangular frame that fitted exactly the hole in the wall left for it. For the large windows I added 'crossbars' inside the frame. Next I cut an acetate sheet to the same size a the frames and using faux leadlighting outliner in a pewter colour and a pattern drawn on a piece of graph paper to create the 'glass' for the windows. Once dry, the glass pannels were glued to the inside of the window frames and the windows glued in place in the house.
Next came the fake beams on the walls that give the impression of an authentic tudor style building. I started with the strips around the windows as these help hold the windows in place. I then went on to add them on all the remaining walls, inside and out.
 Now we've almost caught up to where I am at the moment. I have cut out pieces of foam board for the roof, but am yet to decied whether to thatch or tile the roof and how to best achieve either effect. To finish the 'construction' phase of the house I also still need to add the balcony railing, the internal stairs, fake ceiling beams and a few decorative brackets. Then it will be on to the furniture, accessories and people!
Tuesday, January 5, 2010
The Bakery - Stage Two - Part One
With all the chores of the Christmas season out of the way, I started work on Stage Two of the Bakery on Boxing Day. My first task was to make a firm decision on the layout of the house. Way back when I started the basement block (stage one) the plan was to have the oven on the side and the trapdoor access to the surface on the back wall, but somewhere along the way I changed the plan and swapped the position of the oven and trapdoor. This means that the chimney carrying the smoke from the oven in the basement had to run up the back wall of the house, not the side as I originally planned. I also originally planned to have the trapdoor emerging inside the ground floor shop, but no matter how I drew it, having the shop positioned over the trapdoor just didn't work, so in the end I left it outdoors. The trapdoor now emerges under the outside steps up to the first floor. This is probably a little inconvenient for the bakers, but the structure of the steps gives me somehting to attach the pulleys to so that the bakers can lift their bread out of the basement via a 'dumb waiter' type of system.
So, with a new layout plan decided, I started work on the house. First came the 'framework'. I cut six posts (at 7" high) from 1/2" square stick of spruce wood to form the outline of the ground floor and to hold up the first floor. I drilled a hole in the top and bottom of each post and a hole in the 'ground' (the top of the basement block) where each post would go and used a piece of toothpick as a 'dowel' to help hold the posts in place. (The holes in the tops of the posts also hold toothpicks that pass through the beams above and into the first floor posts, but that comes later.) Next came the horizontal beams that connected the tops of the posts. These were made from balsa wood strips that I had 'stained' with a mix of watered down paint to look something like oak. I started with the two side beams which were - carefully - pushed over the toothpicks jutting up from the posts until the toothpicks emerged from the top. The remaining beams were then fitted and glued in place. This was the result:
 This photo is taken from the back left corner. The space between the back left post, the centre left post, the centre right post and the back right post is the space where the bakers shop will be.
The next step was to make and fit the stairs to the first floor. These are again made from balsa wood. Normally when I make stairs like this I use lils (craft pins) to hold everything together. This works well, but leaves a metal 'nail head' showing along the side for each step. As I wanted my steps to be metal free, I used toothpicks again. The toothpicks are glued to the uderside of each step and then each end of the toothpick is poked through the side piece - which I think is what should be called the 'stringer'. The ends of the toothpick were then cut off. This makes the toothpick almost invisible, unless you happen to lie under the staircase and look up.
This photo is taken from the back left corner. The space between the back left post, the centre left post, the centre right post and the back right post is the space where the bakers shop will be.
The next step was to make and fit the stairs to the first floor. These are again made from balsa wood. Normally when I make stairs like this I use lils (craft pins) to hold everything together. This works well, but leaves a metal 'nail head' showing along the side for each step. As I wanted my steps to be metal free, I used toothpicks again. The toothpicks are glued to the uderside of each step and then each end of the toothpick is poked through the side piece - which I think is what should be called the 'stringer'. The ends of the toothpick were then cut off. This makes the toothpick almost invisible, unless you happen to lie under the staircase and look up.
 With the stairs made, I positioned two more posts and used beams to tie them into the existing structure and fixed the stairs to the beams. As you can see in the photo, my current test dummy Naked Neville took a stroll about to see what he thought while the glue was drying.
Before moving on to the next floor, I cut pieces of foamboard to act as the 'walls' and this next photo shows how effective adding walls can be!
With the stairs made, I positioned two more posts and used beams to tie them into the existing structure and fixed the stairs to the beams. As you can see in the photo, my current test dummy Naked Neville took a stroll about to see what he thought while the glue was drying.
Before moving on to the next floor, I cut pieces of foamboard to act as the 'walls' and this next photo shows how effective adding walls can be!
 I'll add another post soon with the details of the first floor construction!
Monday, January 4, 2010
Back on Schedule
Just a quick post to let everybody know that now the Christmas break is over I'm back to working on my normal schedule (which unfortunately also means I'm back to the grind at work) and should be back to adding a minimum of a blog post per week. Over the break, I made a flying start on the second stage of the Bakery, but I'll add that post in a day or two. In the meantime, I already have the photos of my progress so far on Flickr, so go take a look!
Subscribe to:
Posts (Atom)