A Randomly Selected Newspaper Headline:

The following is a randomly selected newspaper headline from many years ago:

Welcome to my blog. Please feel free to leave a comment. I assure you I always read and appreciate everything you have to say. Unfortunately, thanks to Blogger being, well . . . Blogger, I can not respond to comments nor leave any on your blogs. They simply disappear into the ether. Occasionally I will remember to respond in the next blog post I put up, but usually these good intentions slip my mind. So if you want to ask a question or get a response to any comments you may have please leave an email address or other contact method in your comment and I will get back to you.

I have also added a separate page to the blog for the Tower of Magic with a brief summary of all the rooms of the ToM in the one spot. The link is just below this and above the main body of the blog, or you can just click here.

Monday, June 25, 2012

Personality . . . .

I'm not sure how it happened, but I recieved both of my orders from the UK exactly a week after they notified me the packages had been posted.  Either they posted them the week before notifying me and the packages made their way to me over two weeks (rather fast for UK to Australia) or they were posted when the notifications were sent and they took just a week to arrive.  One week is faster than mail can travel from one side of Australia to the other, so one week from one side of the world to the other had me more than a little surprised.


Anyway, with these orders in hand I could finally start mking the rooms of the house look like, well, rooms.  The blank box that was the dining room was instantly tansformed by the application of wallpaper.


The paper used in here is "El Dorado" made by Les Chinoseries and it is absolutely gorgeous.  It's also quite expensive, so rather than buy a third sheet to have enough to cover all the walls in here, I've used an oversized fireplace that will have a wide overmantle ontop that covers the large gap where there wasn't quite enough paper for this huge room.  The fireplace is on the side wall rather than the back wall so that the stunning mural scene becomes the main focus.  Another of the new arrivals were doors.  Despite the fact that I wanted to put a set of double doors in this room, I only bought single doors.  It was an easy matter to take two doors, turn one around to open the opposite way and then stick the frames together.  Some stain later the doors were ready to go into the rather large hole in the wall.


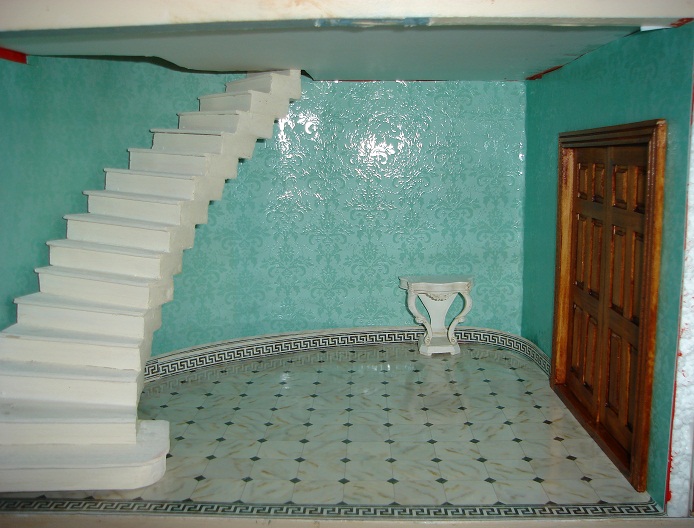
Also in the packages was the flooring for the Hall next door.  It's a shiny marble tile effect paper with a Greek Key style border.  The walls have been papered with a scrapbooking paper with a very subtle pattern.  This paper is plan B for the room.  See the bits of red at the edges of the paper?  That's the colour the Hall was to be painted, the intense colour broken by white panelling around the bottom and lots of white plaster decorations on the walls.  But the red paint I had was old and left clumpy bits everywhere, plus it looked terrible next to the classy paper in the dining room next door.  And by the way, the remaing red will be covered by coving (etc) eventually.  Now that I had the floor paper, I could start to paint the stairs to match (hopefully) the tone of the marble.  The stairs have been given a coat of white, but I'm still mostly filling, sanding and re-filling the messy ends to get them perfectly smooth before they get any more paint.


 Downstairs in the basment there are more doors.  One leads to the mystery room on the right, the other leads to nowhere but gives the impression that there is something behind it.  The walls in the hall have been painted "vellum" with some scrapbooking paper left over from a few years ago lining the lower parts.


In the kitchen next door the chinmey is in position and the cooking range has started to be built within it.


So with the exception of the mystery room in the basement, all the rooms on the bottom two floors of the house are starting to show some personality.  Perhaps by this time next week the rooms in the upper two floors will be able to say the same?

Monday, June 18, 2012

Busy in the Basement

For those of you who prefer facebook to blogger, I have linked my blog to facebook so that my blog posts will show up on my facebook page.  Here's the link: http://www.facebook.com/alennka.celestial   Each new blog entry made here should automatically appear there.


Being unable to do much work in the main part of the house until my various orders arrive, this week I started working on the separate basement.  The basement is made from a cheap shelf unit which was cut down a little to make it a better fit to the main house.  The first step after this was to lay the floor.  I had been planning to use Air Dry Clay for this, but decided I didn't want to wait overnight for it to dry, so I used polyfiller instead.  I mixed a little extra water into the filler to give it a creamer consistency and spread a thin layer over the floor.  I then dragged a stylus through the filler to create the pattern of stone blocks.  A quick sand and several layers of paint later, this is the result:


I'm not entirely happy with the colour, it's a little too brown and not quite enough grey and the matte sealer over the top has almost a gloss finish.  Once the floor was finished, I assembled the basement and then painted the walls and ceiling.  Yes, I did have to keep wiping paint off the floor and yes, a smart person would have painted and then assembled.


The basement is divided into three rooms.  The smallest central room is a stairwell and hallway that connects the other two rooms together.  The staircase doesn't actually lead anywhere, you have to imagine it connects up somewhere behind one of the false doors that will be upstairs.  Besides the stairs is another doorway to nowhere, again you have to imagine it leads to other service areas of the basement.


To the left of the Hall is the kitchen. At least it will be a kitchen one day.  It's accessed via an open arch so that the busy staff don't have to fuss opening and closing a door while holding trays piled high with all the delicacies the kitchen produces.  The walls are painted a pale blue.  In the Georgian era kitchens were often blue as it was thought the colour discouraged flies.  Wouldn't it be nice if it really were that simple?  The range and oven will be housed in a brick chimney in the back right corner of the kitchen.


The structure of the basic chimney is foamboard.  Over this I've added "bricks" made from the tops of two egg cartons cut into rectangles about 1cm x 2cm.  Again I'm not too sure about the paint job here.  The colours are too vivid and overpowering and need to be toned down a little.  Th cooking range will be built into the large opening while the smaller one is for the bread oven.

The third basment room is a bit of a mystery space at the moment.  It could be a scullery, laundry, housekeepers office/bedroom or a number of other domestic type rooms.  As usual, it's a case of too many ideas, too little space.


Wednesday, June 13, 2012

Hey, It's a House After All

Like it or not (and frankly I hate it) there was not going to be any progress on this house until I bit the bullet and compromised on what would be in the house.  Nine rooms just weren't going to fit, so I reluctantly reduced the room count to six, creating two large rooms on each floor.  No second bedroom, no morning room or maybe one of them, but no nursery.  Sigh.


The room above the staircase hall is the study.  I'll add a wall along the back to create a hallway that runs along the back of the room to connect the top of the stairs, the study doorway and the door to the drawing room next door.  The internal walls are made of pieces of polystyrene foam sandwiched between two sheets of thin but stiff cardboard.  I cut rectangles out of the card where the doorways will go but have left the foam intact for the time being because the doors haven't arrived yet and I want to be sure they'll fit first.


With the hard descions on layout made, the next task was to lay the floors.  The two top floors and half the ground floor (the dining room) have narrow floorboards made of popsicle sticks.   This isn't the quickest method of covering a floor, but it is cheap and effective.  I started by painting the sub floor black as this will make any gaps in the floorboards less noticable.  Then it's just a matter of cutting the sticks and glueing them down.  Then cutting more and glueing them down . . . . .then cutting more . . . two and a half floors worth, what was I thinking?  I actually have blisters on my fingers from all that cutting.  Then there is the muscle strain from hefting piles of old dollshouse magazines around to weight down the boards and make sure they stay flat while the glue dries.  Eventually I won the battle though and after a quick sand, the floors were stained and varnished.  I should mention that the floors aren't actually as orange as they appear in the photos but are in fact a much more pleasant honeyed brown colour.  The stain I used was labelled "walnut" which surprised me as I always thought walnut was a much darker wood.


Moving on from the floors, the next task I tackled was to finish making the structure of the house. The blue line in the photo is the original roofline of the house.  Due to the angles and low peak, there was very little you could do with these rooms as the house came, so I used more polystyrene foam to square off and raise the roof to make the top two rooms more usable.  Having learned the strength of foam in relation to curious cats, I immediately added a layer of paper maiche on top of the flat roof to toughen it up a little.


 Now the next major problem with this house is the outside.  I sure can't leave it looking like this now can I?  But what to do with it?  It depends a lot on what I do about the front of the house.  I don't want to reuse the original front, it's not Georgian enough, the changes to the top floor mean the upper section won't fit and I want to add a basement which won't be covered at all.  So what do I do?  A solid front made to look like a proper house or a clear panel to showcase the interior?  If it's solid, the sides and back will need to be finished to match, but if it's clear, the back and sides can have just about anything done to them regardless of whether it is house-eske or not.  If I do a solid front, what about the basement?  I can't have the front door just hovering a floor above the bottom of the house.  Do I build the front out a little at basement level so the front door opens onto a flat surface?  But that's what I dislike about basements, they make the house so very deep.  Plus it's an extra level of complication on a house that's already trying to drive me up the wall.  Whatever the front is, it will need to be in two pieces as the stupid pediment sticks out right in the way.


Do you remember my saying I had ordered a heap of goodies for the house?  The good news is that the first order has arrived.  It was full of gorgeous plaster pieces made by Replicast Miniatures and bought from Fairy Meadow Miniatures.  There are two types of coving/cornice, some ornate panels for the study/library walls and a pair of over-door pediments amongst other bits.  They are absolutely exquisite, but be warned, Replicast Miniatures has now closed down, so when your favourite miniatures store sells out of their items, there won't be any more.

The bad news is the two other orders I've placed for this house.  Both were for items just not available from any store in Australia, so I had to order from two stores in the UK.  That in itself isn't a problem even though waiting two or three weeks can be frustrating (provided some postal worker doesn't misread the address and sent it to Austria instead, then it takes seven months for the people in Austria to send it to every corner of their country trying to find where it should go before somebody realises it shouldn't be in Austria at all).  My complaint is that I placed both orders the week before last and recieved email confirmations that the orders had been received and proccessed.  Fair enough.  Then at the end of last week I received a further email from each supplier saying that the order was now packed and ready to be shipped at the suppliers earliest connvience.  What, their warehouses are so big it took the guy sent to put the order together a week to make it back to the office?  If the items were out of stock, why were they listed on the companies websites as available and at the very least, why couldn't they have sent an email saying "we need a week, please be patient" when the order was placed?  And one email was phrased to say the order was now ready to be shipped "at the first opportunity".  That could mean it'll be sent that day or sometime next month.  If you hadn't already guessed, this sort of thing really bothers me and the fact that two totally separate companies both did the same thing is a double annoyance, even more so because these are both companies I usually consider to be reliable.  So two weeks after I placed the orders, both are still at least two, more likely three or four weeks away from arriving.  

Finally for this week, if you missed my last post I've opened a poll for you to vote on possible names for the house.  You'll find it at the top right of the sidebar and I'd be very interested to know what you think of my shortlist of possible house names and if you have any alternate suggestions.  I'm thinking maybe a good name for this house would be PITA (Pain In The . . . um, Arm).


Friday, June 8, 2012

What's In A Name?

I really need something better to call my current project than just "the Georgian House".  So I've been looking for some suitable sounding names, but can't decide what to use.   These are my favourites, all the details come from http://surnames.behindthename.com/

KEIGHLEY
SOURCE: Location
USAGE: English
Meaning & History
Derived from an English place name meaning "clearing belonging to Cyhha". The Old English given name Cyhha is of unknown meaning.
Keighley House sounds like a pretty grand and lofty place to me.

MURGATROYD
SOURCE: Location
USAGE: English
Meaning & History
From a place name meaning "MARGARET's road".
This one isn't really a serious contender, I just love how it the name sounds.

PETTIGREW
SOURCE: Nickname
USAGE: English, French
Meaning & History
Derived from French petit "small" and cru "growth".
A name meaning "small" seems appropriate for a miniature


PRESTON
SOURCE: Location
USAGE: English
Meaning & History
Originally derived from a place name meaning "priest town" in Old English.
Preston Manor sounds like a solid old English mansion, plus it's the name of the town where my Grandma was born.

REYNELL
SOURCE: Given Name
USAGE: English
Meaning & History
Variant of REYNOLDS


ROYSTON
SOURCE: Location
USAGE: English
PRONOUNCED: ROIS-tən   [key]
Meaning & History
Originally taken from an Old English place name meaning "town of Royse". The given name Royse was a medieval variant of ROSE.


WALMSLEY
SOURCE: Location
USAGE: English
Meaning & History
From an English place name meaning "a clearing in a wood, near a lake".

Please help me choose which name to use by voting in the poll at the top right of the page or suggest a different name, all ideas welcome!

Tuesday, June 5, 2012

Still Staircase Woes


After last weeks disasters it was pretty clear I would have to use the house I have without too many modifications.  So I've rebuilt the house, re assembled the pediment and spent far too much time changing my mind about the stairs.


This is the bottom part of my curving staircase in situ.  If I put the top half ontop of this to create a staircase with a continuous curve, it ends up being far too wide to be able to squeeze two rooms either side of it.  I would also mean that there wouldn't be room to put a fake door in the back wall of the stairwell/hall meaning I would have to add a real staircase up to the top floor and down to the basement to create logical  access to all areas for the people who live in the house.  That's a lot of space just for steps.

One alternative is to do this:


By using a landing I could fold the stairs back on themselves, but there's still no room for fake doors.  Plus it looks a little odd.

Then there is the problem of room size.  With a central staircase folded back on itself and two evenly sized rooms either side, the rooms end up about 23cm wide.  I pulled out the bedroom suite I bought for this house almost a year ago and tried it in a room this size.


As you can see, it does all fit (except for the bedside table), but only just and it really isn't showing off the classy high quality furniture off to its best.  I've also ordered some wallpaper with a mural scene on it that you won't really be able to see in a narrow room; it needs a long back wall to really show it off.

So . . . . .

Now we come back to ritzy staircase and one big room per floor or cramped staircase and two cramped rooms per floor  or no staircase and two good sized rooms per floor.  It seems that every choice is a huge compromise on the vision I have for this house.  One compromise would be to have two rooms per floor, the staircase/hall in one of the ground floor rooms and have the staircase emerging directly into a room upstairs, say the drawing room.  That would eliminate the need for a second floor hallway and I would only lose one room to the grand staircase.  But which room would get the boot and would the emergence of the staircase into a room a) take up too much space in the room or b) just simply not be grand enough for a grand house?


 Whatever I end up with, I do have one piece of good news.  I've been trying to find some inexpensive fancy wrought iron look stair railings.  I've seen some lovely things, but all with prices to make your eyeballs spin.  Then I had the idea to use pieces of fanblade.  I bought a stack of these cheap fretwork fans for $2.50 each and provided I make no mistakes I can get as many as 30 spindles from each.  All they need is cutting out and painting black.  Much better than paying about $15 for a pack of 6 spindles.  Sweetington, a talented miniaturist I have contact with via Flickr suggested using the fan blades as the steps themselves and gave me this link to illustrate his point: http://www.flickr.com/photos/bara-koukoug/3518523444/  The steps aren't suited to this house, but I can imagine them someplace with a steampunk theme. . . .

I still have a couple of weeks to agonise over the decisions that need to be made for this house.  I can't procceed too far with it until the things I've ordered (wallpapers, doors, mouldings, etc) arrive and as much of this has to come all the way from England it won't arrive for at least more two weeks.  I think in the meantime the best thing to do is to ignore the house itself and start working on the basement instead.  The basement will be built by adapting a flat packed shelf unit.  Oh wait . . . . I can't plan that until I know where, and if, stairs will come down to the basment from the upper house.  That's the way this house is going; there's always something that prevents the next bit from working!

Friday, June 1, 2012

Past Glory

 A big thank you to everyone who left a comment on my last post.  Your words were very encouraging and your suggestions were all very good ones.  And Daydreamer, how I wish we could get Builders Foam here in Oz!  I'm having one last go at re-designing the staircase and then we'll see about the house.

And now for some much better news:

First it was the Oriental Folly, now DHE have written a blog post featuring the Dig Site!  You can read it by clicking here!  Is there anybody who doesn't love Kiki?  There's a chance he'll become even more famous several months hence . . . I'm not sure I'm supposed to talk about exactly how so I'll leave you hanging on that.

Monday, May 28, 2012

The Staircase of Doom


In planning the layout of the Georgian house, everything hinged on the size, shape and orientation of the staircase.  The wider the stairs, the narrower the adjoining rooms.  Thus creating the staircase seemed the only logical place to start work on the house so I could determined the final sizes of the rooms.

Oh boy, was that ever a mistake.

The original plan was to have and grand staircase with an elegant sweeping curve to it.  No matter how careful the calculations, I find nothing I work out on paper is ever actually the same when built, so rather than spend hours trying to nut out the staircase, I pulled out a sheet of balsa wood and started cutting steps.  As soon as I began to assemble the stairs I realised there was no way that this staircase was going to fit into the house, not if I kept the study and second bedroom.  Neither of these rooms were part of the initial plan, in fact as little as two weeks ago I had no notition they may ever exist, but once the seed of the idea for each room was born they both became rooms I just had to have. 

So, big hall and grand stairs and no extra rooms or small hall and less impressive stairs with extra rooms?

I'm greedy, I really want it all, so I decided to try and scale down the grandness of the staircase just a little and still squeeze in the extra rooms.  I dismantled the staircase I'd already begun and started repositioning the steps to create a tighter curve, narrower treads.  Still too big.  I took it apart again and tried something different, still no luck.  Eventually I pulled out some spare ready made stairs that I think came out of the house I turned into Highcroft Castle (that's three castles ago) and cut them into various lengths, put landings in, added bends and took them away again.  With each attampt, the stairs became increasingly less and less grand and elegant and more dull and mundane.  And still, with every possible shape and size there was a problem - a doorway was blocked, there was insufficient head room to walk up the stairs, etc, etc.  In the end (a whole day later) I found myself reduced to a straight front to back run of stairs and a very narrow, unimpressive hall in which to put them.

I looked at what I had decided was the only staircase that left space for the extra rooms then closed my eyes and looked at the staircase in my mind, the one that was supposed to be in the house.  There was no comparision.  Clearly I had compromised far, by far too far, too much for the sake of the extra rooms.  It simply wan't good enough.  There was no choice left but to eliminate the extra rooms and go back to the original staircase.  Hey, I could always just build another level onto the top of the house and squeeze them in up there right?  Five floors isn't too many after all . . . . . .

So it was back to the balsa steps.  These were glued together to create a staircase with an elegant sweeping curve just like I'd started to make days earlier.  This is the result:


Imagine it painted to look like white marble with black iron railings.

Now at long last I had a staircase, I could layout the rooms within the shell of the house.  The hard part was over right?

Guess again.

I hate the house I was using for this project.  I've already renovated and redecorated it once.  I was happy with neither of it's previous incarnations.  In no small part this is due to the way the house was made.  It's very thin plywood walls and floors  and is only strong enough to hold together because of 1/2" square pine beams along every edge and corner.  Therefore every wall appears to be 5/8ths of an inch thich when viewed from the font, but the actual wall inside is 1/2" farther out than it looks.  Basically, it's ugly and worse, it's terribly awkward to work with.  The plan this time was to pad the walls out to the depth of the posts to create flat even walls with no jutting out posts.  I had some 1/2" thick polystyrene foam to use for this, but when I went to try it, it turns out that 1/2" and 1/2" can be two totally different depths.  Go figure.  The polystrene foam was somehow too thick despite being the same depth.  The house also has a big solid pediment accross the top of the middle floor.  With the changes I want to make, it'd be in entirely the wrong place so I tried to hammer, chisel and otherwise pry this off.  I broke one end away, but as for the rest I was closer to snapping the floor than shifting the pediment.  Yet at this point neither could it stay as it was because it was so damaged by my efforts.

Being at this point somewhat short of patience and having a huge amount of the polystyrene (salvaged from the packaging when my Mum bought a new bed last year) I decided the easiest way to proceed was to knock the old house apart competely and use the bottom floor as a base from which to build an entirely new house out of solid polystrene foam.  It seemed so much easier than trying to fix the numerous problems with the old house.  So after a few well placed knocks with a hammer, the house came apart and I started rebuilding it out of polystyrene.  While I was going I added an extra floor for the study and second bedroom and yet another for the basement kitchens.  I also increased the ceiling height of the main floors because they were a little on the low side before.  Dumb move that because the already constructed staircase was built for the lower ceiling height.  Not that that mattered as it turned out.

Yikes!  Suddenly I had a house as tall as I am!

It was one of those moments when you stand back, look at what you've done and think "Nuh-Uh, no way".  As one single unit it's just too big.  I realised I would have to cut it into at least two stackable parts and probably take out a floor as well.

And then a cat jumped ontop of it.

Some people have made houses out polystyrene foam and they work.  Obviously these people don't own cats.

The thousands of little beads of polystyrene that had acumulated while I cut few into the air and same down like snow and when the air had cleared, the cat had vanished and the walls and floors of the house were a broken crumbled mess.  So much for that plan.

At the end of the week, what do I have left?  I have the start of a swanky staircase and this:


A pile of walls and floors (with broken pediment still attached) hidden under a cupboard.  I have no house unless I re-assmeble this pile.  If I do that I'll have all the old problems back to haunt me yet again.  Broken Pediment, silly plywood and beam construction.  Is it worth it?  And if it's not, what do I do?  Draw up a design and cut a new house out of MDF?  I can't do that because a house that size would end up being too heavy to move.  The polystyrene foam obviously wasn't terribly practical.  By a new kit house?  Again, it'll be MDF, thus heavy, plus it'll be ridiculously expensive, won't arrive for weeks and when it does get here I'll need to totally change it anyway.  Give up on the idea of the Georgian house altogether?  But I already have all this furniture, most of it the expensive type, I can't just let it stay in the cupboard where most of it has been sitting for almost a year already.

I think the only practical solution to the hole I'm currently in is to go away and cry.  I really don't know what else to do.

Monday, May 21, 2012

Endings and Beginings


Whoa.  Such a lot has been going on this week it's hard to know where to start!  I guess the best place is at the end of the Dig Site.  As you can see, the columns have been given another repaint.  They look a lot less crazy now.  Instead of multi coloured stripes, they now have blocks of colour.  These pilars are (very loosely) modelled on "lotus flower" style pilars, which are meant to resmble an open lotus flower.  In keeping with this idea the main body of the pilar (i.e. the "stem" of the flower) is now green while the upper part (the "flower") is blue.  The pilars are accented with gold faux leadlighting outliner.


 This is not only an improvement on last week's look, but a vast improvement on the orgininal "lotus bud" style pilars.


 The Site is now finished.  At least for now.


 You may notice in some images Kiki (the mummy) has developed a distinct lean.  I think he must have been hitting the jars of wine that were entombed with him for the afterlife.  It's because one of his legs is shorter than the other.  I'll find a wedge I can slip under his foot and hopefully steady him up.


 I told you about the logs in the fire last week, but failed to take a decent photo of them.  Here they are at last.

Moving on to other things, Friday and Saturday saw the annual Doll, Bear and Miniature fair return to the Country Club Casino.  This is my haul:


Those of you out there who are DHE fans will recognise almost everything in the photo.  Of the dwindling number of dedicated miniature stalls (down to four this year) each of them had about 90% Dollshouse Emporium items.  It was overall very disappointing, absolutely no wallpaper or any kind of DIY items including scenic water, nothing in 24th scale (though there were some 48th scale items) and almost no cats!  Every year I go there to stock up on Scenic Water and cats, but alas! all I could get was the little tabby on the chaise who is a pretty low quality polyresin job.  Still, I did manage to spend lots of money.  Almost all of this is destined to go into the Georgian house.  The desk, though lovely, strikes me as being more suited to a later period in history, so I might save if for something else.

And speaking of the Georgian house  . . . . . I have at long last started to work on it!


This is the shell of the house with all the old decoration stripped out of it.  You can see the remanants of the last two decorations schemes in this shot.  Let's hope it's third time lucky for this house.  Below is a diagram of the new layout I have in mind for the house:

I'm not sure whether it will stay like this or if I'll move the Hall/staircase over to one end.  If I do it means putting fake doors in the back walls to connect the rooms.  If I leave the Hall in the middle, the rooms can connect though doors in the side walls.  I am also going to add a basement area for a kitchen and other "domestic" rooms such as a larder, scullery, dairy, etc.  I'm still doing a lot of thinking about how the layout will (or won't) work.

And finally, some more photos of the Dig Site just because:


Thursday, May 17, 2012

. . . . Where'd Everybody Go?

I logged into my Dashboard this morning to see what was happening amongst my fellow Bloggers . . . . only to be told by Blogger that I wasn't following any blogs!

It's obviously another of Bloggers famous mystery faults.  Has it struck anyone else?  If so, did the list of blogs you're following come back on it's own after a while or should I start madly hunting down all the blogs I had been following and re-follow them?  Thanks.

OK . . . never mind, all the blogs seem to have come back on their own.  Phew!

I need to dig up some blogs to follow!

Monday, May 14, 2012

The Mummy Returns


Another week, another pair of pilars.  These two are definately an improvement over the originals, nowhere near as lumpy and uneven . . . . . It's just too bad some idiot painted them in a colour scheme that works best within circus tents.  And the bullseye pattern on the bases is just too much.  But guess what?  I don't know what other colours would look better, so for the time being at least they are staying as they are.  The area over the door is decorated with a fridge magnet depecting an Egyptian style head.  On the whole, the inside space of the Dig Site just hasn't cooperated or gone to plan at all.  I should have been less ambitious and just done an outside scene and skipped the inside bit.


On the plus side though, Kikerikotep (just call him Kiki, it's easier) has turned out wonderfully.  Since last week he's had his wrappings "dirtied" up a little more through the application of a couple of layers of brown paint that had been watered down a little.  Somehow he looks more cheerful than menacing so maybe he has those red eyes not because he possesses some sort of evil power but simply because he's been awake for the past two thousand years.


Right outside the door, Wil now holds a lantern in one hand and a pistol in the other, ready to peer through the hole he's chipped in the door and discover what lies within.  The first thing he'll see is Kiki . . . good thing he's got his gun ready then?  His lantern is a piece of acetate sheet cut into a cross shape and then folded to create a box.  Faux leadlighting outliner covers the corner joints as well as the top and bottom to create the impression of a metal structure/frame.  A loop of black wire pushed into the faux lead while it was still wet creates a handle while a red glass seed bead acts as a flame within.


 The Site is now more or less finished.  The space between Wil, Agnes and Aldo seems a little empty, as does the space between the first two sections of pilar, but I can't think what to put there


 I seem to have managed to forget to take agood photo of it, but one of the finishing touches I've added are logs on the fire.  The logs are bits of real firewood scrounged from the bottom of the woodpile.  I held them over a candle to char them a little then added them to the fire.  In the past I've used black paint to give logs a charred, burned look, but the real thing looks so much more convincing.


 All the lose parts (tools, snakes, arefeacts, cups, etc) have been fixed in place with Tacky Wax.  You may notice Rashid now has hair.  I realised one of the reasons he didn't look right was that he didn't have ears!  (oops!)  That solved the to wig or not to wig debate as I had to cover up his lace of auditory organs once I'd discovered it.  His hair turned out messy and I'm still not entirely happy with him.


 A cheeky little bird has perched atop the bust of Nefertiti.  Let's hope he keeps his bowels under control for the duration of his stay on the priceless artefact.


The entire scene is covered by a clear perspex cover.  No sooner had I glued the pieces together to create said case than a cat decided it looked like a good place to stretch out for a while.  At least now I know the cover is Strong.


So, now do I start work on the Georgian at last?


Monday, May 7, 2012

Show Me The Mummy!


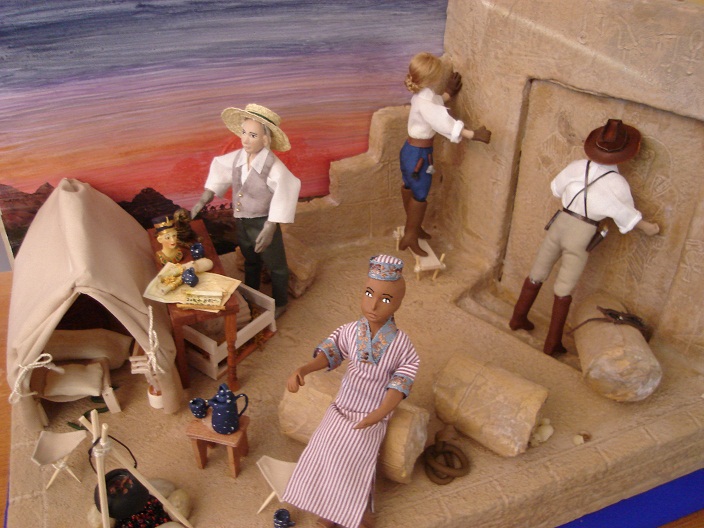
After a week of wrapping, stuffing, stitching and glueing the people of the Dig Site are finished!  All four have head & shoulders, lower arms and lower legs made from polymer clay connected by a wire armature (frame or skeleton).  Their 'bodies' are made of foam wrapped around the wire armature with a little extra polyester fill stuffing down their trousers to give them more shapely legs.  They all wear clothes made out of various cotton fabrics.


This is Rashid.  He's the team's local guide and translator.  Yes, his head is too big.  I was going to leave him bald, but I may go back and give him some hair to see if this makes his head look less out of proporition.  His sandals are made from leather while his clothing is made from a cotton fabric.


Aldo is the most experienced member of the team with a lifetime of treasure hunting under his belt.  His hat is absoulutely the best one I've ever made and I'm now thinking that if I ever get around to making that dress shop it will have to have an extensive millinery section.


Agnes is the only woman of the group and perhaps the most keen to get to work.  She even wears some tools on her belt to help her excavate the ruins.  Her wig is a pre-bought one made by Heidi Ott.


Wil, short for William, is the leader of the group.  You saw his hat and gun last week; they were bought online.  His belt, braces and holsters are real leather. His shirt, like Agnes', has seed bead buttons.


And finally, there is one more "person" at the Dig Site. . . . . 


The Mummy, I call him Kikkerikotep, is a 6" high plastic skeleton wrapped in strips of calico.  Once he was fully wrapped he was painted with a mix of glue, water and brown chalk paint to fix the wrappings in place and start to give them an aged look.  The wrappings will still need a little more aging before he's finished.  His eyes are red glass seed beads.


You may have noticed that I've ripped out the columns by the door.  I will have another go at making some new columns.  Once I've done that and cleaned up the mess I've made of the back wall, the Dig Site will be very close to finished.