
Thursday, November 7, 2013
Comments
Blogger seems to be throwing another tantrum at the moment and not letting my reply to your comments. I just wanted to let everyone who has commented know that I have read your comments and will reply as soon as Blogger lets me!


Wednesday, November 6, 2013
One Thousand Books And (Not) Counting
If you read last week's blog post, you may remember I said a good rule to use when making books was to make twice as many as you thought you'd need, then make an extra dozen. To further illustrate this point, about six hours of book making creates a pile of books this big . . . .

Which fills up this much shelf space . . . .

Another few hours and about two thirds as many books again filled up the remaining Library shelves. I think I can now make books in my sleep, in fact I think I did do a few that way already! I didn't keep count, but there are easily over a thousand books in this room.

With the books in place I added some more detail to the shelves in the form of decorateive brackets and some braid along the top, both painted to (almost) match the wood of the shelves.

The fireplace is made from cardboard, some porch railing posts, more of the brackets used on the shelves and a pair of scrapbooking decorations, one at the top and the other acting as a fender at the bottom. Four scrapbooking corner embelishments put together create the frame for the unicorn picture hung over the mantle.

The Library is now starting to look like a proper room rather than a building site. As usual for this point in a project I am currently reconsidering the furniture arrangement I had intended to use and am toying with a number of different idea on just how to use the space.

And finally, another photo of the mirror-illusion shelves just because I'm so chuffed with them!


Which fills up this much shelf space . . . .

Another few hours and about two thirds as many books again filled up the remaining Library shelves. I think I can now make books in my sleep, in fact I think I did do a few that way already! I didn't keep count, but there are easily over a thousand books in this room.

With the books in place I added some more detail to the shelves in the form of decorateive brackets and some braid along the top, both painted to (almost) match the wood of the shelves.

The fireplace is made from cardboard, some porch railing posts, more of the brackets used on the shelves and a pair of scrapbooking decorations, one at the top and the other acting as a fender at the bottom. Four scrapbooking corner embelishments put together create the frame for the unicorn picture hung over the mantle.


The Library is now starting to look like a proper room rather than a building site. As usual for this point in a project I am currently reconsidering the furniture arrangement I had intended to use and am toying with a number of different idea on just how to use the space.

And finally, another photo of the mirror-illusion shelves just because I'm so chuffed with them!

Monday, October 28, 2013
A Trio of Sorceresses and a Tonne of Books

Chrysta has been joined by new friends Amethyst and Gemma. Amethyst (Amy for short) wears a purple gown while Gemma is in black. Like Chrysta, they're all handmade from the same mould (hence they look like triplets). While Chrysta was made from Cernit clay, Amy and Gemma are both made from Sculpey. As you can see, the Cernit definately gives the better result, it has more of a 'glow' and a more translucent finish that make it more realistic. It is however so much harder to work with than the Sculpey.


The garden itself is practically finished now that water has been added to the fountain. The pool is made of Solid Water while the fountain is done with Scenic Water trained up thin wires. The fountain part is a bit messy but somehow looks more like crystal than water - perfect for the Crystal Garden! Floating in the pool are lily pads (wire and faux leadlighting paint) and flowers (resin beads).

Hopefully, the garden will be finished by next week and if I'm lucky and actually get to see some sunshine I may even manage to get some decent photos of it.

Meanwhile, after their modelling job in the garden last week, Saskia and Artie have dropped by the Library on their way back to Castle Starcaster. After weeks of neglect and being slept in by cats, there is finally some progress for them to see. I've taken down the arches from the shelf tops and run some coving stained to match the rest of the shelves around the top instead. I'm not sure about the fancy trim on the top. I don't have enough to go all the way around, so I was going to just do the ends of the shelves as it is in the photo, but it doesn't look right does it? And Artie reminded me that it's the same trim used in Castle Starcaster's library and it might look a bit 'samey' if I used it in another library. So I guess it's time to think up plan B.

I have installed the mirror in the back corner creating the illusion of continuing shelves. Everything behind the red curtain is mirror. I wasn't clever enough to postion the mirror so that it reflected only shelf from every angle so to compensate I hung the curtain to block the side of the mirror where you tend to see things beyond the library. I'm very pleased with the overall effect, it works really well. It will be impossible to fill the shelves down this aisle area after the centre shelf is permanently glued in place so I had a marathon book making session and managed to make enough books to fill this area and glued them in place. Next time I decide to make a room filled with books, someone please hit me. What I've found to be a good rule of thumb for making books is to make as many as you think you'll need, then make as many again and an extra dozen on top and you may have enough. By the time I've filled the remaining three quaters of the library I will definately be swearing never to make a book again!
Monday, October 21, 2013
Chrysta

Meet Chrysta, the sorceress who tends the Crystal Garden.

Her gown is made of magenta chiffon over black polished cotton. The chiffon has a loose pattern of made sparkly paste of some kind.

Her jewellery is mostly flat backed faux pearls and crystals.

Her head dress is decorated with real beads and crystals (though the pearls are still fake).


I'm very pleased with the way Chrysta turned out, just what I wanted for the garden. There's just one slight problem though . . . . . . .

When you stand Chrysta in the Crystal Garden, she looks too squashed in. Her skirts are too full and the paths too narrow.

Where ever she stands, there's the same problem! Even with the central fountain pushed to the side, she still looks cramped.

She does fit best at the back, but then she's lost behind the central fountain.

Test model Harry proves that someone in trousers looks much more fitting in the garden.

Artie and Saskia from Castle Starcaster stopped by. Saskia in her more triangular shaped skirt fits in much better than Chrysta. Even Artie in his wizardly robes looks quite good (although he does have to walk sideways along the paths).

So . . . Having spent days working on Chrysta, do I now set her aside and try to find a spot for her in a different room and make another doll for the Crystal Garden (or leave it people-less)? Or do I squish her in whether or not she really looks comfortable? . ? . ?

In the garden itself, the edges of the beds have been capped with strips of mirror paper to finish them off, a backdrop of stairs leading to other rooms of the tower has been added in the doorway and work has begun on the central fountain. The fountain is topped by a slice of geode, the only real crystal in the Crystal Garden. I would say it's nearly finished, but then if I have to make another doll . . . . . . .
Tuesday, October 15, 2013
How Does Your Garden Grow . . . .

The Crystal Garden has now been filled with plants. A vine made of glass leaf shaped beads and flower shaped seaquins has grown around the doorway (for which I still haven't filled in the background - next week I promise!).

I took out the plants I had "planted" last week and mulched the garden beds with some purple glass shards (designed to vases and floral arrangements. Once the oasis foam was covered in the mulch, a mix of PVA glue and water was pured over to hold the mulch in place. As this was drying, I pushed the plants through the mulch into the foam in what I hope was a pleasing arrangement.

I found the large pink round beads in my craft store. They are wooden beads around which strands of seaquins had been wrapped. To the naked eye each seaquin looks a little like a flower bud about to open, sadly they don't look as effective in a photo.

The red glass paint flowers from last week are planted in one of the front flower bed. I forgot to leave enough length on their stems to be able to twist them into a single bush, so they are growing as indivual flowers.

And the other front garden bed which sports some rather unusual blue cube flowers. Scattered through the garden are four golden butterflies enjoying the beautiful blooms.

The outside of the central bed has also been filled with plants, including some flowers made from clear/pearly flower shaped beads. The central area will be the water feature. The white flowers currently scattered there are resin beads that will be painted and with the addition of some glass paint lily pads will be floating lillies.
And for those of you who are wondering what's going on in the Library . . . . .

Monday, October 7, 2013
Spring Gardening

In Spring, some people go outside to work in the garden. In Tasmania you only go outside in Spring if you want to drown or be blown half way to New Zealand. So sensibly, I've been doing some gardening indoors.

I started making the tallest plants for the Crystal Garden first and will fill in the shorter plants around them later on. They're all made the same basic way with a few variations along the way. Here's a quick tutorial on how the plants are made. Please excuse the poor video quality, I needed both hands to work so had to record by wedging the camera under my chin.
Cut some jewellery wire into lengths about three-four inches long (this measurement varies depending on how high you want the finished plant to be, cut the wire about 1 1/2" longer than you want the finished height to be). You want between 20-40 lengths of wire per plant. Next thread a bead onto the end of a piece of wire and fold the end of the wire back and twist it around the main stem of wire to secure the bead. Repeat this for all the lengths of wire.
When you have secured beads on all the pieces of wire, pick all the wires up by pinching the middle and buch them together with all the beads at one end. Pinching the bunch of wire in the middle, twist the ends together tightly so that the bundle stays together (you may want to use pliers to do this). Trim any uneven bits of wire from the ends of the stem. Tease out the bead 'flowers' and plant the plant by pushing into some oasis foam which has been inserted into a pot or garden bed.

Another way to create 'crystal' flowers is to use wire and faux leadlighting paints.
To do this cut some wire into 1 1/2" lengths. Twist the ends of each piece of wire together to form a loop. If you want, use pliers to manipulate the shape of the loop into a more petal like shape.
Sit the loop on a clean plastic document pocket and fill with faux leadlighting paint. It is instinct to try and hold the end of the loop to hold it still while filling, but it actually works better if you refrain from touching the loop at all. Leave several hours to dry. When dry the glass paint will peel off the plastic pocket and you can trim and overflow from around the outside of the wire with a fine pair of scissors.

Twist the stem of a few petals together to form a flower. You can glue a small bead into the centre of the flower if desired.

Ten plants down . . . Many, many more to come . . . .
Monday, September 30, 2013
Got 'Em Covered

All the surfaces of the Crystal Garden (walls, floor, ceiling) have now been covered. The picture panels made last week have been installed on the side walls and covered by arched windows made of cardboard and painted metallic black/grey. At the moment I'm still debating whether to add more architectural detail to the windows, but I think perhaps the colour of the leaded backdrop is more than distraction enough from what is meant to be the main feature of the garden; the plants.

More faux leadlighting was used for the ceiling. The circles are pre-bought rings from the Gallery Glass range. If any of you would like to do something similar, I'd recommend simply drawing circles with some liquid outliner as I bought these circles about ten years ago when they were on sale for 50 cents a sheet, reduced from $60 a sheet. Hand drawn cirlces may not be quite as round, but unless you're lucky (and unfortunate) enough that your local store is selling circles out cheap as they are no longer going to stock them, hand drawn is far more economical.

While I'm on the subject of faux leadlighting, here's the door in the library decked out in hinges, studs and a handle made by using more of the outliner.

Elsewhere in the Library, not much has changed, just a coat of mid brown stain on the shelves.

Back in the CG, the construction phase is nearly finished, there's just the doorway to install and a few bits of trim here and there, then it's on to the planting!
Monday, September 23, 2013
Working on the View

The Crystal Garden has changed only slightly over the course of the past week. The tiles have been added around the front beds and the central fountain, the mirror being broken up by using some white tiles to tone down the level of glitz and keep it from being painfull to look at. The tiles of the floor and back wall have also been grouted with a pale grey grout. You may be wondering about the currently blank side walls, but never fear I have been working hard to address them.

These two panels are made of faux leadlighting paints. The designs are from a cheap colouring-in book whith two designs traced and mashed together for each panel to create something the right size and shape to completely cover the side wall. Each design was slipped into a plastic document pocket and the leadlighting was created ontop of the pocket using the traced design as a guide. The side walls of the garden will be lined with mirror paper and then the panels will be adhered over the top once they have had another day or two to completely dry and I can peel them off the pockets. The backing of mirror paper will cause the light to bounce back through the leadlighting and give the impression of light coming in through the window. I wil then add "walls" with large windows over the panels. The idea is that the leadlight panels will look not so much like leadlight windows but like a "crystal landscape" beyond the Crystal Garden.
When planning the Garden I almost decided to try using the faux leadlighting paints instead of tiles. The idea I had was to use the outliner to create a grid (tile-esque) pattern and then fill it in with the colours to create a tile effect. Obviously I went with real tiles instead, but I think this could look quite effective and if any of you are brave enough to try it before I do get around to it, I'd love to see the results.
DHE announced the winner of their Creative Competition last week, and sadly it was not Mill Cottage. Nor was it the Steampunk Inventor's Workshop. Although DHE haven't revealled the second and third place winners yet, if you work on the theory that the winners would be notified well before the announcements are made publicly, they haven't won second or third either. Well, maybe next year then. The winning entry is certainly well done and rather clever (although I can't say it's really to my taste . . . um no pun intended). I for one could never spend that many hours working with polymer clay, nor get anything like those results! If you would like to see it you'll find it on the DHE website by clicking here.
Tuesday, September 17, 2013
Taking a Break From Reality
Really, it must be something of a record for me. Since finishing work on Dawncrest Castle at the end of March last year I have worked on miniatures set in the real world. OK, so there was the Dragon Wizard and his Lair and I suppose the Steampunk Inventor's Workshop is fantasy too, but they were more like sidetracks than real projects so they don't really count.
It's time to brush off all that reality and break into some fully fledged fantasy! For some time I've been planning to make a 'Tower of Magic' (or ToM for short). The ToM will be comprised of a series of independant roomboxes that stack together to form a 'Tower'. I'm using these boxes from Fantastic Furniture: Buzz Cube. I'm cutting a couple of inches off the heights of the cubes to lower the ceiling heights in the rooms. Each separate cube can be joined to others by way of dowels supplied with the basic flat pack. The beauty of this is that I can work on one or two roomboxes for the Tower, then work on something different, then come back and add more rooms to the ToM later on. The danger is of course that I will forget that at some point I have to stop adding rooms . . . .
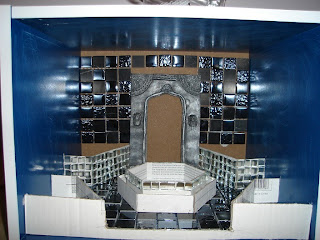
The first room I'm working on for the ToM is the 'Crystal Garden'. The garden has four raised garden beds and a central fountain with a faux doorway in the back wall. The garden beds will eventually be filled with magical plants made of beads and faux leadlighting paints and whatever else I think of that works. The paths and back wall have been covered in dark glass tiles while the sides of the back garden beds have mirror tiles glued in place. The plan is to add more mirror tiles to the front beds (as soon as I buy some more) but I may go with something a little less . . . glitzy. I want the garden to sparkle, not burn holes in the sides of bank vaults.

The frame around what will be the doorway is the firesurround I took out of Dawncrest when it was renovated last year, a lesson in why you should never throw anything out. The plants that grow in the garden will be made out of crystals and beads, much like the gemstone tree in this photo of Highcroft Castle: Wizard's Room or the gem bonsai in this one: Mai's Shop. (Unfortunately, it seems I can't add photos directly to my blog from my Flickr account anymore so you'll have to follow the links to Flickr to see them.)

As I ran short of tiles for the Crystal Garden, I made a start on a second room for the ToM, the Library. The floor and ceiling of this room are covered in scrapbooking paper. All the shelves have been made, but still need some fancy trim on their fronts. As Dan retired to Bellerose House, my new test model, Harry, is standing in what will be the doorway.

The ugliest chairs ever will not be staying in the room permanently, they're just there to prove there is space for a pair of chairs infront of the fire. In the back left corner at the end of the two opposing bookcases I am planning to put mirrors to create the illusion that the shelves of books continue on into the distance. Yes, you can expect a lot of swearing when I try and install the mirrors and make it work.
It's time to brush off all that reality and break into some fully fledged fantasy! For some time I've been planning to make a 'Tower of Magic' (or ToM for short). The ToM will be comprised of a series of independant roomboxes that stack together to form a 'Tower'. I'm using these boxes from Fantastic Furniture: Buzz Cube. I'm cutting a couple of inches off the heights of the cubes to lower the ceiling heights in the rooms. Each separate cube can be joined to others by way of dowels supplied with the basic flat pack. The beauty of this is that I can work on one or two roomboxes for the Tower, then work on something different, then come back and add more rooms to the ToM later on. The danger is of course that I will forget that at some point I have to stop adding rooms . . . .

The first room I'm working on for the ToM is the 'Crystal Garden'. The garden has four raised garden beds and a central fountain with a faux doorway in the back wall. The garden beds will eventually be filled with magical plants made of beads and faux leadlighting paints and whatever else I think of that works. The paths and back wall have been covered in dark glass tiles while the sides of the back garden beds have mirror tiles glued in place. The plan is to add more mirror tiles to the front beds (as soon as I buy some more) but I may go with something a little less . . . glitzy. I want the garden to sparkle, not burn holes in the sides of bank vaults.

The frame around what will be the doorway is the firesurround I took out of Dawncrest when it was renovated last year, a lesson in why you should never throw anything out. The plants that grow in the garden will be made out of crystals and beads, much like the gemstone tree in this photo of Highcroft Castle: Wizard's Room or the gem bonsai in this one: Mai's Shop. (Unfortunately, it seems I can't add photos directly to my blog from my Flickr account anymore so you'll have to follow the links to Flickr to see them.)

As I ran short of tiles for the Crystal Garden, I made a start on a second room for the ToM, the Library. The floor and ceiling of this room are covered in scrapbooking paper. All the shelves have been made, but still need some fancy trim on their fronts. As Dan retired to Bellerose House, my new test model, Harry, is standing in what will be the doorway.

The ugliest chairs ever will not be staying in the room permanently, they're just there to prove there is space for a pair of chairs infront of the fire. In the back left corner at the end of the two opposing bookcases I am planning to put mirrors to create the illusion that the shelves of books continue on into the distance. Yes, you can expect a lot of swearing when I try and install the mirrors and make it work.
Tuesday, September 10, 2013
The Making of Mill Cottage
Mill Cottage is built from DHE's "Cabin" kit. This kit is very basic and a lot of other people have said it's also boring, disappointing and a copy of the Garden Pavillion with different doors and windows. I have to agree with a lot of that, but being so plain also made it a blank slate and thus easy to impose a range of wild ideas onto it and as such perfect for use in a competition. So far I've only seen one other person's competition entry and it is completely different to anything I had considered (although the bookcases are slightly familiar to one of my earlier ideas). You can see Things' entry here : DHE Forum. Isn't it just lovely?

Getting back to Mill Cottage. I started by dry building the kit and playing with some sample furniture to see what would fit and what worked and what didn't. From this I learned that the door would be best if moved from the side around to the front and that I would need to raise the height of the walls to have the headroom to add a mezzanine bedroom. The walls were raised two inches by adding a strip of balsa wood around the bottom of the kit walls. The balsa is thicker than the MDF walls so the walls step out a little at the join. With the extra pieces attached to the walls and the hole cut for the new door position, the kit was permanently re-assembled. I altered the roof in the same way as I did for the Steampunk Inventor's Workshop so that the front section hooks over the apex and is removable, but the back section is permanently fixed.

To provide space for the mill wheel and a small garden, the kit was glued onto a plywood base. Balsa wood was used to create a porch over the front door and walls around what would become the mill wheel and culvert. The chimney was built using blocks of corrugated cardboard. The inside of the bottom was hollowed out for the fireplace. Once all the extra bits were built, the next step was to create the stone effect on the walls. As a lot of people have asked how the walls were done, here's a mini tutorial:

You'll need some spakfilla (designed to fill holes in plasterboard), a flat spatula, a ball point stylus (or toothpick), sandpaper and some stone coloured paints. Work in sections of about 20x20cm or (9x9") so that you have time to work with the filler before it dries out. Put a dollop of the filler onto your surface and spread with the spatula until you have a layer about 2-3mm deep. If you have trouble spreading the filler, mix in some water just a drop at a time then try spreading it again. You just need enough water to help it spread easily but be careful not to add too much water as this will render the filler useless. Spread the filler as evenly and smoothly as you can, but don't worry if it's still uneven, you can sand it once it's dried. If you want a rough texture finish, you can try tapping it very gently with a ball of damp kitchen paper or a stiff brush.
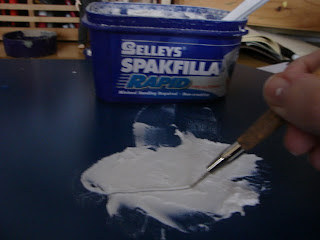
Take a ball pointed stylus, toothpick, blunt pencil or other object with a dull point and drag it through the layer of filler to mark out lines. At the end of each line you'll need to wipe you stylus on a damp cloth or scrape the excess filler that will cling to it back into the jar. Continue to make lines to form a random stone or brick pattern in the filler. If you make a mistake, just use your spatula to smooth a little extra filler over the area and start again. Don't worry about any blobs of filler that cling at the edges of the stones, these will probably fall away when dry or can be sanded off when dry.

Once you are happy with the pattern of your stones, leave them to dry totally. Once the filler it completely dry, sand it gently until you are happy with the texture of your stones.
.JPG)
Paint the stones in you choice of colours. For Mill Cottage I used about three soft greys and a light brown. I like to start with a darker colour first and then dry brush successively lighter tones over the top. However, if you want a pale grout colour use a pale colour first, then dry brush your darkest tone and then successively lighter tones over the top. Basically, just play until you are happy with the final effect, if something doesn't work, you can always paint over it and start again. When you're happy with the look, apply a coat of clear sealer to protect the finish.

Once the walls were finished, the door and windows were installed. These were stained and the glass panes were given a leaded look using faux lead lighting products. A black outliner creates the pattern of diamond shaped panes and a clear paint was used to fill in the panes to give them a more textured, hand made look. The final step to make the house weather proof was to thatch the roof. To do this I used some cheap fur fabric and glued a single piece of the fur over each section of roof, curling the edges around the edges of the MDF. For the ridge, I took a strip of the fur fabric and cut the fur down to a short fuzzy stubble and glued this over the peak of the roof. I added some decorative stitching using some cotton twine and a honking big needle. All this was then covered with some layers of paint until it looked suitably thatchy.

With the basics finished outside, I next started work on the interior. The walls were papered in a scrapbooking paper from the local craft store and the lower section of wall was panelled in balsa painted purple up to the height of the raised extension to cover the fact that the join was a little uneven in places. More balsa wood made the frame for the mezzanine level and a piece of foam core board covered in floorboard paper makes it's floor. The rails were salvaged from an earlier kit I had transformed into something that didn't need rails. The stairs are also salvaged, coming out of Dawncrest castle when I renovated it last year.

Most of the furniture used in the cottage are items from my stash. Only the bed was made from scratch and the two arm chairs were made from a cheap flat pack kit. Once I had decided exactly what would fit where, I gave some pieces a fresh coat of paint and others some new upholstery.

A hoard of accessories were the final addition for the inside giving the space a cluttered and homey feel.

With the inside decorated, it was time to finish up the outside by adding the mill wheel and garden.

The wheel structure is all balsa wood. The wheel is made of two rings of balsa with flat "rungs" sandwiched between them and a toothpick for the central axle.

The culvert or stream was lined with fish tank pebbles and then some Scenic Water was poured over both wheel and culvert. The weight of the water made the wheel spin, proving that my wheel really could have run a mill! I wedged a skewer through the spokes of the wheel to hold it steady until the water dried so that I ended up with water running down the wheel rather than one great blob on the bottom of the wheel.

For the garden, I first covered the exposed base board with a grass sheet from a model railway shop. This grass goes under the front porch and wall so that when the front is removed you see a neat finish. I then covered a piece of balsa in more of the grass and attached this to the front wall and side of the porch. It was on this that I made the garden so that when the front of the cottage is removed up, the garden is removed too.

The garden path was made from a piece of vinyl floor tile cut into a curvy S shape. The look of individual stones was made by carefully carving grooves in the surface of the tile. A little brown paint was rubbed over the surface to dull the tile's shine. The climbing vine is cotton twine, dipped in watered brown paint and allowed to dry. Lengths of this dyed twine were twisted together and allowed to branch out into individual strands as they climbed higher up the wall. Once the glue holding them on the wall was dry, polymer clay leaves and flowers were glued onto the vines.

The birdbath was made out of air dry clay years ago for a project I decided not to use it for. The rest of the garden was filled with lichen moss "bushes", more polymer clay flowers and assorted accessories. The gnomes I found at the local doll, bear and miniature fair earlier this year, the rake is from a table-top Zen garden kit and Dexter the digging dog is one of the few items I bought especially for this project. I'll put a Dexter into every garden I do as he's just so cute!

Last of all came Florie, the cottage's resident. As you can tell from her hideous hands, she's handmade from polymer clay. (Why are hands so hard to make, even with a mould?) Her hair is black and grey felting wool. She wears a green striped dress I saved from a bought doll I redressed. Her apron is handmade from a printed cotton with lace trim.

The History of Mill Cottage
Mill Cottage began life as a working medieval mill almost a thousand years ago. Farmers from the local area would bring their grain there to be ground before taking it back home to their wives who used it to bake the bread they ate daily. The original mill was repaired and rebuilt many times over the years until finally the coming of the industrial revolution rendered it unable to compete with the larger, more modern mills and it was forced to close.

The old mill then saw a number of fleeting and increasingly ignoble uses such as a trading post, a storehouse, a barn and finally and animal pen before the old building was finally abandoned altogether.

As a child Florence was enchanted by the now ruins of the old mill and would make up stories about the people who had once lived and worked there. As an adult, Florie moved away from her home town and soon forgot the ruins of the mill that stood just beyond it.

Florie returned to her old home many years later and again came upon the ruined mill. She immediately fell in love with the romantic ruin (if a structure filled with the remains of decayed straw and animal dung can be described as romantic) and begged the mill's owners to sell it to her. With her children grown and her husband sadly deceased, she set about restoring the mill and creating a cozy cottage for one . . . . well, one human and a number of cats.

Getting back to Mill Cottage. I started by dry building the kit and playing with some sample furniture to see what would fit and what worked and what didn't. From this I learned that the door would be best if moved from the side around to the front and that I would need to raise the height of the walls to have the headroom to add a mezzanine bedroom. The walls were raised two inches by adding a strip of balsa wood around the bottom of the kit walls. The balsa is thicker than the MDF walls so the walls step out a little at the join. With the extra pieces attached to the walls and the hole cut for the new door position, the kit was permanently re-assembled. I altered the roof in the same way as I did for the Steampunk Inventor's Workshop so that the front section hooks over the apex and is removable, but the back section is permanently fixed.

To provide space for the mill wheel and a small garden, the kit was glued onto a plywood base. Balsa wood was used to create a porch over the front door and walls around what would become the mill wheel and culvert. The chimney was built using blocks of corrugated cardboard. The inside of the bottom was hollowed out for the fireplace. Once all the extra bits were built, the next step was to create the stone effect on the walls. As a lot of people have asked how the walls were done, here's a mini tutorial:

You'll need some spakfilla (designed to fill holes in plasterboard), a flat spatula, a ball point stylus (or toothpick), sandpaper and some stone coloured paints. Work in sections of about 20x20cm or (9x9") so that you have time to work with the filler before it dries out. Put a dollop of the filler onto your surface and spread with the spatula until you have a layer about 2-3mm deep. If you have trouble spreading the filler, mix in some water just a drop at a time then try spreading it again. You just need enough water to help it spread easily but be careful not to add too much water as this will render the filler useless. Spread the filler as evenly and smoothly as you can, but don't worry if it's still uneven, you can sand it once it's dried. If you want a rough texture finish, you can try tapping it very gently with a ball of damp kitchen paper or a stiff brush.

Take a ball pointed stylus, toothpick, blunt pencil or other object with a dull point and drag it through the layer of filler to mark out lines. At the end of each line you'll need to wipe you stylus on a damp cloth or scrape the excess filler that will cling to it back into the jar. Continue to make lines to form a random stone or brick pattern in the filler. If you make a mistake, just use your spatula to smooth a little extra filler over the area and start again. Don't worry about any blobs of filler that cling at the edges of the stones, these will probably fall away when dry or can be sanded off when dry.

Once you are happy with the pattern of your stones, leave them to dry totally. Once the filler it completely dry, sand it gently until you are happy with the texture of your stones.
.JPG)
Paint the stones in you choice of colours. For Mill Cottage I used about three soft greys and a light brown. I like to start with a darker colour first and then dry brush successively lighter tones over the top. However, if you want a pale grout colour use a pale colour first, then dry brush your darkest tone and then successively lighter tones over the top. Basically, just play until you are happy with the final effect, if something doesn't work, you can always paint over it and start again. When you're happy with the look, apply a coat of clear sealer to protect the finish.

Once the walls were finished, the door and windows were installed. These were stained and the glass panes were given a leaded look using faux lead lighting products. A black outliner creates the pattern of diamond shaped panes and a clear paint was used to fill in the panes to give them a more textured, hand made look. The final step to make the house weather proof was to thatch the roof. To do this I used some cheap fur fabric and glued a single piece of the fur over each section of roof, curling the edges around the edges of the MDF. For the ridge, I took a strip of the fur fabric and cut the fur down to a short fuzzy stubble and glued this over the peak of the roof. I added some decorative stitching using some cotton twine and a honking big needle. All this was then covered with some layers of paint until it looked suitably thatchy.

With the basics finished outside, I next started work on the interior. The walls were papered in a scrapbooking paper from the local craft store and the lower section of wall was panelled in balsa painted purple up to the height of the raised extension to cover the fact that the join was a little uneven in places. More balsa wood made the frame for the mezzanine level and a piece of foam core board covered in floorboard paper makes it's floor. The rails were salvaged from an earlier kit I had transformed into something that didn't need rails. The stairs are also salvaged, coming out of Dawncrest castle when I renovated it last year.

Most of the furniture used in the cottage are items from my stash. Only the bed was made from scratch and the two arm chairs were made from a cheap flat pack kit. Once I had decided exactly what would fit where, I gave some pieces a fresh coat of paint and others some new upholstery.

A hoard of accessories were the final addition for the inside giving the space a cluttered and homey feel.

With the inside decorated, it was time to finish up the outside by adding the mill wheel and garden.

The wheel structure is all balsa wood. The wheel is made of two rings of balsa with flat "rungs" sandwiched between them and a toothpick for the central axle.

The culvert or stream was lined with fish tank pebbles and then some Scenic Water was poured over both wheel and culvert. The weight of the water made the wheel spin, proving that my wheel really could have run a mill! I wedged a skewer through the spokes of the wheel to hold it steady until the water dried so that I ended up with water running down the wheel rather than one great blob on the bottom of the wheel.

For the garden, I first covered the exposed base board with a grass sheet from a model railway shop. This grass goes under the front porch and wall so that when the front is removed you see a neat finish. I then covered a piece of balsa in more of the grass and attached this to the front wall and side of the porch. It was on this that I made the garden so that when the front of the cottage is removed up, the garden is removed too.

The garden path was made from a piece of vinyl floor tile cut into a curvy S shape. The look of individual stones was made by carefully carving grooves in the surface of the tile. A little brown paint was rubbed over the surface to dull the tile's shine. The climbing vine is cotton twine, dipped in watered brown paint and allowed to dry. Lengths of this dyed twine were twisted together and allowed to branch out into individual strands as they climbed higher up the wall. Once the glue holding them on the wall was dry, polymer clay leaves and flowers were glued onto the vines.

The birdbath was made out of air dry clay years ago for a project I decided not to use it for. The rest of the garden was filled with lichen moss "bushes", more polymer clay flowers and assorted accessories. The gnomes I found at the local doll, bear and miniature fair earlier this year, the rake is from a table-top Zen garden kit and Dexter the digging dog is one of the few items I bought especially for this project. I'll put a Dexter into every garden I do as he's just so cute!

Last of all came Florie, the cottage's resident. As you can tell from her hideous hands, she's handmade from polymer clay. (Why are hands so hard to make, even with a mould?) Her hair is black and grey felting wool. She wears a green striped dress I saved from a bought doll I redressed. Her apron is handmade from a printed cotton with lace trim.

The History of Mill Cottage
Mill Cottage began life as a working medieval mill almost a thousand years ago. Farmers from the local area would bring their grain there to be ground before taking it back home to their wives who used it to bake the bread they ate daily. The original mill was repaired and rebuilt many times over the years until finally the coming of the industrial revolution rendered it unable to compete with the larger, more modern mills and it was forced to close.

The old mill then saw a number of fleeting and increasingly ignoble uses such as a trading post, a storehouse, a barn and finally and animal pen before the old building was finally abandoned altogether.

As a child Florence was enchanted by the now ruins of the old mill and would make up stories about the people who had once lived and worked there. As an adult, Florie moved away from her home town and soon forgot the ruins of the mill that stood just beyond it.

Florie returned to her old home many years later and again came upon the ruined mill. She immediately fell in love with the romantic ruin (if a structure filled with the remains of decayed straw and animal dung can be described as romantic) and begged the mill's owners to sell it to her. With her children grown and her husband sadly deceased, she set about restoring the mill and creating a cozy cottage for one . . . . well, one human and a number of cats.
Subscribe to:
Posts (Atom)