A Randomly Selected Newspaper Headline:

The following is a randomly selected newspaper headline from many years ago:

Welcome to my blog. Please feel free to leave a comment. I assure you I always read and appreciate everything you have to say. Unfortunately, thanks to Blogger being, well . . . Blogger, I can not respond to comments nor leave any on your blogs. They simply disappear into the ether. Occasionally I will remember to respond in the next blog post I put up, but usually these good intentions slip my mind. So if you want to ask a question or get a response to any comments you may have please leave an email address or other contact method in your comment and I will get back to you.

I have also added a separate page to the blog for the Tower of Magic with a brief summary of all the rooms of the ToM in the one spot. The link is just below this and above the main body of the blog, or you can just click here.

Wednesday, December 17, 2014

More Movement

Most of the photo's you'll see in this post are out of date.  I've re-rearranged most of these rooms since the photos were taken.  Am I happy with the layout now?  Well, maybe for the next five minutes.  After that, who knows?


 The sitting room in the above photo looked fine with this furniture layout when the furniture was all bare balsa.  Once the chairs were upholstered this layout made the room look lopsided as there was a visually 'heavy' fabric on the left wall and along the front, but the right wall had nothing to balance this.  I could have tried painting the desk and side chair a dark colour to try and balance the room, but I wan't really happy with them in this position anyway so they were moved out and the two arm chairs moved into their position facing the sofa.  The front area of the room is now empty but at least the room looks more balanced.


Of course now I needed to find a new home for the desk . . . which ended up in the Music room which required the Music room to be rearranged which required furniture moving out of that room and into others which required those rooms to be rearranged . . . . and so it went on.


 One room that has managed not to change (too much) is the Library.  In here I've finished off the desk adding faux drawers and giving it a coat of paint.  I still need to repaint the legs of the armchair and top of the side table to match the desk.


 On the other end of the 'things that have changed' scale is the downstairs hall.  I decided I didn't like the wallpaper in here and so re-papered it with this green paper.  It was definitely better before and I have a feeling the paper on the walls in here will change again before this house is done.  The colour is just too strong for the size of the space.


 But there is one room that has worked and has only been rearranged when I've pinched the furniture to try it somewhere else.  The Red room doesn't really have a function - aside from looking impressive.  The twin cabinets are balsa wood with jewellery finding legs, faux hinges and pediments.  The round sofa is again balsa wood covered in red and gold brocade.


In this bedroom the bed is still in the same place but the other elements have moved.  The bed itself is a bit plain at the moment, but I'm having trouble finding fabrics in colours that will work with the wall colour and also something small enough to use as an embellishment on the bed head itself.  


Wednesday, December 3, 2014

Musical Chairs


One thing that can be said for the Box House, no one who lives there will ever be short of a place to sit . . . . there are two dozen assorted seats in the house.  If you have a particular favourite chair you may have trouble finding it though as I am still continually re-arranging the furniture through the entire house.


 Most of the furniture in the house is made from balsa wood like the desk and arm chair in the library.  The side table beside the arm chair is made from jewellery findings with a balsa top.


Another material used for the furniture is lace.  The small sofa in the left of the music room in this photo (which is not where it is now) is a balsa base on jewellery finding legs with a lace back.  Hopefully, once it is painted and upholstered it will look like it's been carved.


 Above the music room is one of the bedrooms.  For this room I've done something I've wanted to do for a while and copied the fabulous twin bed by June Clinkscales you can see if you click here.  Mine is no where near as good, uh, detailed but then it is only half the size/scale.  It began as a pile of balsa wood lumber and became this:


 I am really quite pleased with how it came out, the only problem is that it does rather dominate the room.  Any additional furniture I add to the room just makes it look over-crowded.  Yet just the beds looks too naked . . . .


Another thing I've wanted to try and make for ages is one of these round sofas.  It's base is is the lid from an empty pot of scenic water covered in black felt with wooden bead feet.  Atop this is a circle of balsa covered in red and gold brocade.  Sat on this are three more pieces of balsa shaped to create the 'backs' of the seats.


The most difficult room to arrange has been the music room.  I never should have added the raised area and made the opening to the rear 'corridor' more central.  This is the best arrangement I've come up with and I upholstered the furniture to suit this room to stop myself from re-considering and moving it out to another room.  Hopefully. . . .


Wednesday, November 5, 2014

Doors of Doom


The wooden panelling in the ToM Sitting room is installed.  It is balsa wood overlaid with cotton lace that has been soaked in wood stain with the finished effect supposed to look like carved wood.  It is quite effective . . . . apart from the areas where the lace refuses to absorb the stain.  Hopefully, enough stain painted over the top with a brush will eventually see the colour even out.  So far it's just made the balsa wood look water stained.  Oh and that central post is not off centre and crooked, it's just the camera angle, honest!


The fireplace has a fire grate made of part of a plastic fence section and wire mesh and filled with 'embers' of black and red glass seed beads.  The problem here is that the stonework on this wall needs more colour and variation, which is easy enough to fix.  I just need to convince myself that I can do it without getting paint all over the other walls in the process . . .


I am ambivalent about the trim around the ceiling.  I think perhaps it needs an extra something over the top to make it look more finished and 'at home' where it is.  I also need to tweak the curtain behind the bookcases to you can actually see the mirror illusion of a continuing row of bookcases.


Now the box house.  If I cheat and show you photos like this one of the Music room it does look like it's coming together fairly well.  All the rooms now have skirting and cornice/coving.  Mostly this is lengths of braid or as in the Music room a printed design.  What this photo doesn't show you is the door in the side wall.


Here you can see the doorways on either side.  Notice the frame on one side of a wall doesn't quite meet up with the matching frame on the other side of the wall, at least does not meet straight.  Although these doorways seem OK, most of them don't sit flat against the walls either because the plastic they are made of has warped out of shape.  A good strong glue would hold them in place properly, but because they are plastic I'm having trouble finding a glue that will hold them at all.  The doors fit into the frames before the frames went into the walls, but once the frame is in place on the wall, the doors tend not to fit any more.  So after some hours of messing about with this I've decided this is how the frames and doors will be fitted: the frames will be ruthlessly jammed into place and some white satin ribbon will be glued over the join between the two parts to hopefully make them look like one piece.  The door will then be cut to fit and glued in place.  This means that the doors will be crooked and not open, but at least the suckers will be in!


Once the doors are fixed, there are just a few more 'building' tasks to do; the stairs need rails and some rooms need fireplaces before the house is ready for the mini residents to start moving their furniture in.  Maybe the furniture will be willing to co-operate with me, at least a little more than the doors were.


Wednesday, October 29, 2014

More Books


At one point, the walls for the Sitting room in the ToM were going to be plain grey like the ceiling.  So if you've been following this blog for a while and have learned anything about me you won't be surprised to learn that they turned out to be vibrant purple.  I'm just not very good with neutrals.  The lower part of the walls will be covered in wooden panelling.


Most of the time I spent working on this room this week went into making books.  Despite having only two shelf units I still needed over 100 books to fill them.  Some of the books have covers printed from internet printables or magazine cut outs but many are just covered in scraps of the wallpapers used in the box house.  The parallel shelves were filled with books before a piece of mirror paper was glued behind them to create the illusion of the shelves continuing off into the distance before the whole unit was glued into place in the back corner.


While on the subject of books, the library in the box house now has some shelves installed and a number of faux books.  These books are just images of rows of spines glued onto scraps of balsa to help them stand up and not individual books.  One advantage of smaller scales is that cheats like this that would look terrible in 12th scale are passable in 24th.  (If they're on a back wall that will have furniture in front of it to block the view of it).  Originally, the library was going to be a double height room, but I couldn't seem to make the room I wanted work the way I wanted it so I divided the room into two, a much less grand library with a kitchen below.


As the kitchen is something of an afterthought it was decorated quickly with things I had on hand.  The grey upper walls are the grey paper I was going to use in the ToM sitting room.  The blue 'tiles' of the lower walls were a free wallpaper in Dolls House and Miniature Scene magazine some time ago.  These tiles and the floor paper (which was an off cut from an earlier project) are designed for 12th scale but work all right in the smaller 24th scale room.  The range (oven) is black EVA foam with a piece of metallic red paper to create the 'fire'.  It's not the most realistic effect but like the books on the back wall of the library you won't really be able to see it once a room full of furniture is placed in front of it anyway.


 At the opposite end of the ground floor is the morning (or garden or breakfast) room.  It has a large corner window overlooking the garden to let in the morning sun with cheerful yellow walls.  Trompe l'oeil niches with topiary, a balustrade effect dado and open sky effect ceiling enhance the garden feel.


Although a few rooms are starting to take shape, overall the house still looks like a construction site.  It still needs doors, fireplaces, skirting boards, cornice/coving (or whatever it's called where you are), ceilings and stair rails and then I have to figure out how I'm going to make furniture to fill it.

Wednesday, October 22, 2014

All Walls


The story this week is all walls.  Walls, walls and more walls.  Fourteen rooms worth of walls.


Thirteen of those fourteen rooms are of course in the box house, which yes, absolutely needs a better name.   Most of the walls have plain scrapbooking paper with a slight texture covering the walls.  These plain walls are further enhanced by adding some low panelling (dado) with designs printed from internet scavenging.  The double height library and the centre floor stairway are both papered with twelfth scale wallpaper with designs that don't look too oversized in 24th scale.  As the vision for this house is very early Victorian I've tried to keep things light, bright and simple without too much of the 'fussiness' that comes along over the next couple of decades.


In the ToM room I've created a stone wall incorporating a fireplace along the back wall of the room.  This sits beside the odd looking wooden structure I showed you last week.  This now has shelves added to it, but can you guess yet what it is?  Remember the Library and the mirror that created the illusion that the shelves carried on into the distance?  Ever wonder where you might emerge if you wandered around those illusionary shelves?  Well, you'll come to this room.  The parallel shelves will have another piece of mirror behind them to create the same illusion so that it hopefully will appear that they are a continuation of the Library.  The purpose of the room itself will be a sitting/reading room.

Wednesday, October 15, 2014

Little Boxes

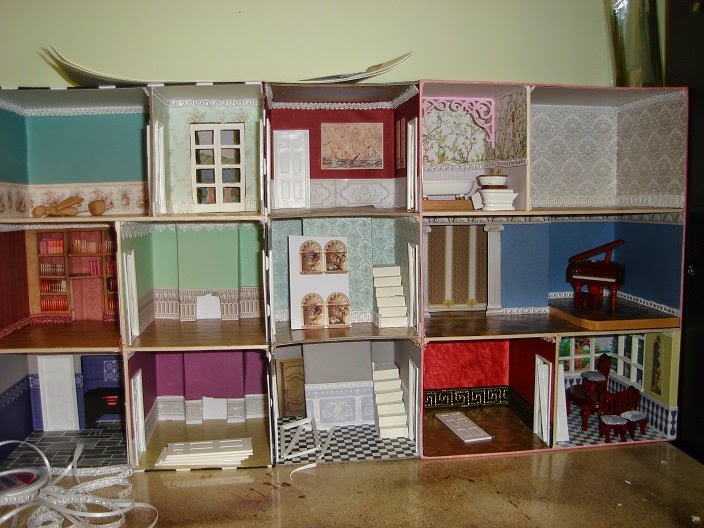
Lately I've been looking at houses.  If you don't count 48th scale I haven't done a full house in ages, just room boxes and small projects and I was starting to get itchy.  It's time for another whole house.  I don't have room for another 12th scale house, so whatever I do has to be in 24th (half) scale.  The house I found that I liked best is the 24th scale version of Trelawney Manor, but no one will ship it to Australia (at least not for a price I can afford).  But I'd fallen for the idea of a large (smaller scale) manor house somewhere in the 1830s or 40s.

So then I had this wild idea . . . . .


Boxes like the ones above are constantly available from a local store in a changing variety of colours and designs and in a range of sizes all for just $2 a each.  They're made of strong cardboard and one size of these boxes makes good 12th scale vignettes.  I used one to house the Christmas scene pictured below a couple of years ago.


They're a good size for a small scene like this, but nowhere near deep enough to use as a proper room box . . . in 12th scale.  Then it occurred to me, I don't necessarily want a 12th scale room.  If the boxes are only half as deep as the minimum for a 12th scale room, wouldn't they be perfect for a 24th scale room?  Glue several rooms together and you get a house as big as you want.  I clung onto this idea for a few days until I had a chance to hit the shops, tape measure in hand, only to discover none of the sizes of box were quite right for 24th scale.  Phooey.  The smallest box size was perfect for 48th scale rooms however, so half a dozen of them went into my shopping basket.  Then another thought, Why just one room per box?  I wanted a big house anyway.  The largest size of box worked out to be a good size for dividing into six 24th scale rooms.  So I bought two of these boxes so I could have a twelve room house.


Rushing home I began to plan the layout of my new 'house', but even with twelve rooms I kept running short on space.  I considered not having stairs and relying on fake doors in the back wall to create the illusion there may be stairs somewhere out of sight, but if you're going to design a house from scratch, why should you have to compromise?  So instead of positioning both boxes directly against each other I cut up the lids of the boxes to create an extra room between the boxes for the central staircase.


By making two of the rooms double sized, I now have a thirteen room mansion.  I used the lids of the boxes to make the stairwell as by adding the room between the boxes the lids would no longer have covered the whole front of the house anyway.  I haven't decided yet whether to make a front to make it look like a proper house or if I should leave the front clear to display the inside.  I think I'll leave that decision until I see how the insides turn out.  If I make a mess of things, solid front to hide it away it will be.


The interior of the house will be set sometime in the very early Victorian era, somewhere around the 1830s or 40s.  So the first thing you'll tell me about this is that at that time they did not have toilets like the one you can see in the photo above and indoor bathrooms at all were rare.  Well, I already had the 24th scale bathroom set so I figure I might as well use it and I think I can snap the cistern off the loo and mount it on the wall to create a slightly more appropriate high flush system.


Despite getting carried away with this new 24th scale project, I also managed to make a start on the next 12th scale room for the Tower of Magic.  Originally, this room was going to be the bathroom, but I couldn't make up my mind on the layout, colour scheme, design . . . OK, basically on the whole room, so I pushed the bathroom back for a later time and will make this room something else.  This means that the structure in the back corner is not a shower regardless of what it currently looks like.  As for what it actually is . . . I'll tell you next week!

Monday, October 6, 2014

Two Down . . .


The reason why I ought to remember to add a new post to the blog every week is that when I'm lazy and miss a few weeks as I just done, I end up choking your bandwidth the dozens of photos of two finished projects.  If this post is taking a long time to load for you, it may have something to do with the thirty photos on the page.  My apologies for this and I promise I will try to be a better blogger in future and not let so much time pass between posts.


The house made from the 'Old Rectory' kit is now finished.


All the fireplaces have fires of red and black seed beads (for coals) in grates of varied jewellery findings.  In 48th scale I need to find smaller beads if this trick is really going to look right.


The bedroom in left of the top floor has a scratch made bed covered in fabric with a woven floral pattern.


Books and an unwound scroll for the library.


The x frame chairs flank a storage chest in the gallery.


The table in the great hall


The gold an silver platters are made from foil from the top of a container of butter.  It's gold on one side and silver on the other.  I used a hole punch to create round plates.


The printed doors have been accented with faux leadlighting outliner for handles and hinges.  And a note for those with as little sense as me, it would be so much easier to do this before glueing the doors into the building.


I don't seem to have a good photo of the right hand bedroom, but this one does show the fireplace off quite well.


And finally the kitchen.  It could use some pots, pans and utensils (etc)  but the only way I can think to make them is with polymer clay but not only did it not seem worth the effort of pulling the clay out for so few things, I have doubts I could make pots that small; all I'm likely to get are squashed blobs of clay.


With the Old Rectory building done, I started another 48th scale project . . . .


You'll have to forgive the very bad photographs of this one as it's built inside a glass fish tank, a highly reflective glass fish tank.  It's a Japanese garden complete with a small tea house.  A badly painted mountain forms the backdrop and the slope of the ground is made from Oasis foam.


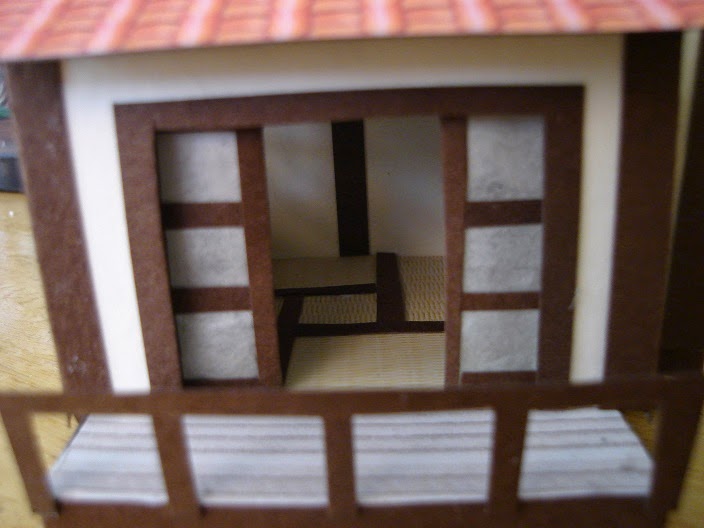
The tea house is made from mount board accented with thin brown cardboard.  The roof is printed from a seamless tile pattern from the internet.  The tiles are more Chinese than Japanese but that's as close as I could come.


The side of the house has a small extension.  Traditionally this is where guests would enter, crawling through the small internal opening into the main room of the tea house to show humility to their hosts.


Inside the floor is papered with a woven reed texture printed from the internet and outlined in strips of brown cardboard to resemble traditional tatami mats.  The doors are made from rice paper and more cardboard.


Once the Oasis foam was carved into a pleasing slope it was 'painted' with some PVA glue and had some fine model railway grass sprinkled over it.  Model rail gravel went into the hollow that would form the pond.


Pebbles were pushed into the Oasis foam to create the rocky pile down which the waterfall flows.  If you look very, very hard you might even be able to see the waterfall, but the 'water' is really hard to spot through the reflective glass.


You can see it a little better in this shot, taken holding the camera inside the tank.


And a little closer . . .


The garden was then filled with plants.


The flowering cherry trees are made by twisting wire into tree shapes, painting it brown and glueing pink flower soft to the branches.


Most of the bushes are lichen while others are model railway . . . urm, "bush making stuff"; a sort of crumbly foam substance.  Some of the lichen bushes have been sprinkled with purple flowersoft to resemble flowers.


Stone pebble steps lead up to a pergola up which some wisteria has been trained.  The pergola is balsa wood while the wisteria is brown cotton twine and more flowersoft.


 A path of white sand leads from one side of the garden, over the bridge and along to the tea house.


Even in 48th scale I found there wasn't quite enough room for everything I wanted to include but on the plus side the lid will now fit on my box of miniature garden supplies!