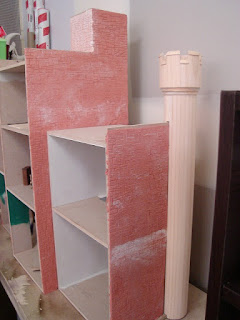
Well, what can I say? Pressing a mould into clay over and over and over and over and over again for hours on end is rather boring. In fact it is incredibly, mind numbingly boring. The results, however, are worth the effort.
I use a mix of paperclay and ordinary air-dry clay, one pack of paper clay and half a packet of air clay. Once thoroughly mixed the clay is rolled out into a thin sheet (about 1-2mm thick) and large enough to cover the entire wall. PVA glue is then spread over the wall and the clay sheet pressed over it and trimmed to size. I then added the stone effect using Impress Moulds made by Malcom's Miniatures. Each set of stone moulds consist of half a dozen individual moulds, each creating a stone of different dimensions. The stone moulds look like little plastic mallets from side on, but when the end is pressed into the clay the result is a single stone block. By using the moulds in random arrangements a random stone pattern is achieved but it takes time. To give you an idea, the wall in the foreground of the above photo took about three and a half hours to complete.

For those of you planning to use air drying clay, I'll share a few tips. When rolling the clay out, use a plastic rolling pin (a piece of PVC pipe works well) or a wooden rolling pin covered in plastic as the clay tends to stick to wooden rolling pins. Approach the clay like a baker. When you roll out dough you dust the table with flour first to prevent the dough sticking. Do the same with clay, but use talcum powder instead of flour. If you find the clay sticking to the moulds, use more talc to dust the moulds the same way you might use flour to dust biscut cutters. Measure and mark out a horizontal line every 10cm to help keep your stonework level. Use cling film to cover the areas of clay you're not working on to keep it moist until you're ready for it. If the clay starts to dry out, use a spray to lightly mist the clay with water, but be sparing. The more water added to the clay, the greater it's tendancy to crack.
Finally for today, welcome to the 77th follower, sophie appleton. She is another follower who doesn't appear to have her own blog, but as ever, if you do have one Sophie all you need to do is let me know and I'll add the link.
P.S. Is Cyndy out there? I'm still waiting to hear from you so I know where to send your giveaway prize.


I think your stone walls look great so it is well worth the effort, looks much more realistic than paper would. Great idea.
ReplyDeleteAs Margaret says there is no comparison between how this looks and how paper would have, the 3D is what makes this so spectacular. However I do have sympathy for the mind-numbing moulding work.
ReplyDeleteThanks too for the tips :)
looking fabulous!!! :D Linda x
ReplyDeleteHat's off to you for your patience! It's going to look fab when it's complete and thanks for such an excellent description.
ReplyDeleteI am in awe of your patience!
ReplyDeleteTeddy
Thanks all for the comments. Patience really has nothing to do with it. Once the clay is rolled out and stuck on the wall, you have to keep going before it dries out. Keping it wrapped in plastic only keeps it fresh so long, so once you start you have to keep going no matter how physically ill you start to feel somewhere in the middle of it all or face the thought of scraping it off and starting all over again.
ReplyDeleteI have over the past couple of weeks developed a great sympathy for scribes in ancient Mesapotamia.