With the castle finally having reached it's full height it was time to start making the outside of the building look like a castle. The first step in this process was to add a small gatehouse tower and a bridge in front of the castle. This lifts the level of the entrance up one floor so that the lowest floor inside (the dungeon) becomes a basement rather than a ground floor.
After painting the entire outside of the castle black I then clad it in rectangular 'blocks' cut from a sheet of EVA foam. I chose this method over clay or pollyfilla to create the stones because the moisture in these two products tends to make the foam board of the walls warp. The foam is easier to cut than cardboard and is flexible so is very forgiving when applied to uneven walls (and yes, they are a little uneven).
Unfortunately, the foam doesn't come in grey or anything close to stone colour; the blocked walls started off in a deep blue so once all the walls were covered in blocks they had to be painted. If you look closely, you can still see slivers of blue between the blocks so at least one more coat of grey is needed before I start to dry brush some lighter tones over the top to make the outside match the stonework you saw in the basement. I would also like to know when the walls are black, blue and grey how flashes of white are showing between the blocks in these photos; you can't see them with the naked eye.
Originally, the plan was to have solid walls on all four sides of the castle, but I've decided instead to cover the sides with clear plastic so you will be able to see into the castle without the need to lift off the side panels. This means no more time spent on the tedious task of 'blocking' the walls and it means that when finished the castle will look like a solid castle from the front, but the internal rooms will still be on display (I'm not a fan of spending hours creating the ultimate interior and then closing it off behind a wall where you'll never see it).
A Randomly Selected Newspaper Headline:
The following is a randomly selected newspaper headline from many years ago:
Welcome to my blog. Please feel free to leave a comment. I assure you I always read and appreciate everything you have to say. Unfortunately, thanks to Blogger being, well . . . Blogger, I can not respond to comments nor leave any on your blogs. They simply disappear into the ether. Occasionally I will remember to respond in the next blog post I put up, but usually these good intentions slip my mind. So if you want to ask a question or get a response to any comments you may have please leave an email address or other contact method in your comment and I will get back to you.
I have also added a separate page to the blog for the Tower of Magic with a brief summary of all the rooms of the ToM in the one spot. The link is just below this and above the main body of the blog, or you can just click here.
Pages
Tuesday, March 24, 2015
Wednesday, March 18, 2015
Top Two
The construction and rough decoration of the top two floors of the castle have now been finished. The ceiling of the top floor rooms are sloped to allow for the pitch of the roof line.
On the left side both rooms feature (paper) wood panelling and patterned wallpaper. The top floor has been sunken by a few steps so that I could add steps leading up to the door in the back wall. As I've previous mentioned, these Petite Properties doors are a little low to be what I consider 'in scale'. By adding a few steps leading up to them it makes them look taller and thus more to size. Sadly I only figures this out in time to use the trick in this one room . . . the rest of the castle just has really short doors.
On the right side these short doors aren't such a big issue as they are not viewed directly against the larger archways I cut into the stair tower. There are four rooms over the top two levels on this side. The rooms on these top two levels will all be bedroom suites (i.e. bedrooms with private sitting rooms, bathrooms, etc).
All together, the castle has eighteen rooms (nineteen if you count the stairwell) that all need to be furnished and filled. I haven't decided yet whether to fill the rooms and then finish the exterior or to do the outside first. It all depends on how I decide to enclose the sides.
On the left side both rooms feature (paper) wood panelling and patterned wallpaper. The top floor has been sunken by a few steps so that I could add steps leading up to the door in the back wall. As I've previous mentioned, these Petite Properties doors are a little low to be what I consider 'in scale'. By adding a few steps leading up to them it makes them look taller and thus more to size. Sadly I only figures this out in time to use the trick in this one room . . . the rest of the castle just has really short doors.
On the right side these short doors aren't such a big issue as they are not viewed directly against the larger archways I cut into the stair tower. There are four rooms over the top two levels on this side. The rooms on these top two levels will all be bedroom suites (i.e. bedrooms with private sitting rooms, bathrooms, etc).
| Left Side |
| Right Side |
All together, the castle has eighteen rooms (nineteen if you count the stairwell) that all need to be furnished and filled. I haven't decided yet whether to fill the rooms and then finish the exterior or to do the outside first. It all depends on how I decide to enclose the sides.
| Front |
| Back |
Tuesday, March 10, 2015
Upward and Onward
The 'little' 48th scale castle continues to grow with five of its overall six floors now in place.
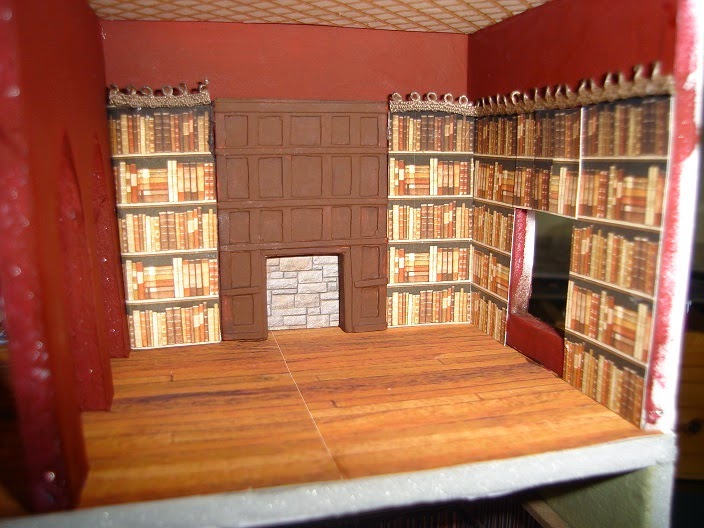
On the left side of the castle the room immediately above the entrance hall come armoury is the library. Technically, it shouldn't be filled with books and in a real castle would more likely to have had a few scrolls which listed the castle accounts and records and very little else. I don't have the patience to try and make a room full of 48th sized scrolls and try finding a wallpaper that looks like a shelf full of scrolls, so books it is. Every building should have a room filled with books in any case.
I've always wanted to add a secret passage or hidden room to my houses but never manage to fit it in. Until now. The shelves to the left of the fireplace (which is a plaster piece from Petite Properties by the way) swing open to reveal a secret staircase.
Hopefully, this passage will emerge higher up in the castle but as I keep changing my plans as I go (as usual) this may wind up being a passage that leads only to a dead end.
Above the Library is this room with some handsome faux wood panelling. I have to admit I'm not to sure of the purpose of this room yet but it will likely be some kind of sitting room. The door in the back wall leads to the minstrel gallery above the Great Hall, but I'll tell you about that a little later.
Above the potential sitting room the only room decorated on the fifth level so far is this little corridor that connects the stairs to the other rooms on this level which will be bedrooms.
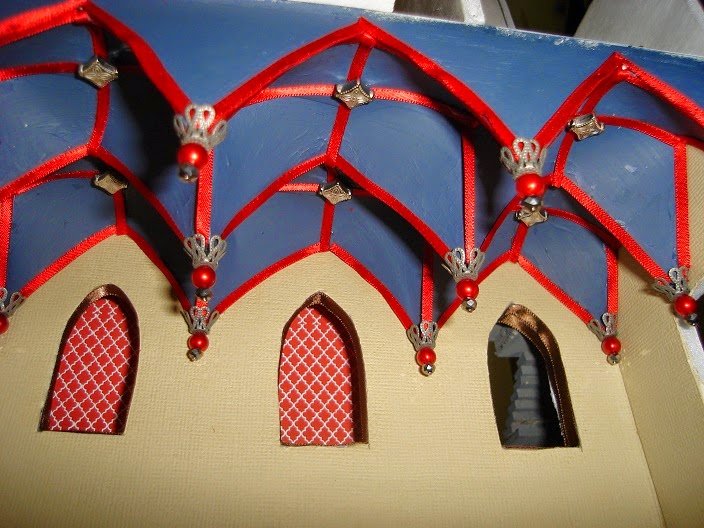
Swinging about to the right side of the castle and the Great Hall sits directly above the kitchen. It spans two floors (the Library and the probable Sitting Room being on the opposing side of this space). It features a vaulted ceiling and colourful tiled floor. The tiles and wood panels are of course print outs from internet images. The red paper behind the two openings in the back wall is left over from the dining room in 'Le Petit Palais'. These openings will have railings added to serve as a minstrel gallery overlooking the hall. The third opening opens into the stairwell. I added it to keep the wall balanced but I'm not sure whether to leave it open and add a rail to make it a balcony like the first two or whether to put a stained glass window in there to block it off.
The ceiling was created by making a skeleton of balsa wood and covering it in a skin of card as shown in the above photo. Once the gaps were filled and the whole lot painted, the edges were trimmed in red ribbon and the points decorated with beads.
This is the end result. Personally, I'm really pleased with how it turned out and will definitely be looking for places to create similar ceilings in future.
The floor rises up a few steps at the back of the Great Hall. This is where the 'high table' where the lord and all the really important people will sit raised above the level of the common folk at the other end.
Above the great hall on the fifth floor, there are walls but that's about it. Eventually, it will be a suite of rooms including a bedroom, sitting room and dressing room with an additional surprise as well!
Tuesday, February 24, 2015
The Next Level
I have to confess . . . When I figured out the number of steps in the castle a couple of weeks ago I said 25 steps by 5 floors, that's 100 steps. I hope it doesn't take you as long as it did me to realise how very terribly wrong that little bit of simple mathematics is. There are, of course, actually 125 steps. At least I can be certain when I tell you the castle now has double the floors it had last week.
At least I seem to have managed to get the measurements right in building the castle, at least so far as the next floor sits on the basement and matches up with level of the door opening on the stair tower.
One mistake I did make was to put an arched ceiling in the basement dungeon. I used toothpicks to make bars to secure the dungeon, but continuing the bars up to a curved ceiling and having them fit properly is not easy. So at the moment anyone wanting to escape the dungeon only has to climb over the top of the bars. In future I will have another go at sealing off this escape route either with bars or a solid piece of wall.
Above the dungeons are the castle kitchens. The floors are tiled with pieces of orange EVA foam cut into squares and glued in place. This was given a wash of brown paint to create a more terracotta tone and 'grouted' with a mix of pollyfiller, water and grey paint. Under the arch on the left side of the room is an area separate to the kitchen that will probably a scullery or buttery. The right side of the kitchen is where the kitchen proper will be. The opening in the back wall is for the ovens.
On the opposite side of the castle I used a door kit from Petite Properties to add a door to the wall dividing the well room from the alchemists lair. The door itself is quite effective but when you see it against one of the doorway arches I cut you'll notice it looks very short. It looks even worse against a 48th sized person.
Working to scale, a 48th (1/4") person the equivalent of 6' tall should be about 1 1/2" tall, therefore a doorway should logically be at least that high too, preferably a little higher. Yet the professionally made to scale door is no more than 1 1/4" high. Set against my admittedly generous arches, this door really looks wrong. Worse, I have five more of these doors to use higher up in the castle and they're all going to look silly too. Up until now I've loved everything I've bought from Petite Properties but it seems items they sell as 48th scale aren't all quite 48th scale.
Above this dwarf door is a pretty swanky room with a smart red and black tiled floor and linenfold panelling look walls. Like the kitchen, the floor tiles are cut from EVA foam, but this time laid closely enough not to need grout in a smart diamond pattern. The panelling is just printed paper as is the fire surround and brick backing. The wall on the right of the room is where the castle's front door will be located, making this room the castle's entry hall. It will also be the armoury with displays of weaponry and seating for newly arrived guests waiting to be shown further into the castle.
Wednesday, February 18, 2015
The Basement Begins
The basement level of the castle is progressing with the internal walls added and given a stone look finish to match the floors. The finished castle will open on both sides, rather than from the front or back as most dollshouses typically do. The above photo is the left side which houses the stair tower and two other basement rooms which will likely be a well room (to provide the castle's water supply) and either a store room or an alchemists lab. Yeah, alchemists lab sounds like more fun to me too.
The opposite side of the basement level is currently one big open space. This will be divided into sections by adding bars to create a dungeon/cell and a treasury with a guard room in-between them. Of course, housing the castle's treasure in full view of the castle's prisoners may not be the best idea . . . . so maybe I'll swap the positions of the treasury and the alchemists lab.
The ceilings on this level will be barrel vaulted (i.e. arched). I'm achieving this by cutting some EVA foam to size and 'squishing' it into shape. At this point the ceilings aren't quite finished or installed but hopefully you can get the idea of how they should look.
As you can see from overhead, the ceilings are currently very uneven. I will cut some ribs out of balsa which will sit on top of the foam ceiling and under the solid floor of the next level and help hold the ceiling to an even curve. But that is still to be done . . .
Tuesday, February 10, 2015
100 Steps to Heaven
The first 12th scale structure I built from scratch was a castle, so it is fitting that the first 48th scale structure I do from scratch is also a castle. It has nothing at all to do with an obsession . . . . The glorious thing about a 48th scale castle is that the smaller size means there is more space to include features that just wouldn't fit into a 12th scale castle (at least not if you still want to be able to lift it and fit it through doorways). This castle will be six floors high, but will still have ceilings high enough to add features like a vaulted ceiling, something I never could manage to squeeze into a 12th scale structure.
But before I tell you about the castle itself, I'll start at the beginning and tell you about the base. The castle rests on a thin piece of MDF that was once the back of a picture frame (I must have used the frame as a clear front for a roombox at some point). It's something in the area of 22cm wide by 45cm long. I glued polystyrene foam over the MDF to raise the ground level of the castle up about an inch and carved some of the foam away to create some uneven ground and a river bed in front of the castle.
All the edges of the foam was covered with Paper Clay to create the look of rocky ground. I should point out that what I buy labelled 'paper clay' seems to be a totally different product to what everyone else knows as paper clay. It's a clay that has the consistency of chewing gum, is kind of spongy when dry and still slightly flexible. It's the flexibility that made me choose it for the edges of the base as it won't chip easily if it gets bashed against something.
The flat area that forms the floor of the lowest level of the castle was covered with a thin coat of pollyfiller into which lines were carved to create the look of paving stones. All of this (clay and filler) was then painted with a dark grey and then dry brushed with successively lighter shades of brown.
With the base finished, I started work on the castle stairs. All six levels of the castle will be accessed from a single stair tower. The walls of the tower are made of 5mm thick foamboard. They are lined with a stone block paper printed from a texture found on the internet. Each of the 100 individual steps in the tower is made of balsa wood. Not all of the steps are entirely straight, but given all my mathematically calculated plans to ensure the stairs would fit in the tower inexplicably did not work the stairs actually turned out pretty well.
The stairs are also backwards to the way they would be in an authentic castle. A castle is traditionally a defensive structure so the stairs would have been designed that anyone going up would have their right side to the wall. This meant that any attackers trying to storm up the stairs into the castle would not have room to properly swing their swords while the defenders coming down wouldn't be so hampered. So let's just hope this castle is never invaded . . . .
Wednesday, February 4, 2015
The House on the Hill
Welcome to the fully furnished and landscaped Pumpkin Cottage, or as I now call it, the "House on the Hill".
Upstairs in the cottage is the bedroom. Originally I wanted to put twin beds in here, but I had to drop back to just the one bed as squeezing two in would mean that one of them posed an immense fire hazard due to the covers being practically in the fireplace. A double bed would probably have worked, but I'd already made the singles, so being lazy I just dropped back to a single single.
This is the first 48th scale house I've been brave enough to try using polymer clay to make accessories for. The jug, bowl and chamber pot on this wash stand are examples of this. So it is possible to make things tiny enough to work in a 48th scale house, but I did spend most of the time I was working with the clay combing the floor for tiny little bits I'd dropped because they were too small to hold onto and work on at the same time.
One thing I don't like about this kit is the ceiling height on the ground floor. Yes, it may be right for scale, but it is so low it makes it hard to see the details on the far side of the room. It's not even possible to wiggle the camera in for a good shot of it.
With the inside furnished, I started work on the gardens. Petite Properties do make a garden kit to compliment Pumpkin Cottage, but they didn't have it on their site at the time I bought the kit (and I had spent more than enough money anyway) so my garden is entirely from scratch. The base is an MDF disc from the craft store intended for use as a place mat. On top of this I added three layers of polystyrene foam each layer smaller than the last. This was then carved to create a smooth hill on which the cottage could sit. The hill was painted green and covered in model railway 'grass'.
The picnic table is another Petite Properties kit and came for free on the front of a Dolls House and Miniature scene magazine some months back. The whole reason the house has a garden was to find a place to use the table so I felt a little stupid when I realised I hadn't left enough flat ground to sit the table on. The solution was to use a piece of bark to create a platform for the table to sit upon.
The trees in the garden were all hand made and I think are far the best trees I've ever made. The trunks are balsa wood dowel. Bunches of floral wire were pushed into the wood to make branches. This was then covered with texture paste to give a rough, bark like texture. After painting the branches were given foliage in the form of lichen moss (again, from model railway suppliers) except the weeping blossom tree in the front of the house which was given flower soft blossoms instead.
The paths were made by taking white sand, fine gravel, a little grey paint for colour and mixing them with PVA glue and then pouring them into place.
The rest of the garden was dotted with flowers made of flower soft in various colours, bushes of more lichen or model rail fake foliage as well as 'rocks' which were either pieces of bark, left over 'path' or actual pieces of pebble.
Unlike so many of the projects I've done recently, I actually really like how this one turned out. I think I have gained enough experience with 48th scale now to say I'm ready to attempt creating one from scratch. Just like the first 12th scale building I made from scratch, I'm not thinking
Subscribe to:
Posts (Atom)